How To Make Your Own Almond Milk
This post may contain affiliate links. Please read my disclosure policy for more information.
I’m not sure why it took me so long to finally learn how to make almond milk. I’ve been choosing non-dairy plant milks instead of cow milk for a few years now, but still hadn’t bothered to try making it myself. But at long last I gave it a try and found out it was pretty easy to do and I think homemade almond milk tastes better too!
I think the most important bit of information to share about making homemade almond milk is that while it’s not hard to do, it helps very much to have the right tools. Homemade almond milk is just the strained liquid from a blended mixture of soaked raw almonds and water so the ingredients aren’t complicated. But to do that blending and straining, it helps to have the equipment you need.
It’s usually recommended to use a high speed blender for this process like a Blendtec, Vitamix, or a Ninja. This helps to get the mixture in a more liquified state before the straining. I splurged a few years ago and bought myself a Vitamix S30 blender and that’s what I use to make my homemade almond milk.
For the straining, it’s super helpful to have a nut bag made especially for this purpose. I bought this fine mesh nut bag and it’s been easy to use and easy to clean when I’m done.
Steps To Make Almond Milk
So we’ve taken a look at the equipment that’s helpful (a high speed blender and a nut bag). Now let’s take a look at the ingredients and the process to make almond milk at home.
To make almond milk you will, of course, need almonds. Raw almonds should be used and they will need to be soaked in water first to soften them a bit. They need to be soaked about 8 hours so a lot of folks just soak them overnight. However I’ve also used the quick soak method of covering the almonds with boiling water and then they only need to soak for about an hour. After they’re done soaking, they’ll be drained and rinsed.
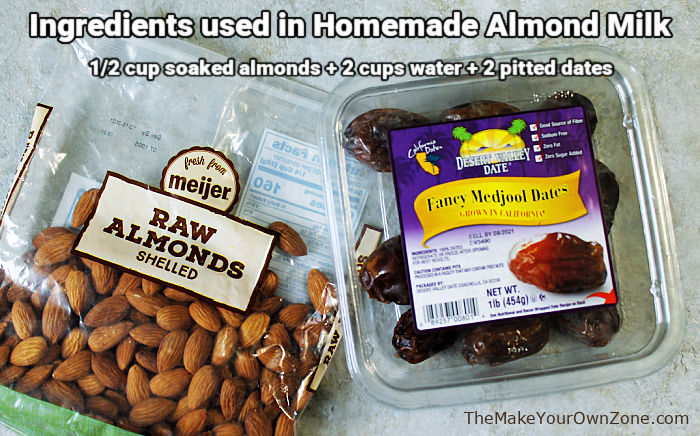
Then, you’ll simply put your ingredients in your blender. I use a 1/2 cup soaked raw almonds + 2 cups water. I like to use filtered water from my Brita Water Pitcher. I like my homemade almond milk to have a little sweet taste too so I also add 2 dates with the pits removed (I use the larger Medjool dates).
Next, you’ll blend the almonds, water (and dates if using) together at high speed for one minute.
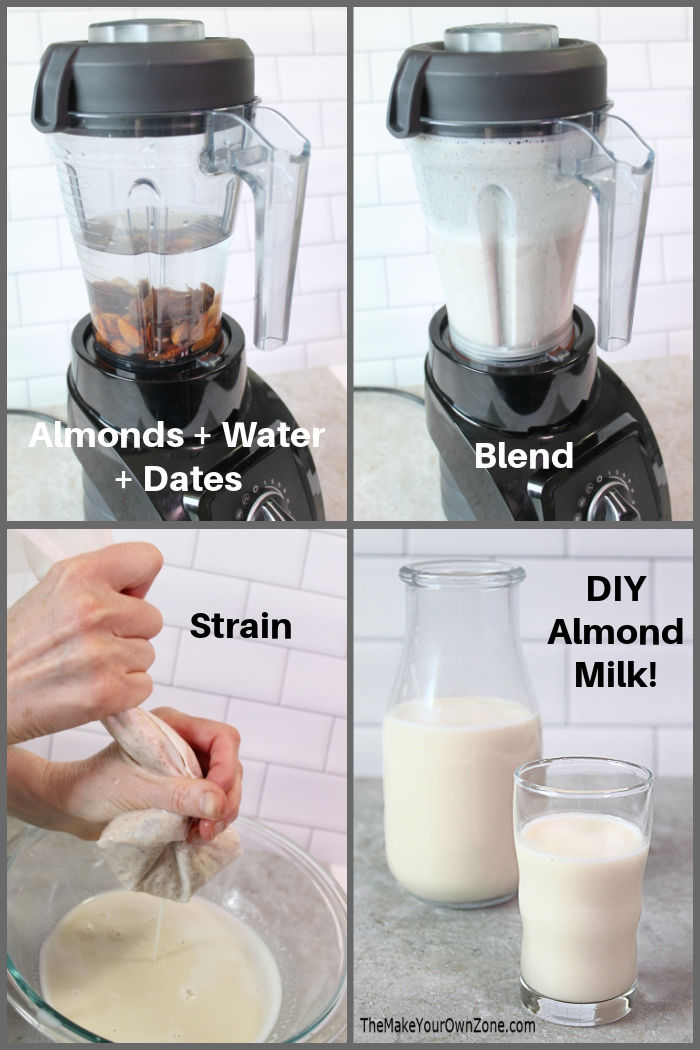
Then comes the straining, and as mentioned earlier, I highly recommend a fine mesh nut bag for this process. Hold the nut bag over a bowl and then pour the entire contents of the blender into the nut bag. Some of the liquid will immediately strain through into the bowl, but you’ll also want to squeeze the bag to get as much of the liquid out as possible. When you’re done, you’ll be left with almond pulp in the bag that can be discarded (although I think I might start experimenting with ways to use it).
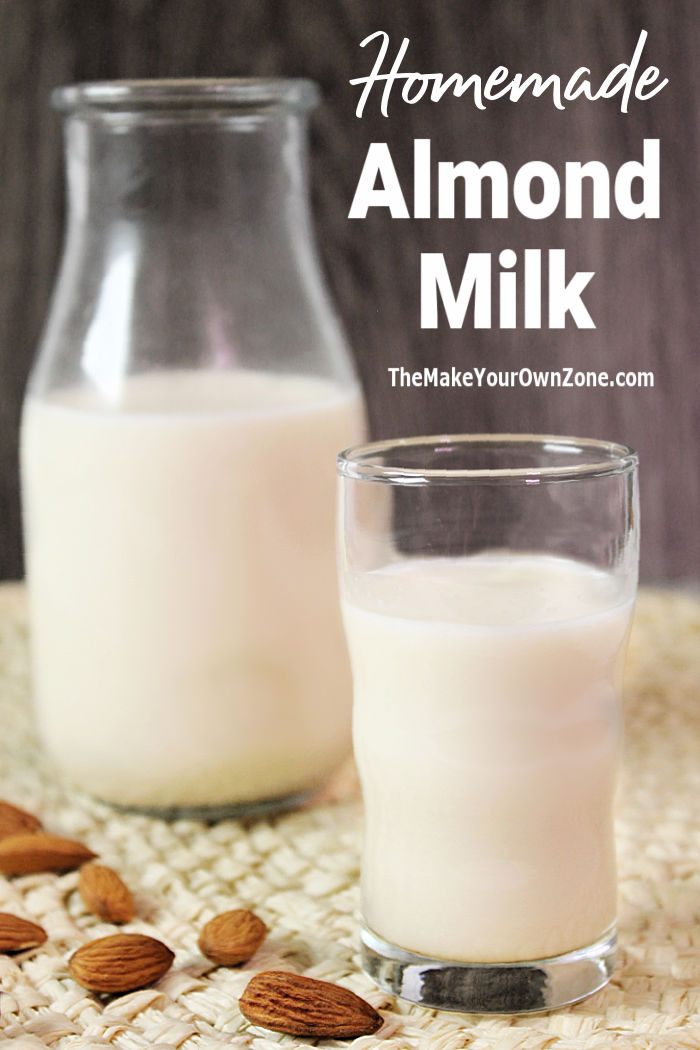
You’ll also be left with fresh homemade almond milk in your bowl!
Another thing I like about this process is that I can make my own almond milk in a smaller size quantity. This recipes makes about 16 ounces of almond milk. I would often have a hard time using up the 32 oz size cartons from the store before the taste would go a little off. When I make my own almond milk, I can make the size batch that fits my needs.
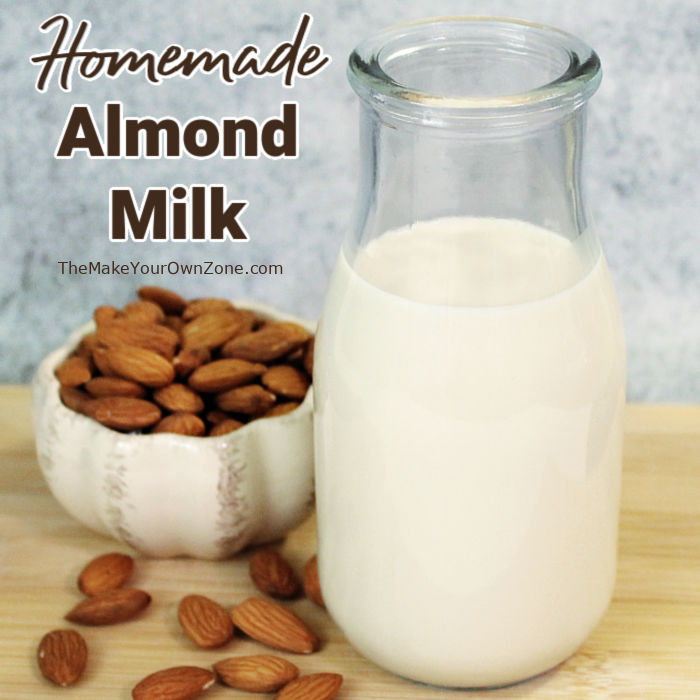
Finally, you’ll transfer your homemade almond milk to some kind of jar or bottle and keep it in your refrigerator. This type of glass bottle with a lid works well. It’s usually recommended to use homemade almond milk within 3 to 4 days, although I’ve kept mine for a little longer (about a week) and all was well. The mixture will separate a bit as it sets in the refrigerator. Just give it a little shake to mix it again before using.
So now that I’ve learned homemade almond milk is a pretty easy process, my hope is to stick with it and keep making my own. I love that when I make my own almond milk it’s a natural product made with just almonds, water, and dates. There are no mystery ingredients like the “natural flavors” so often listed on the store bought stuff.
And of course you can customize too. If you like more almond flavor, use a little less water. If you like a weaker mixture, add more water. If you like it sweeter, add more dates, or leave them out if you want no added flavors. Some people add vanilla beans or extract to the mixture too.
Once again, there are always lots of possibilities when you make your own!
See more – – > Homemade Beverage Ideas
Homemade Almond Milk
Equipment:
- Blender (A high speed type of blender is optimal)
- Fine Mesh Nut Bag
Ingredients:
- 1/2 cup Raw Almonds (soaked and drained)
- 2 cups Water (I use filtered water)
- 2 Pitted Dates (I use Medjool dates)
Instructions:
- To soak the almonds, place them in a bowl and cover with water. Let them soak for about 8 hours (you may wish to soak them overnight). You can also do a quick soak by covering the almonds with boiling water and letting them soak for one hour. When the almonds are done soaking, discard the soaking water and rinse the almonds.
- Place the soaked almonds, the water, and the dates in the blender. Blend for one minute at high speed.
- Hold your nut bag open over a large bowl. Slowly empty the contents of the blender into the nut bag. Gently squeeze the nut bag for a minute or two to release some more of the liquid. You can discard the almond pulp in the nut bag when you are done with this step. The liquid that you have strained into the bowl is your homemade almond milk.
- Transfer your homemade almond milk to a bottle or jar with a lid and keep in the refrigerator. This mixture is best used within 2 or 3 days, although I have kept mine for up to a week and all was well.
- The mixture will separate as it sets in the refrigerator. Simply shake it up a bit again before using.

For emergencies keep a jar of unsweetened almond butter in the pantry. 1-2T almond butter and 1 cup water blended is a great way to make instant almond milk.
Yes, that’s a quick method that I’ve heard works but have not tried it out yet. Hoping to try that soon!
That’s an interesting idea, Ellen. I haven’t bought nut butter so I’m wondering, is that made from raw almonds?
I think almond butters can be made with either roasted or raw almonds and hopefully the manufacturer has specified on the label or in the ingredient list.
Homemade almond milk tastes better than bought and you can adjust the taste the way you like it, What do you do with the leftover almond pulp? I’ve dehydrated it to make almond meal, and other recipes, and would love to know your ideas.
I’m hoping to try a recipe I saw for chocolate chip bars using the almond pulp (I’ve been using the Enjoy Life brand of chocolate chips).
My first thought for the leftover almond pulp is the same as my first thought for most things like that: I put it in my compost bin.
But I’ve got to say I really like the idea of dehydrating it to make almond meal.
What have you found the cost comparison to be?
I think the homemade almond milk actually costs a little more. I calculate that a 16 oz batch of homemade costs me about 85 cents or about 5 cents per ounce. The store bought was costing me about 3 cents per ounce. However I often could not use up the entire 64 oz container of store bought almond milk before the taste starting going a little off and I would often throw some of it out unused. So in that sense, I feel like I am still getting my money’s worth out of the homemade as I make it in smaller batches that I am always able to completely use so none of it goes to waste.