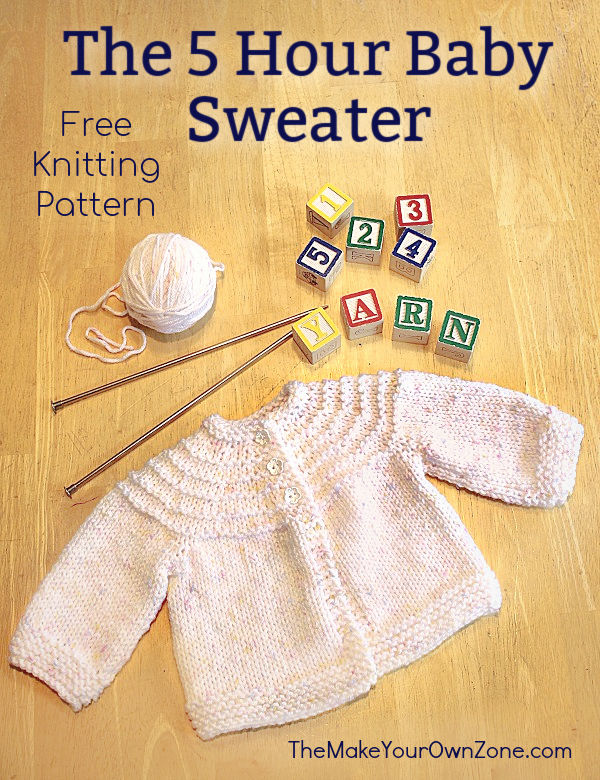
Another 5 Hour Baby Sweater {Knit Pattern}
This post may contain affiliate links. Please read my disclosure policy for more information.
When I found out that grandbaby #2 was on the way, I knew I wanted to knit a little baby sweater, along with another classic ripple baby afghan. I’ve seen versions of a popular pattern known as the 5 hour baby sweater and after looking at several, I decided to just revise it a bit and make it my own version of a 5 hour baby sweater!
If you’re a knitter you may have seen some version of this Quickie 5 Hour baby sweater pattern before too. My research showed various versions of this pattern have been around since the 1950’s.
So is there anything new to add to this well-loved pattern that’s been floating around for years? After knitting through it once I answered that question “Yes” as I had several notations and changes jotted in my margins. I decided to type up my revised pattern so I had it for the future and to share it with others that may find these changes helpful too.
Another 5 Hour Baby Sweater
Because this is a longer pattern, I won’t take up space writing it all out here. Instead you can click the link below for a free printable pdf of the pattern:
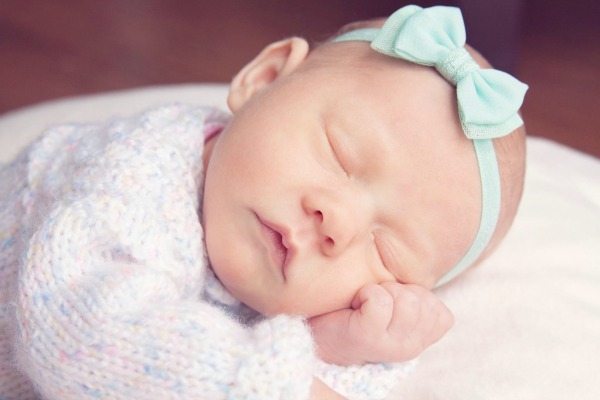
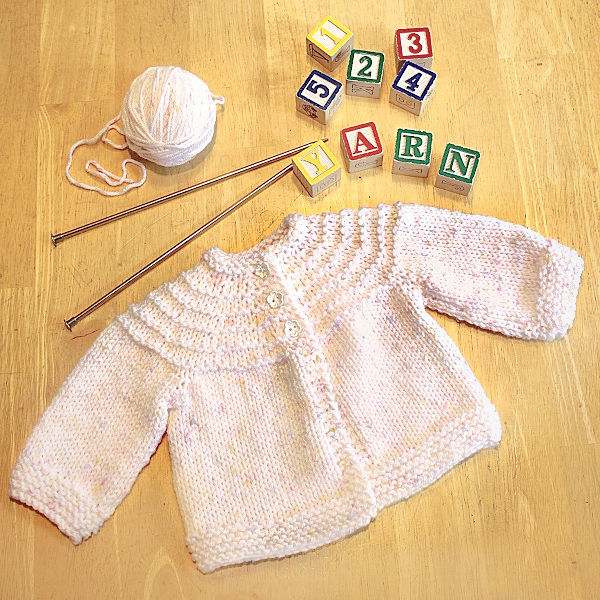
This sweater is 20″ around, is an approximate 6 month size, uses U.S. size 7 needles and medium (4) yarn. For the sweater shown here I used the Hobby Lobby “I Love This Yarn” brand in Tweed Pastels.
(Note: I’ve also made this pattern in a 0-3 month size by switching to a smaller needle and lighter weight yarn so it would fit this little cutie patootie who came a few weeks early. You can read more here: 5 Hour Baby Sweater – Just A Little Bit Smaller)
A few of the changes I made were to adjust the needle size, I added three buttonholes to the yoke of the sweater, used the KFB (knit front and back) type of increases, and increased the length of the body which I felt better matched with the sleeve length.
Knitting The Baby Sweater in 5 Hours
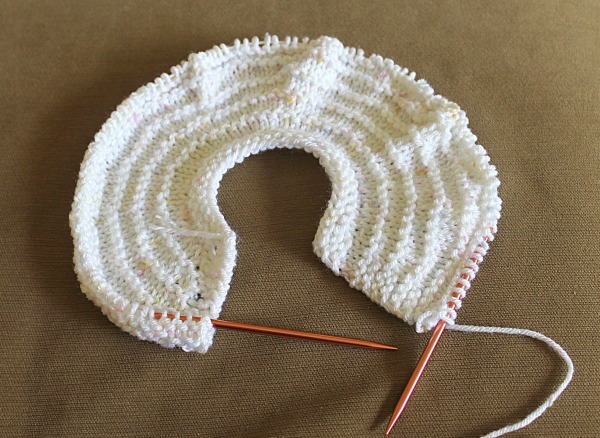
I also timed myself to see if this sweater can really be finished in 5 hours. Yes it can! In fact it took me almost exactly 5 hours with just a little extra time at the end for sewing the sleeve seams, adding buttons, and weaving in yarn ends. Here’s how my progress looked as each hour went by:
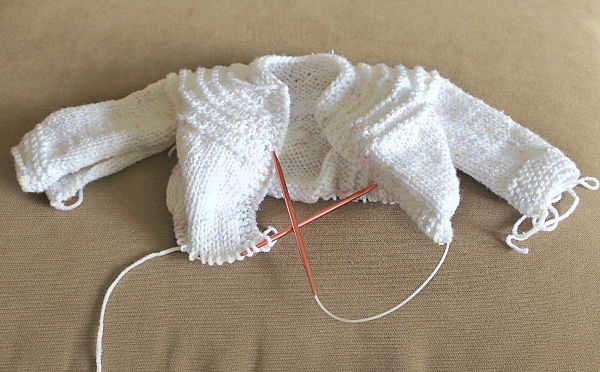
At the end of Hour 1: I had the yoke done. This is a good stopping point because the next row is full of increases and markers and I wanted to start that fresh with my wits about me!
At the end of Hour 2: I was about half way done with the first sleeve. At this point there’s a lot more stuff going on – some stitches are being held on my double pointed needles (which I like to use with these point protectors), some stitches are being worked with a second set of needles, and the remaining stitches are just hanging out on the circular needles waiting.

At the end of Hour 3: The second sleeve is finished. This was also a good stopping point as the next row entailed putting all those stitches back on that are being held. Again . . . one of those rows where I wanted to be fresh with my wits about me.
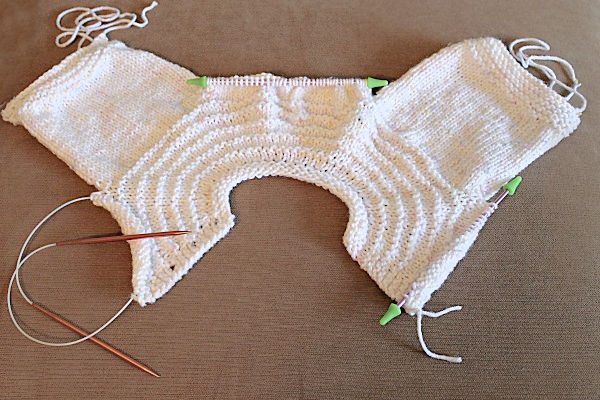
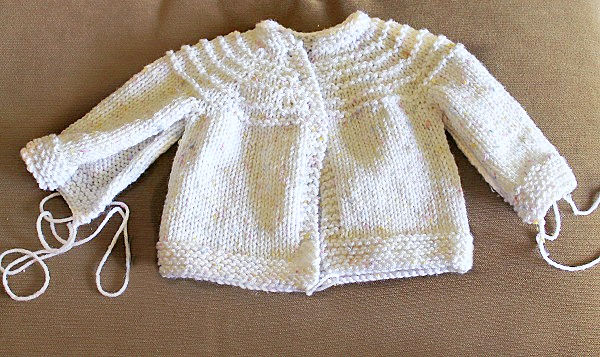
At the end of Hour 4: I’m about half way done with the body. All the stitches are back on the circular needles and it’s pretty easy knitting at this point!
At the end of Hour 5: We have a baby sweater! All that’s left to do is the finishing work.
Here’s the link again for the printable pattern: Printable Knitting Pattern: 5 Hour Baby Sweater
(Update Feb, 2020: Since first publishing this pattern, I have updated the printable pattern to make it more clear that the increases are Kfb increases where you knit into the front and the back of a stitch to create another stitch. So where the pattern states “Inc” it is a “Kfb”. )
No babies to knit for? Some other creative offshoots of this pattern that I found are the 7 hour toddler sweater and the 10 hour adult sweater.

I love this pattern and directions. As a beginner Id love to see this being worked as a video especially when its time to start the sleeves and multiple needles.
A wonderful tutorial. Thank you for your time, and effort to make this a free pattern. I will make it for my 5th G Grandchild.
The mum wanted a 3 month size as baby will be born in winter.
It’s nice and small to knit in a hurry. 🙂
Hi – what size buttons did you use for this pattern? It’s so cute and I’m buying what I need now. Thanks! Jennifer
I used 5/8″ buttons for this baby sweater pattern.
Have been looking for a baby sweater pattern that I like. Finally, found this one. Going to make for #4 g-grandchild. Beautifully looking!
Hi! I’m a beginner knitter but I wanted to try this pattern, and so far it’s been great! I have a question about the sleeves though. Where it says “working on another set of needles for these 31 stitches” would I be able to use circular needles? Also, do the needles need to be the same size, because I have a set of size 6 circular needles that I could use.
You could use the circular needles for the sleeves as long as you do not knit in the round and just knit back and forth on them. You’ll want to stay consistent in the needle size too, and use the same size needle for the sleeves as you did for the other parts of the sweater.
Thank you for your lovely and quick sweater. It would be great to have it on a video. What kind of bind off did you use for sleeve, a stretchy one? And for end of body? TIA
I just used a regular bind-off for my sleeves (knit every stitch) which seemed to work just fine for this sweater. I don’t currently have a video for this pattern, but I’m hoping to start making a few knitting videos soon!
Hello Bev,
Thank you for your reply. I finished the sweater and love it, so easy. I did the smaller size. I’m in Australia and don’t understand your wool thickness but by google search I used an 8 ply. It turned out to the size you mentioned. I would like to use a finer yarn, 4ply. So half the yarn thickness of what you’re using for the small sized sweater, I suppose. Would you be able to help with how to adjust the pattern? Or is there a similar one available?
I don’t know how to adjust my pattern to that type of finer yarn. That would be a “2” weight for me, which I don’t often see in my nearby stores. However here’s a link to a pattern I came across that does use the lightweight 4 ply yarn. It’s a pullover but has several baby sizes to choose from. Perhaps that might be an option for you! https://www.lovecrafts.com/en-gb/p/unisex-boatneck-sweater-in-rowan-summerlite-4-ply-downloadable-pdf
I love this pattern and directions. As a beginner Id love to see this being worked as a video especially when its time to start the sleeves and multiple needles.
*note from the pattern author to this comment: I will leave this comment here, because I believe this will work if you are using a M1 type of increase. However my pattern is written correctly for Row 6 if you are doing a KFB increase.
for anyone stuck on row 6, here is what I did since i realized the error in the pattern after i started the row:
k4 inc
k1 inc
k2 inc
k2 inc
k2 inc
k2 inc
k2 inc
k3 inc
k2 inc
k2 inc
k2 inc
k2 inc
k2 inc
k1 inc
k4
=47 stitches
the pattern as it’s written calls for too many increases but you can evenly distribute the needed increases on your own. You need to get from 33 stiches to 47. 6 of those stitches are knits at either end so that leaves 27 stitches to play with in the middle and 14 increases that need to be made.
I followed the pattern k1, inc 1 for the first 2 stitches giving me 4. I made sure to do this at the beginning of the orginal 27 and the end. (I realized the pattern error after doing those first two and rather than back track i just evenly added it to the end)
That now leaves 10 increases to spread across the remaining 23 stitches in the middle. (Thats because the other stitches in play are acounted for at either end of the row. k3 then k1inc k1inc and k1inc k1inc then k3)
I did k2inc until I got to the middle of the pattern then did a k3inc before returning to k2inc until I hit the last 6 stitches to begin the k1inc k1inc k3
hope this saves someone time!
I see now, thanks for your comment. I am just unfamiliar with this type of increase. I am able to account for it now and the sweater is working up beautifully.
Thank you so very much!!! I am currently stuck on row 6 and couldn’t figure out how to fix it as I was positive I was following the instructions correctly. This will help tremendously.
Like you said, I made this baby sweater in a day ,it was so easy, thank you for sharing .I make all my crochet and knitting projects for a prayer Shawl. Ministry.
Yes I love the circular needles 29″ will be great(got to fish them out. Lol ty
Looking forward to knitting this as easy and fast.
Would you have the gauge for a 12 month old size please Thank you
What is the best way to reattach the yarn after the first sleeve?
I usually find a stitch close by to where I am going to begin the knitting again, and thread the yarn through it, tie a small knot to attach, and then begin knitting.
Sorry, I hadn’t read the other comments previously posted before I sent mine in. 🙂
I see from your responses that my goof is in the increasing.
I’ll try another method.
Thanks again to all the happy “Knit-Wits” out there.
Terry
Greetings! Thanks for this nifty pattern. I have made it twice before and was so pleased with it, but right now am having problems. In row 6 where we increase then knit one with 3 stitches on each end, I end up with 60 stitches instead of 47! Can you help me understand what I am doing wrong?
Thanks for any help that you can give.
Terry
so I was excited to make this and thought I was doing well, but directions were confusing about putting on different needles and then rejoining. I ended up joining yoke and rest of sweater backwards, so not sure what to do now
So I was doing GREAT with this pattern until its time to put all stitches being held back on circular needles. Ive tried 4 times and wvery time I end up with a mess. I am not reattaching properly. How do I know which to reattach first etc? Ugh! Im so upset
I believe there is an error in the 5 hour baby sweater. Row 6 say to K3, *increase in next stitch, K1, repeat from * to the last 4 sts, end with Inc, K3. (47 stitches). I believe the 47 stitch court is incorrect. If one increases one and knits 1 to the last 4 stitches – that count is 59 stitches. Then if we do the increases at row 10, we are way off in the stitch count. I must not be understanding your increase rows, since no one else mentioned this problem for me
For the increase are you doing a “Knit front and back” type of increase? That seems to be where some of the stitch discrepancies come from when folks are coming up with different stitch counts.
Here’s how the stitches count out for Row 6 – You are starting this row with 33 stitches. The 3 stitches at each end of the row are kept as garter stitch so we’re looking at the middle 27 stitches. You’re increasing in half of those stitches (a knit front and back increase) which adds 13 stitches, and then you end with an increase so there are 14 new stitches added to this row. So 27 + 14 gives you 41 stitches, plus the 3 stitches at each edge to add 6 more stitches, for a total of 47. I hope that all makes sense!
Bev,
Thank you so much for this pattern! I decided to attempt knitting a baby sweater and came across your pattern on Pinterest. It was easy and each step was very well explained. I have experience with basic knitting stitches. The most stressful part (for me) was transferring the stitches to the stitch holders and then back. I really dread dropped stitches because I’m not good at recovering them. I still need to sew the sleeves, weave in the ends, and add the buttons. It turned out so cute! I did use the Hobby Lobby yarn in the Rosy Cheeks color.
PS- How am I just finding out about the knitting-on cast on option?!?! It’s a game changer for me!
So glad you enjoyed making this sweater. The Rosy Cheeks color of yarn is a pretty one!
I have done this pattern many times for our local charity shop.
I have done it changing the needle size and that works for a couple of sizes.
Is there a pattern for larger sizes?
Thanks Rita
I usually suggest this pattern for a 7 hour toddler sweater that’s very similar to this pattern but a little bit larger: https://suzies-yarnie-stuff.blogspot.com/2010/02/7-hour-toddler-sweater.html
How can I adjust this pattern for baby 6-12 months? Thanks
Amanda
I had this pattern many years ago and lost it. I was so happy to find it again. Just finished yesterday. Thank you.
I am having trouble with row 6. I can’t figure out how it ends up as only 47 stitches. If I increase every one of the middle 27 stitches (minus the 3 on each end) I come up with 54 not 47. What am I doing wrong?
I had the same issue and ended up with 61 stitches at the end of row 6. I ripped everything out and tried again and still got the wrong number. I’m giving up on this sweater.
Hello! I’m a beginner knitter and I was wondering what length of circular needles are used in this pattern.
Thanks!
You will need the 29″ length circular needles for this pattern.
Thank you!
bonjour
dommage qu’il ne soit pas en français je n’arrive pas à trouver une traduction
il est très beau je l’aurait bien tricoté
I am an experienced knitter. I followed all the instructions. Used the correct needles and weight/gauge yarn. But the sweater came out very small. It seems to fit more of a newborn baby than a six month old. I don’t know what I did wrong. Any suggestions? I like to make it again because it was so simple to make.
I don’t think you did anything wrong, different knitters can have a bit tighter or looser knitting even using the same pattern. I would try going up a needle size as size 8 or 9 needles still work well with size 4 weight yarn.
I just made this sweater and love the pattern. I used size 8 needles with baby bee 4 yarn. It fit my 12 month old, but there was no wiggle room. how can I make the sweater to fit a 16 month old using the same yarn?
Lovely pattern knitted up very nicely thank you
I’ve tried to knit this pattern twice now and am having difficulty with the sleeves. Bothe times the sleeves are inside out if I follow your directions,
“Begin first sleeve: Inc in next 2 sts, K23, Inc in next 2 sts
Working on another set of needles and on these 31 sts, work in stockinette stitch for 22 rows. Should I begin the stockinette row with a purl row since I already have a knitted row? Thanks in advance!
Yes, after you do the increase, K23, and next increase, you’ll turn the work and do a purl row, and then continue in stockinette stitch for 22 rows to make the sleeve.
Can this be knitted on straight needles, dpn’s? I’m not a beginner but I’ve never used circular needles. I’m anxious to try this little sweater. Thanks!
Hi I have knitted from patterns recommending circular needles, it just means you will have a lot of stitches on the one needle. If you can cope with that, then there’s no problem.
Good luck
This pattern really works best on the circular needles because they can hold the amount of stitches needed more comfortably. Because this sweater is not “knit in the round” on the circular needles, and is instead just worked back and forth as you would on straight needles, I would encourage you to give it a try and I think you’ll find that you are able to do it!
Love your pattern…you make a pattern easy to read and follow….no unneeded complicated stitches like the m1 and others. Thank you so much. You know how to write a pattern.
I am so thrilled at how you knit the sleeves before the body. Since I simply cannot make sleeves with dp needles or circular, I have always used your way. Thanks for confirming it’s ok!
What size buttons do you use for this?
I think I used 5/8″ buttons.
I love this pattern! Could I use the seed stitch instead of the garter stitch around the whole sweater?
Yes, if you are familiar with the seed stitch, I think you could certainly try that for the borders of the sleeves and sweater body instead of the garter stitch.
hi im doing the 5 hours knit sweater im stuck on the sleeves pattern says beg first sleeve inc in next 2sts knit 23 inc in next 2 sts working on another set of needles and on these 31sts my question is why do i have only 27sts instead of 31 thank you
When you increase in the first two stitches, you will now have 4 stitches. You then knit 23, and when you increase in the last two stitches there will now be 4 stitches there. So you should have 4+23+4 which equals 31 stitches.
I am a beginner knitter and wanted to try this sweater for my nieces first baby. So far so good. I am just starting the sleeves. I have one question. Do you block the sweater when finished? And if so can you let me know how to do it. Thank you
I did not block this sweater and it still looked fine (maybe because it is so small!)
I having a hard time with the sweater body , how to add all the stitches back onto the circular needles?
Thank u for this pattern. I found the one with the size 10 needles but it just didn’t look right. Size 7 seems better. YAY this sweater is so cute
I really like this pattern but I am have a problem that I can’t figure out. The pattern starts with 33 cast-on stitches. In Row 6, the body of the sweather (not including the edging) increases a stitch every other stitch. The pattern says I should have 47 sts on my needle, but I always end up with 61 sts on my needle at the end of Row 6. What could I be doing wrong?
I had the same problem. Instead of doing a typical increase, do *k1, kfb to the last three stitches. I keep getting 48…. But it is better than the 61 I was getting with basic increase.
Instead of increase, knit front back.
There will be 14 stitches in which are you increasing (knitting into the front and the back of the stitch). This will add an additional 14 stitches to the row (going from 33 to 47).
I don’t agree with row 6. You’re starting with 32 stitches (In row 4 you knit 2 together). If you increase every other stitch after you knit 3, that adds up to 28 additional stitches. I ended up with a total of 61 stitches at the end of row 6.
How many yards of yarn are required for this?
It takes about 4 ounces of yarn for one of the 5 hour baby sweaters, which should equal about 250 yards of yarn.
I made this sweater for my first granddaughter, due in August. I mostly knit hats nowadays, so I was a little cautious. This pattern was easy to follow, especially with the photos of the various stages. Thank you! I wish I could figure out how to post a picture of the finished sweater, it is so cute!!!
I’m sure it will look beautiful on your new little granddaughter!
Bonjour comment est-il possible d’avoir les explications en français merci beaucoup
Thank you so much! This looks lovely.
Can we please see more baby patterns thank you xxx
I just finished knitting this beautiful sweater, but I need instructions for a 12 month baby. Anyway you can help me
I’m very excited to try this pattern. Your instructions and pictures are so very much appreciated. I’m new to knitting and I’ve tried 3 other patterns but I can’t get through them. I’ve read through this pattern and I feel like I understand. I can’t thank you enough. I will post again after the sweater is complete.
Beautiful little cardigam
Cannot understand when its at page 3 starting sleeves. Stuck at this point.
It is lovely to see generous people who don’t mind sharing. I crochet and knit alot for 5 great grandies with 2 more on the way. I excell in my kitchen and are only too happy to pass on my tried and true recipes when asked for them. Your generosity is appreciated .Too many people out there trying to make money out of other knitters patterns. Keep up the generous offers you are making.
New Zealanders are always there to help each other. Hope I can help you one day.
Please post a tutorial
Very cute and easy! Thank’s
Lp Vesna
I amlooking forward to getting this jacket pattern to go with a hat I have already made.
thanks so much for posting such great instructions and a nice sweater. The problem I was having was I did three swatches with 4, 4.5 & 5 mm needle with #4 weight yarn. I got the closest with the 4.5 but as I was knitting it was really small. I was wondering what size needle anyone else used? I have been having a problem with getting the right gauge lately. Starting over on a 5.5 and hoping it works!
Thanks again
I’m having the same problem! I used size 7 US needles and my sweater is about 16″ around instead of 20″
Appreciate you doing this. Have been going through old patterns and some from UK and their codes are very different without explanations
Hi Bev, It’s a beautiful baby sweater. I’m up to the point where I’ve knitted both sleeves but I have no idea how to get all the stitches on the needle to do the body. Could I knit the back and both fronts seperately and then seam up the sides and sleeves? Or would it be possible for you to show on u-tube how to knit this sweater for everyone who is having trouble with this sweater.
Yes, you can since that is exactly what the pattern instructs you to do, You will reattach the yarn to the back and proceed through the pattern to finish the back, then reattach yarn to the fronts and proceed in the pattern to finish the fronts. Based on your comment I suspect you may be over thinking the pattern or the circular needles that are being used flat may be throwing you off. Hope this helps, happy knitting.
I made this comment on a different pattern, not sure how it got here, obviously I messed up, this pattern is meant for the body to be knit in one piece after completing the sleeves.
Comme j’aimerais le faire mais dommage les explications ne sont pas en français
I just finished sweater and love it. Your instructions were easy to follow and I liked that you posted total number of stitches at the end of each increase. I am trying to come up with a pattern for hat. Thank you
Just LOVE this pattern…so easy to follow. I did a ribbed cuff on sleeves on one sweater and used a pattern stitch for the body on another. Do you have a pattern adjustment for a larger sweater? I have used a larger needle size, but would like to use the pattern for 18-24 months. Thanks so much.
Thank you. I can’t wait to do this
I have made several of these sweaters for baby girls but is there a similar pattern that looks more like a boy? I feel this pattern is too feminine for baby boys.
I’m having trouble with your pattern. Row 10 where it says 61 stitches is the the number is stitches that have been added? Or is it how many you should have at this point? I came out with way to many.
61 stitches is the total number of stitches at the end of that row. A total of 14 stitches are increased on this row.
From row 15 to 20 is not working out the way you say it should. Please advise if a correction?
Hi! This will be the first time that I’ll be making this little sweater, about how much yardage should I make sure to have for it? Thanks,
Ruthann
I love top down and no seams too!
This pattern is top down with two sleeve seams to sew when finished, since it’s a baby sweater the seams are short and sew up easily and quickly.
Hi
i have noticed that you do not tell what ply wool to use
The pattern uses yarn labeled in the US as “4” weight also known as worsted yarn or aran yarn
The pattern actually specifies a #4 worsted weight yarn, which is referred to as 10 ply in some parts of the world.
Hi Bev,
Thank you for your clear instructions. This is my first try at knitting and I am finding that your pattern is very easy to follow. I am using the yarn #4 recomended and needles size 7, however, the neck seems pretty small. What the measurement for the neck.
your gauge is 4 stitiches = 1″ I need 6 stiches for 1″ How do I adjust to that?
Thanks again for your help.
Raquel
I am knitting this lovely sweater, but have run into a problem, I cannot figure out Row 28. If I start with 123 stitches and increase before and after each marker that would be 10 increases (not increasing the last 3 edging stitches); which would equal 133 stitches not 131 as stated in the pattern. What am I missing?
Thanks for your help.
Jennifer
There should be four markers on your needles (put in place on row 26). It sounds like you somehow have 5 markers placed. There should be 20 stitches, then a marker, 23 stitches, then a marker, 37 stitches, then a marker, 23 stitches, then a marker, and then the final 20 stitches. Then when you come upon row 28 when it says to increase in the stitches before and after the markers, it will be an increase of 8 stitches (not 10) because there are 4 markers in place on the needles.
bonjour serait il possible d avoir les explications en francais merci
Hopefully you can clarify row 6. When I increase as you stated I end up with too many stitches. I started with 33 stitches and had to end up with 47 Does not work. Same with tow 10. Too many stitches. HELP!!!
Here is some extra info on the increases on Row 6. There will be 14 stitches in which you are increasing (knitting into the front and the back of the stitch). This should add an additional 14 stitches to the row (going from 33 stitches to 47 stitches.
So you will be knitting the first three stitches in the row, and the last three stitches in the row. This leaves the 27 stitches in between. Of those 27 stitches, you will be increasing in 14 of them, and just knitting the other 13 ( increasing in every other stitch).
Need a sweater for 3T. Made the 5 hr baby sweater. Love the pattern. Saw toddler pattern but need to be larger. any ideas?
Here is a link to a pattern I found that’s in sizes 2, 4, and 6 and is knit from the top down like the 5 hour sweater. https://www.abc-knitting-patterns.com/1451.html
Hi, Love this pattern… size 6 needles 3 weight yarn way too small. I am fairly tight knitter
first sweater I made 3 weight yarn size 6 needles very small:
neck circumference: 6.5”, sleeve length underarm: 4.5”, circumference at bottom: 14”
next sweater I tried 3 weight yarn with size 7 needles..much better for new born size:
neck circumference: 8.5” , sleeve length underarm: 5”, circumference at bottom: 16”
and lastly tried 4 weight yarn with size 7 needles: neck circum: 9”, sleeve length 5-1/4” , circum at bottom 17”
It took me 7 hours total to knit. This sweater is so cute. Found cute bunny and flower buttons
Making 5 hour sweater. Line 25 is a knit. Need a purl row. ending up tearing out about 6 rows when I realized it was inside out. I don’t knit much but making a sweater for my great granddaughter.
Nice sweater
Do you have a matching hat pattern?
I love this pattern! It has such a great history, and you have done such a nice job of updating it. I made one for my grand niece — it was a bit of a stretch for me, since I am really an advanced beginner — and now I am making one for a friend, which is going much faster. I am fascinated by the history of this pattern, since I feel that needle arts give a sense of connectedness between the generations. I discovered that the second generation of knitters to use the original version shared it on the (brand new) internet with the intention of people knitting it up for charity. My next one will go to a women’s shelter!
Love your pattern, but my sweater turned out to be really small,I used size 7 needles a worsted weight, so dont know where i went wrong.
Mine too! I used the same size needles and weight and will be lucky if this fits a newborn. I know I’m a tight knitter, but didn’t think it would make up for that massive a size difference. Going to try one more time knitting as loosely as possible…
I again scanned the comments on this baby sweater pattern, and found an explanation I missed earlier about reattaching the yarn from one of your 2017 replies, Bev. It’s so much appreciated, and I will proceed with this. I’m sorry I missed it earlier. Thank you!
Thank you so much for graciously sharing the 5-hr baby sweater pattern! I’m a self-taught knitter, but I have never needed to reattach yarn to a project before. (On the 3rd page of pattern it instructs to reattach yarn after the first and second sleeves are knitted.) Do you have a suggested website source where I could learn to do this? I’m done with the first sleeve, and it’s turning out beautifully so far! Thank you kindly!
HI Bev: Lovely pattern. Love the fact that the sweater is worked in one piece. HOwever I eem to have trouble getting 47 stitches in the first increase row. I end up with 3+53+3 or 3+55+3. Cant seem to figure out where I’m going wrong. Any idea?
Hopefully you can clarify row 6. When I increase as you stated I end up with too many stitches. I started with 33 stitches and had to end up with 47 Does not work. Same with tow 10. Too many stitches. HELP!!!
I tell all my students that have this issue to review your increase, this pattern works exactly as written, I’ve made many, it’s my go to baby sweater pattern for baby, I’m currently working on #13, for the 13th grandchild that’s due to arrive in July. If you have too many stitches you are increasing too many times, this row requires 14 stitch increase, I’ve had a few students bring it to me and we’ve determined that they increased every stitch, instead of every other stitch.
Is it possible to do the sleeves using the magic loop method as if you were making a pair of toe up socks? I used that method on a sweater for my grandson and it came out perfect.
Yes, you probably could do that Zoe – Thanks for sharing that idea!
Oh my gosh! This is daunting to me LOL, but I love how it’s all one piece. I’m going to have to pull up my big girl panties and give it a try. Thank you!
Is this for a baby boy or just the girls?
This sweater can certainly be for the boys too – you could use a darker color yarn, and perhaps find some cute little buttons in a fun shape for boys.
Bonjour,moi je voudrais avoir le patron en francais.Merci
As I do not have a printer I am unable to print this baby pattern which I would love to knit. Have you any ideas
Margaret Wood — you could try going to a copy shop or a public library, they often have printers you can use (pay to use in the case of print shops). Or you can do what I often do, which is save the pattern to my electronic reader (my phone or Kindle/iPad type device) and knit from that. The phone is a little small to work from (font size I mean, but it does work).
One of the best easiest baby sweater patterns ever! I make baby items for charity and this sweater knits up quick. Thank you!
I’m glad you are enjoying the pattern Marilyn!
I use waste yarn instead of all the extra needles that get in the way. Works great! Love this pattern!
Your pattern and information are so clear and comprehensive (great photos) i will be able to adapt them to my homespun yarns (alpacca, wool, cotton). I am knitting for one newborn and another due in April – my first baby sweaters, sublime!!
And with your patterns I can also add knitted lace, wee animals, etc. I’m sharing your website with my knitting group. Thank you so much! And congratulations – you have lots of happy and clever followers.
Thank you for this pattern and above all the pictures!!! I’m in a knitting frenzy right now and this just added fuel to my fire🙏🏽
Love the pattern. I would like to make baby booties using the basic pattern. DO you have any baby booty patterns? Thank you.
I’m currently knitting for the first time too. Once I figured out that Bev is using KFB increase stitch, I used the same KFB whenever the pattern says inc. I have obtained the exact number of stitches she specifies every row.
I am now working on the sleeve section and am very pleased with the outcome. Good luck.
Am knitting this sweater, and find the # of stitches after the increase rows never matched….so had to change the increases in order to get the stated number of stitches. Not sure which is correct—the # of stitches, or the rate of increase, but they don’t add up.
I am confused. Where do I attach the yarn to start the body and how do you pick up both fronts ? It is the one picture missing for me on the hardest change. Thank you
On row 32, you knit across the left front stitches and held them, then you did the left sleeve, then you knit across the back stitches and held them, then you knit the right sleeve, so on that row the only stitches you have not worked yet are the right front stitches, reattach the yarn to these stitches and work them as indicated, then when you work the reverse row, work across all the stitches that were previously held, giving you 85 stitches on the needle at the end of this row. I personally hold all my stitches on the long circular needle, then work the sleeves on straights, then after reattaching the yarn for the right front and flip the circular over and continued working the row.
Thank you! Can’t wait to get started. Will knit to match one or more of the 5 bonnets I’ve completed for my new great granddaughter coming in January.
How did you make it bigger. How many more stitches for a 5. Can you post the directions or email to [email protected]
I would suggest using the link at the end of my blog post to another site that has the 7 hour toddler sweater pattern if you want something a little larger.
I am so confused! I finished the sleeves and knitting across the remaining stitches, but now I can’t figure out the next step. Help!!!!
Greetings. A version of this pattern was in magazines in Australia in 1945 as my mother made one for me. It had moss stitch instead of garter. I made a few of them years ago but sadly with my travels around the world and my Mum moving across Australia it was eventually lost. Glad to see it again. best wishes. Elizabeth
How would you make this to fit 12 months (size 1)
I’ve never made this pattern in a larger 1 year size, however, you could try going up a needle size (or maybe even two needle sizes) which should result in a larger sweater. Then you could also make the sleeves and body just a bit longer too if needed. I had success with going down a needle size to make a smaller newborn sweater so that strategy might also work going up a needle size.
I love this pattern. I’ve made probably 5 times. I also tried to increase the pattern for a size 5. I think I finally got it right!
That’s very cool that you were able to adapt this pattern to a larger size June!
Can you please tell us how to increase this to a size 5 or even a size 3 or 4 toddler? Thank you!
Very easy I have made 5 in the last few months
I have finished through row 25 in circular. DO I change to straight needs? How do I do this?
I am confused as to when I start with straight needles and how to do it?
You do not need to start working on another set of needles until you begin working on the first sleeve (row 32 I believe). Then you are holding the stitches for the front on a holder, working on straight needles for the first sleeve, and holding the remaining stitches on the circulars until you are done with the sleeve. The photo for “at the end of hour 2” shows when you are at that step of the process. I hope that helps!
It might be a good idea to be specific in the pattern about which needles you are to use- circular or straight. I found your pattern on Pinterest first and there were no photos of your progress per hour. I had to read through the pattern to make sure I was supposed to start with the circulars. I am an experienced knitter so figured it out quickly but a beginner might be confused.
Use waste yarn to hold extra stitches. So much easier than extra needles.
I had the same question! Glad to have an answer a couple years later, lol
Tried to reply to a previous comment regarding the sleeve decrease on wrong side instructions, but it looks like I made a new comment. See below for the answer!
Yep, knit into the front and back for increases definitely makes the difference in getting the stitch count correct. Thank you!
I must have skipped a row inadvertently. I took my work back and did it up again and am all set now. On my way to the various components! Love this sweater!!
I am having trouble after row 26. I place the markers and end up with the correct number of stitches but then I go awry. My sweater looks as though I am now knitting on the wrong side and purling on the front side. Did I miss a row? Your pattern before row 26 seems to follow a knitting in three rows then a purl row – in order to make the “ruffle” in the bodice. After row 26, I fear that I am doing something wrong, perhaps in row 29, I’m getting the opposite effect of the picture. should I be knitting here?
I am at the end of hour 3 and do not know how to put the hold stitches back on the circular needles
I have enjoyed making this sweater. My question is – I used the safty pin style stitch holder, now I don’t know how to get the stitches back on the circular needles. It seems that I will be on a purl row and the stitches on the holders are facing the wrong end of the holder. Do I have to take the stitches off (one at a time) and turn them? If I had used double point needles would I have the same issue? Thank you for your help
Why in the adult version, do the rows 56,57 repeat 3 x’s?
That pattern was written by somebody else, but when I took a look, it appears to just be a typo.
I can’t seem to find the pattern for the 5 hours baby jacket it show how it’s done but no casting on how many stitches no instractions
I love this pattern. Have made 3 of them already. One change I have found helpful is to crochet up the sleeve seam. Leave the front stitches on the circular needle and use a straight set to knit the sleeve. Keep the last stitch after your sleeve bind off, then use it to start crocheting up the seam. Then when you get to the arm hole, put the stich on the circular needle, continue across the back, again leave those stitches on the needle. Put the next sleeve stitches on straight needles and finish that sleeve using the same process. By using this method, you only have two ends to weave in. Bonus?
I love this idea Lynne! Thanks for sharing 🙂
Beverly, thank you so much for this pattern. Thank you to Lynne for your comment on crochet up the sleeve. I did that and then knit over to the other sleeve and did the same there. I have no under arm holes. love the suggestion! Seamless construction. I used 5.5 mm knitting needles with worsted weight yarn and I am very happy with results. It would be great to see some of the finished ones from your followers. Thank you!
I started knitting this pattern and following instructions, but found that the stitches at the end of each increase row did not match the stitches I had. I tried several times but each time resulted in same problem. What am I doing wrong? Anyone else found the same problem?
I am exciting to try this pattern out. I have yarn using 4 mm needle, and this is for a 6-month baby. I appreciate very much on your advice on how to adjust the size of the sweater with a smaller size needle.
Thanks,
Amy
This pattern uses size US 7 needles, which convert to 4.5 mm, so if you can use that size needle that would be the best for ending up with a 6 month size. If you use 4mm needles, I think your sweater will be a little smaller and the only way to remedy that for a bigger sweater would be to add more stitches. BUT, that would require making a lot of additional adjustments to the pattern too, so it would really be best to just use the 4.5 mm size needle.
Hi, I really love this pattern! It’s very easy to follow, and I especially like how you show your work at the end of each hour. That really helped me. I don’t have a question about the pattern, I’m actually almost done, but I was just wondering if you had any thoughts on doing a rib on the cuffs and hem. Maybe a 2 x 2 rib. Wondering if you thought it would work/look okay? I’m definitely going to make another one or two in different colors for my baby girl. Thanks in advance for any advice!
Yes, the ribbing might work on this sweater pattern. One thing to keep in mind is that ribbing can make the opening a little tighter and narrower and this sweater is already quite small. But it might be worth a try to see how it turns out!
Something seems not right. Row six you write *increase in next stitch, k1, repeat from*. When doing this the 33 stitches become 60 stitches, not 47. I am confused 🙁
Never mind! I got it! 🙂
How did you get it?? I’m stuck here.?
Same! need some serious help asap
hello excuse me with how many points I have to start for a baby of 1 year and how often I have to increase
I am looking forward to your response
I do not like using circular needles. Can this beautiful sweater be made on straiight needles?
Yes, it can be made on straight needles as it is not knit in the round. I like to use the circular needles because they can hold the number of stitches for this pattern a bit easier.
When I click on the link for the sweater pattern, all I get is a blank page, I’m using Windows 10 64 bit. I also use Foxit reader to read PDF files.
Is there a hat pattern to go with the sweater?
You could try my newborn hat pattern here: https://www.themakeyourownzone.com/2011/03/knitting-newborn-hats-for-hospitals.html
Thanks Bev.
Is there a crochet version of this sweater? I never could get the hang of 2 needles!!?
Sorry Val, I do not have a crochet version because I only have beginner crocheting skills. 🙁 I have the opposite problem that I can’t really get the hang of just one hook!
Do you know of an even more simple pattern for a baby sweater? I find instructions to be always very difficult. My daughter in law is pregnant and I really want to knit baby clothes. Any easy ideas welcome.
Thankyou!!!
Thank you for the sweater pattern. So easy to follow. As a new knitter there is o much to learn also never worked with tiny needles. There is a rythm to it
entaõ gostei muito ,quantos pontos colocar para menino de 1anopór favor , quero muito faeste método , por gentilesa na pala quantos pontos colocou na pala por favor,naõ tenho muita prática [email protected],. obrigada
Lisa – you need to put 33 stitches on the needle to begin this sweater (casting on).
So excited to have stumbled upon you blog. thank you for keeping it in existence. Adorable pattern
Hi, this sweater is adorable! I’m trying to figure out how much yarn to buy for the 6 month size, yardage varies a lot by ounce depending on the brand of yarn. Can you estimate the yardage you used? Thanks!
My best guess would be about 200 yards – I know I used a 4 oz skein for the newborn size and had some of the skein leftover yet when I was done.
I would estimate about 200 yards
I am looking for the number of stitches to start with , from neck side . With medium wool
You will see on the printable pattern that the instructions say to cast on 33 stitches.
Thank you for sharing the patterns, on the 7 hour toddler sweater how can I make it bigger for a 2 and 3 year old.. Thank you
I wish I had a quick answer for making a larger size version of the 7 hour toddler sweater, but I think it would take some time doing that math to figure all that out. Basically you need to know how big around you want your finished sweater to be (I think the 7 hour toddler sweater is 25″ around). Once you know how much bigger you want the finished sweater (perhaps 30″ around?), you would then take your how many stitches you are getting per inch and starting multiplying it out. BUT, then you have to figure out the increases too!
My yarn is a bulky 5- can I use this yarn.What size would it be? This would be my first
sweater. Cheri.
You could try making this pattern with bulky yarn, however you would need to use a bigger needle and your finished product would be a larger sweater. That might be OK, if you’re hoping for a sweater to fit a baby larger than a newborn.
Hi in row 6 I should end up with 47 stitches. Ur alway end up with 43. What am I doing wrong ?!
This pattern is adorable but in reading over the instructions I have a couple of questions regarding the stitch counts. In row 6 it seems that if you increase as directed you will end up with more than 47 stitches. And in row 26 in adding up the stitches and increases I come up with 17 sts for the front, 19 sts for the sleeve 31 sts for the back, 19 sts for the other sleeve and 17 sts for the front. What am I misreading or miscalculating? I haven’t started knitting the sweater yet because of these numbers. Your help is greatly appreciated and thank you for an adorable sweater!
I’m stuck at row 26 also. Adding up stitches I come out 20 short. Plus when I add the increases for each section to the K stitches in pattern, I don’t get the same total. It appears there needs to be twice as many increases per section.
The answer is in the fact that the increases are done by “knitting front and back” (kfb) rather than “make 1” as she says in her notes. So in line 6, 33 – 3 at the beginning and 3 at the end = 27. If every other stitch is knit in the front and back, there are 13 knitted stitches and 14 stitches knit in the front and back to make 13 + 14+14 + 3+3 which makes 47. For line 26, count each increase as two stitches…
If someone could literally write out the row I would really be appreciate it. I’m new to knitting and I really don’t understand the explanation above.
I agree! Maybe it’s my lack of sleep due to newborn twins but I am not understanding how to do row 26. This sweater pattern is so gorgeous so far, I would love to be able to finish it.
I agree with you completely. I’m experiencing the same problem right now. I wish Beverly would give us some explanation. I come out with 17 instead of 20 stitches, both sides.
Perhaps where I have the term “inc” it would be easier for some to think of that as “knit in front and back of stitch”. So where it says “inc” in Row 26 that would equal 2 stitches because you are knitting in the front and back of that stitch. SO . . for the 20 stitches for the front it goes like this: K5, inc, K4, inc, K4, inc, K1. This would be 5+2+4+2+4+2+1 = 20. I hope that helps!
Thank you!
On row six I am stuck on the last for stitches, it says knit to last four end with an inc what does that mean?
Hi Jan, I can see how your math adds up, but the standard knitting patterns do not have this type of confusion. Designers may specify a certain type of increase—but a technical editor would have caught this error. So many people have stumbled over this problem, and written in here to ask what the heck is the problem, but it is not the knitters problem, it is because this pattern is not written with standard knitting terminology. An inc is an inc and 1+1 =2, no matter how you increase. Standard knitting patterns would say *k1, inc, k1* (that increases 1 st), repeating that 10x across row would add 10 sts to the prior total.
Nearly finished my 5 hour cardigan, really pleased with the result, now I’m looking round for more wool to make another.
Well as I have fallen down and broken my ankle 6 days ago,I have to rest it with my foot up,this gives me a good excuse to knit all day, (with my husband waiting on me hand and foot )so I am going to have a go at this 5 hour cardigan,fingers crossed I will manage it in 1 day.
Hi, Bev. I contacted you once before when I was early in the process of making the sweater. I’ve had to tear it back about 12 times. I got very excited when I was making the second sleeve and could see the end in sight, but alas, I made mistakes I could see that I could not fix without really starting all over again. One thing that would help me is instructions how to move the sections to a needle holder. Do you break the thread and reattach? If not, how do you continue the work on the next section?
One way to think of it when putting stitches on a needle holder, is that you’ve worked partway across a row, but you want to save those stitches you just worked for later so you put them on something to “hold them”. Once they are moved to a holder, you can keep working across that row again as usual. So most of the time you don’t break the yarn after putting the stitches on the holder because you are continuing to work across a row. Sometimes when you are putting stitches back onto a needle from a holder, you might need to reattach the yarn.
When using regular stitch holders, you always have to put the stitches back on a needle when it comes time to knit them again. This is why I like to use double pointed needles as holders. There’s no need to put them back on a needle because they are already on a needle 🙂 There are a couple places in the 5 hour baby sweater pattern where you will have to reattach the yarn and I did include that notation on the pattern. Other than those places, you shouldn’t have to reattach. I hope you can continue on and finish the sweater!
Thank you for sharing this pattern and your pictures really help make sense of everything. My question is can you tell me what rows you added the button holes?
Thank you again for sharing.
Nancy
The buttonhole rows are rows 4, 12, and 20.
I love this pattern and am having fun with it but do have two questions.
For doing the sleeves it says do stockinette stitch for 22 rows and then it says “sleeve decrease row” wrong side k2 (k2tog,K3) 5 times, K2tog, K2 (25 stitches).
I’m confused about it saying the wrong side because I thought you would decrease on a knit side?
My other question is what would the total number of rows be for the sleeves? 22 for the stockinette, one for the decrease row, and then 7 for the garter stitch edging making a total of 30 rows for each sleeve; is that right?
Thanks so much for your help!
Ann – I believe the sleeve decrease row is the beginning of the garter stitch cuff of the sleeve so the knit on the wrong side begins the knit every row that is worked for the remainder of the sleeve. I believe the total rows worked for the sleeve would be 30. Although I’m not currently in the midst of knitting a sweater so I could verify that for sure by looking at my work, I’m pretty sure that’s what’s happening in that part of the pattern.
I love EVERYTHING about your blog! Thank you for all the great recipes and patterns and all. I spent two hours here last night reading.
Awww, thanks! I’m glad you found some good reading material and ideas here! 🙂
Disculpa no he podido hacer la descarga de pdf, me puedes decir con cuantos puntos inicias.
I’ve only used regular needles. Are circular needles a must or can regular needles be used?
You could use regular needles but the stitches might be kind of scrunched together. However I would encourage you to give circular needles a try, as knitting on them really feels no different than using regular needles but they can make projects with many stitches in a row much more manageable. I think if you try them, you’ll like them!
I’m a relatively new knitter and I have a question about row 26. It looks like the instructions end about half way through the row, do I do the knit stitch for the remainder of the row?
I hope this isn’t too confusing thank you!
Sarah
Hi Sarah – the instructions for Row 26 will take you to the end of the row. So for instance the first section you work on (before you place the first marker) is working on the first 17 stitches in the row. BUT you are increasing (knitting into the front and back) of three of those stitches (so three stitches are being added). Therefore you will have 20 stitches on the needle when place the first marker. Each section of the instructions for Row 26 progresses along that way. Hopefully that will make sense for you!
Yes, thank you so much for your help!
Hi there! What I hope is a quick question – and might be silly of me – but how do you reattach the yarn after doing the sleeves?
When I reattach the yarn, I usually use a crochet hook to pull the yarn through a stitch nearby to where I want to start knitting again, and knot the yarn onto that stitch. Then the yarn is reattached to your work again and you can begin knitting. Hope that makes sense!
I knitted the sleeves at the same time by leaving both on the circular needle. Went back after finishing the sleeves and picked up the front stitches that previously one row was knitted and added my yarn in to begin knitting the back and next front. That way it was a continuous knitvof tge fronts and back.
That’s clever Emma! Thanks for sharing that way to adapt the pattern.
This is my first sweater and I am having trouble with row 6, can you explain it better for me. Love the pattern
For Row 6, there will be 14 stitches in which you are increasing (knitting into the front and the back of the stitch). This should add an additional 14 stitches to the row (going from 33 stitches to 47 stitches.
So you will be knitting the first three stitches in the row, and the last three stitches in the row. This leaves the 27 stitches in between. Of those 27 stitches, you will be increasing in 14 of them,(increasing in every other stitch), and just knitting the other 13.
I hope that helps and that I didn’t just get you more confused 🙂
I am glad someone else asked this question because I too was problems with this row. I was using the M1 every other stitch, but somehow kept ending up with way too many stitches? I started over and used the knit in front and back, every other as you described and it worked perfectly! Who knows what I was doing, thanks for the pattern!
Got it. thanks a bunch. Forging on. Lol
Beverly, My first ever sweater came out perfectly. Than you so much. I would very much like to make a second by more ” boyish” I was wondering if I could do so by maybe instead of k3 at the beginning and end of rows k5. Also I would like to maybe have five buttons evenly spaced, how would I,do the button holes for that? Thanks again.
So glad your sweater turned out good Wendy! I think it would be hard to switch to the K5 at the edges (instead of the K3) because it might conflict with some of the increases in the rows for the way the pattern is currently written. If you want to make more buttonholes, the three that are currently there are every 8th row (currently row 4, row 12, and row 20). So to add a couple more buttonholes I would add them on rows 28 and 36. However those would not be in the yoke, but they would at least be evenly spaced from the other buttonholes.
Hi sorry but did you add the pattern for this lovely sweater?
Yes, there is a link above to print the pdf of this pattern.
Hi! I’m relatively new to knitting but want to move past scarves, hats, and bags and work on something a little more versatile. This pattern looks wonderful! (But definitely a challenge for me) I may be missing it– but what size circle should the circular needles have (without using magic loop)? Thank you!
I hope you enjoy giving this pattern a try Hannah. I used 29″ circular needles for this pattern so that is what I would recommend.
I too modified this oldie-but-goodie pattern. But I taper my sleeves a bit, (for example, i might knit 16 rows even, then begin decrease each side of sleeve every 4th row until I’ve made 4 or 5 decreases, then make the garter cuff) And i do not cut the yarn after binding off the cuff stitches… instead I grab that last cuff stitch with a crochet hook and slip stitch the sleeve seam together, then return the stitch to the needles before continuing across the back stitches to the next sleeve. Voila! No sewing required except for the buttons!
I love the idea of using the crochet hook to slip stitch the seam and not break the yearn. Good thinking Holly!
I’ve made several of the 5 hour baby sweaters and want to tell you how delighted I am with the pattern. The directions are simple, easy to understand and work and the sweater is gorgeous! NICE baby gifts but also donate them to my local crisis pregnancy center. Thank you!!
So glad you have enjoyed this pattern and have put the little sweaters to good use by donating them too. 🙂