No Discbound Punch? Try This DIY Hack!
This post may contain affiliate links. Please read my disclosure policy for more information.
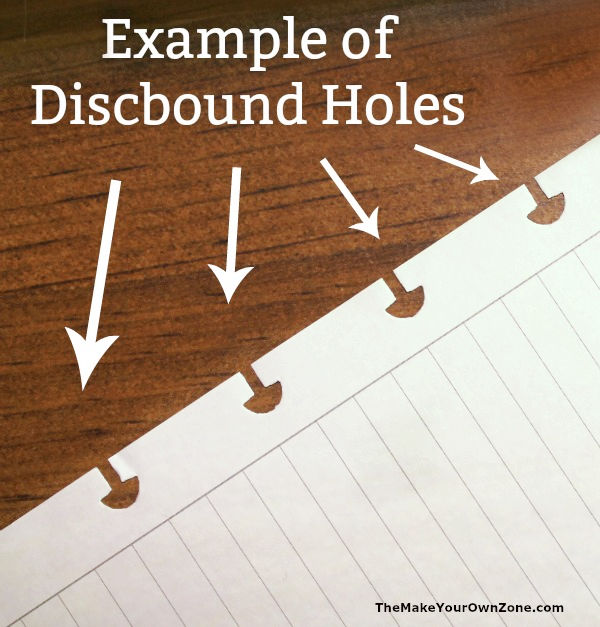
For several years I’ve been using the Arc discbound notebook system for my homemade planners (and I’ve been creating free printable planner pages too!) One of the things I love about the discbound systems is that you can take papers in and out and rearrange them in any way needed in your notebook – BUT – the whole reason this works is because the pages are punched in a certain way. The holes you punch have a little slot that goes all the way to the edge of the page. This is how the pages are able to fit around the discs, and it’s also what makes is possible to remove the punched pages from the notebook again.
So if you’re using an Arc notebook, or a Happy Planner, or some other disc bound system, you’ve got a couple choices. You can depend on the pre-punched pages sold in stores, or you can buy a special punch to make the holes yourself.
Most people opt to buy a punch. I did too, but went the frugal route and bought the smaller Arc punch that only punches one page at a time (which might no longer be available).
Most of the time this small punch works just fine for me. But occasionally I want to punch something just a little bit thicker (like the bookmark project below) and my little one-page-at-a-time punch can’t handle it. What to do ??
How To Make Discbound Holes Without A Special Punch
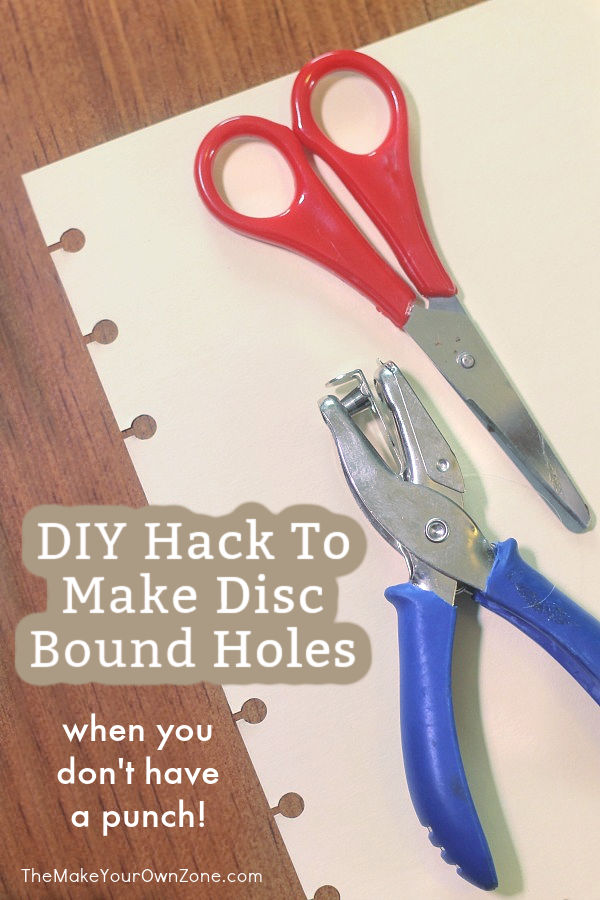
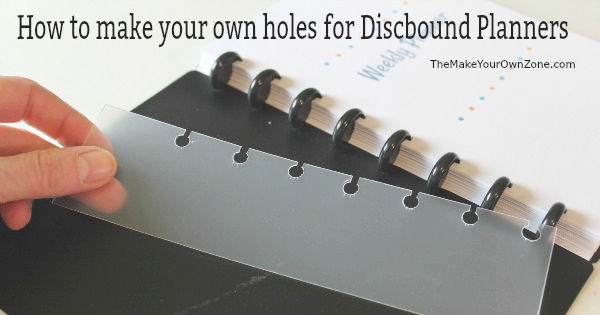
When I make my own holes for discbound planners I use just a couple of ordinary tools – a single hole punch and a scissors. It helps if you already have a punched page to use as a template, but it’s not absolutely necessary.
First, I trace the top part of the holes onto the item I want to punch. Once I have these marks for where I want the holes to be, I punch them with my single hole punch.
Then, to make it possible for these to be disc bound, I take my scissors and make a couple snips under each hole to create a slot.
Viola! We’ve just made our own disc bound holes without a special punch!
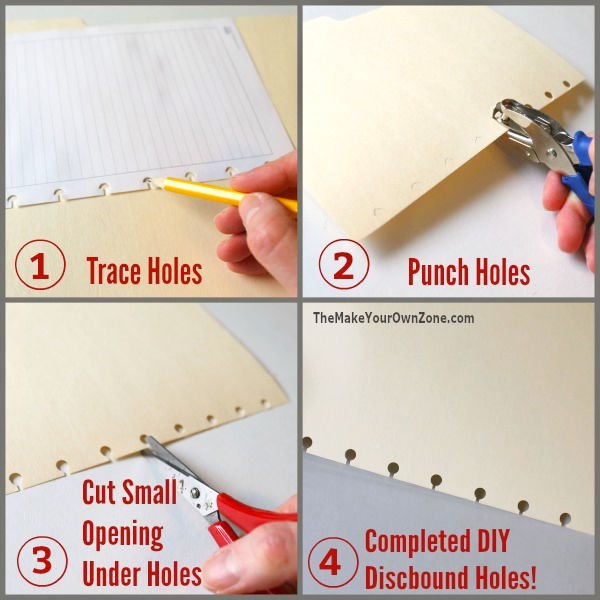
In the picture above I’m cutting holes into a file folder that I cut down to size. This would be an option if perhaps you wanted to make your own index dividers in your discbound planner.

For another example of how this DIY hack can come in handy, here’s how I used it to make my own bookmark for my Arc planner when the piece of plastic I wanted to use was too thick to fit in my little punch.
Make Your Own Discbound Plastic Bookmark
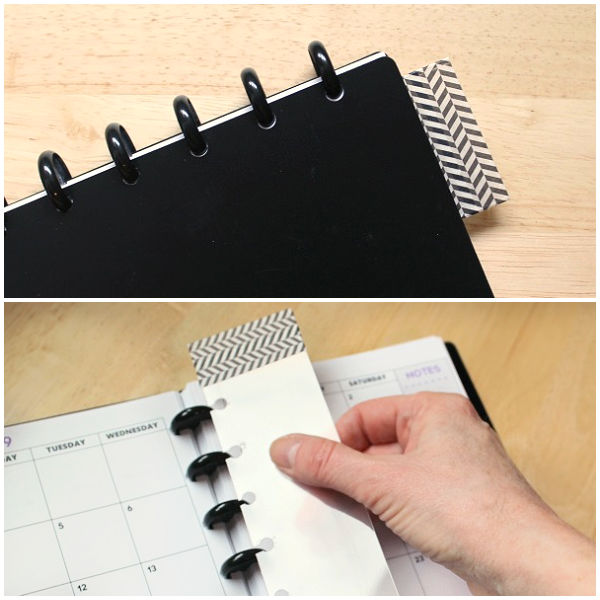
A common accessory for planners is a clear plastic bookmark. Here’s how you can make your own using supplies from the dollar store and the DIY method for making holes described above.
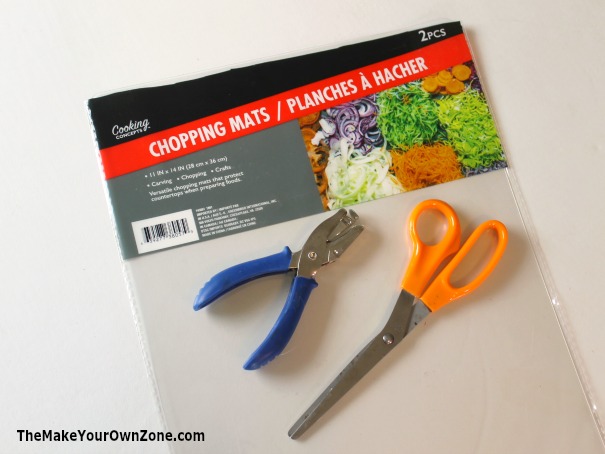
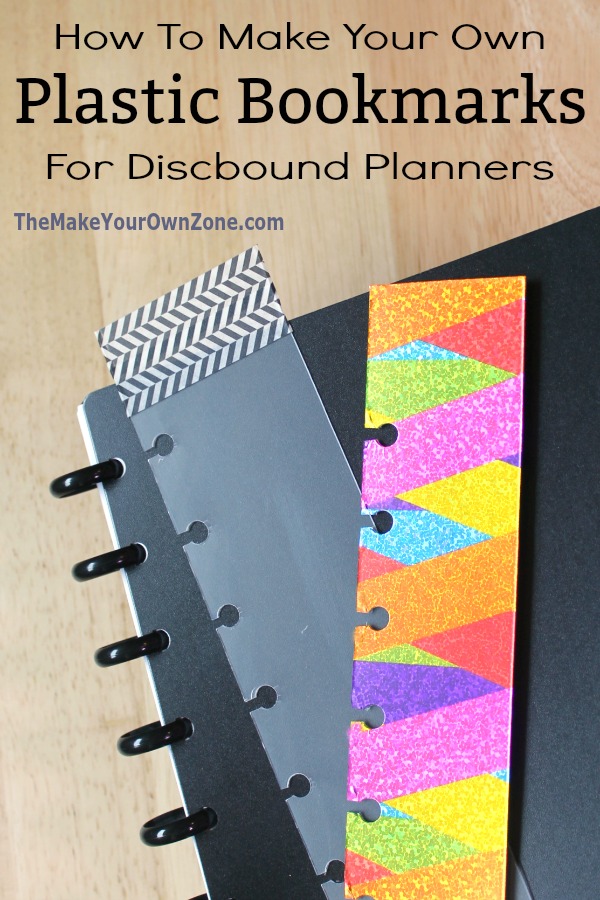
At the Dollar Tree stores you can usually find these clear plastic chopping mats in the area where the kitchen utensils are sold. There are two of these 11″x14″ plastic sheets in the package. These chopping mats are a perfect weight for our bookmarks.
I cut a piece approximately 2″ x 8″ from one of these plastic sheets for my bookmark. I then made little marks where I wanted holes to be on my bookmark. I punched with my single hole punch and then snipped underneath them with my scissors. It took a little strength to punch through with my one hole punch, but it did work!
Finally, I decorated my bookmark with a little bit of Washi Tape where it sticks out above the planner.
I made a second bookmark too, using this colorful duct tape I bought on clearance from the craft store. I cut a piece of duct tape about 8″ long and stuck it onto the plastic. Then I cut out the plastic, using the edges of the duct tape as my guide. I finished up by punching and snipping the holes using my DIY hack, and I was rewarded with another (very colorful!) plastic bookmark for my planner.
So no matter what disc bound system you’re using – whether it be the Arc notebook, the Levenger Circa, or the Happy Planner – this homemade strategy can come to the rescue if you’re dealing with an item you want in your planner, but don’t have the punch to handle the job.
A simple one hole punch and a pair of scissors will save the day and allow you to make your own discbound holes so you can make your own bookmarks, index guides, or whatever else your creative mind may come up with!

boss.
I have a discbound punch but I am definitely going to try doing them with the hole punch and the scissors
Thank you soooooo much! Truly grateful.
Absolutely perfect and timely – I’ve just discovered disc binding and was about to drop £50 on a posh punch. Not now! My wallet and I thank you 🙏 ✂️✂️
I glad you this little hack could save you some cash! 🙂
What kind of paper you use?
I usually just use standard printer paper found at an office supply store, however I often use paper that’s a little heavier than the ordinary 20# paper. I like to use 32# paper.
Great idea! You save me a lot of $$. Thanks.
Loved this idea. Was able to add pocket pages to my planner, too. Thanks for sharing your fun hack.
Hi i have juat dicovered your page, great ideas.. Is it possible to follow you for specific areas like make your own planners on FB or Instagram?
At the point I don’t have ways to separate out the specific areas on my social media.
Thank you! I’m coverting some things and needed to know if this was doable.
Yes, this method definitely works if you need to get creative to put things into a disc bound system.
LOVE THIS! Thanks for sharing.
Genius! Thank you for posting this!!
Yes, it’s a little trick that has certainly come in very handy for me!
I am so glad to have discovered your blog. thx a million.
Namaste
Elizabeth from Kitchener ON
Glad you are enjoying the blog Elizabeth! 🙂
You can also get the one-hole punch at the Dollar Tree for, you guessed it, one dollar!
Yes, that is exactly where I got my one hole punch – at the Dollar Store! 🙂