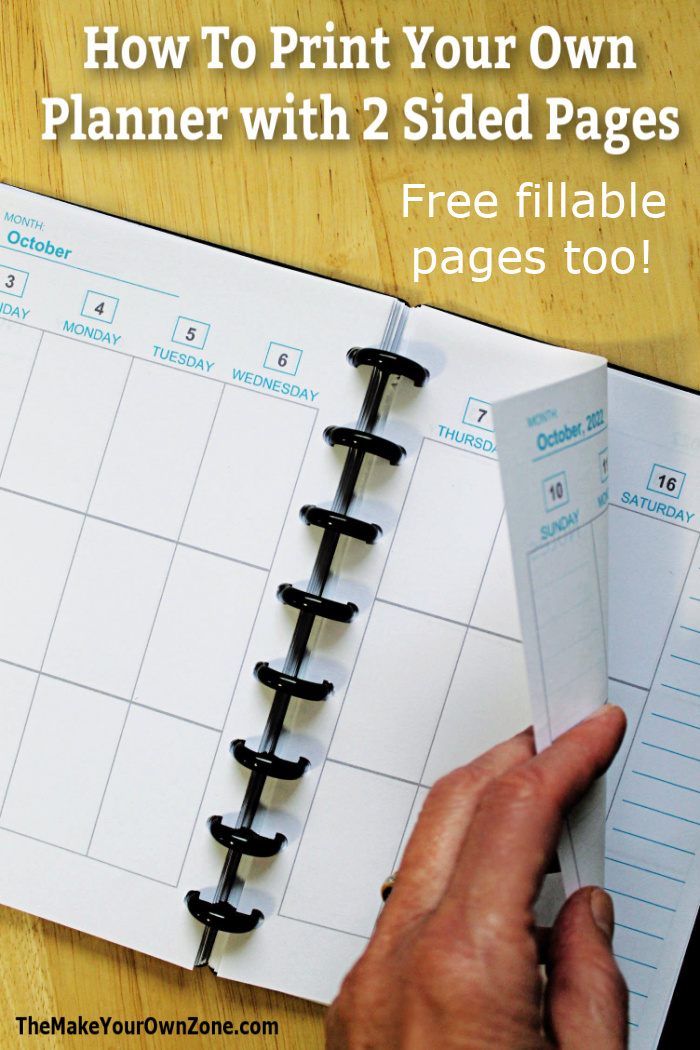
How To do 2 Sided Printing For The Fillable Planner Pages
This year when I designed my free printable planner pages, I decided to create some editable pdfs so that you could type in the name of the month, the weekday names, and the date numbers for any particular week. I also decided for the half size layouts, that it would make it easier to type that in on the page if I would change it so that the page would be cut down the middle and punched at the outside edges (rather than punching the inside edges as in previous years which always looked backwards to people).
These fillable fields and the new layout did indeed add flexibility – BUT – they also added a bit more of a challenge when it came to printing 2 sided if you were using one of the “Week on 2 pages” layouts. If you’re typing in certain dates on each page, and then printing on the backs of pages, and then cutting the pages in half, how exactly do you get the all dates to line up correctly??
I had to do a bit of experimenting myself for the two sided printing, but once I figured out the pattern, it turned out to be quite simple and it was actually pretty easy to get the printed pages to flow along smoothly and correctly. Here’s a quick summary of the pattern, and then we’ll take a more detailed look:
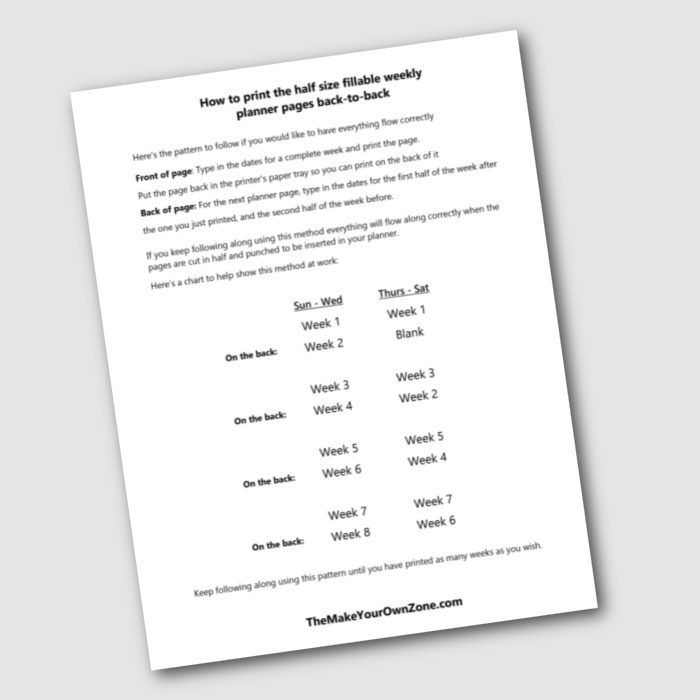
Front of page: Type in the dates for a complete week and print the page.
Put the page back in your printer’s paper tray so you can print on the back of it
Back of page: For the next planner page, type in the dates for the first half of the week after the one you just printed, and the second half of the week before.
So the back side will always have the dates for the first half of the week after, and the second half of the week before.
A Closer Look At 2 Sided Printing for the Fillable Planner Pages
Here’s a more detailed example for using this pattern for 2 sided printing of the planner pages. I often refer to this as “back-to-back” printing also. We’ll use a sample month where I’ve labeled the weeks pictured below as Week 1, Week 2, Week 3, and Week 4 to get us started.
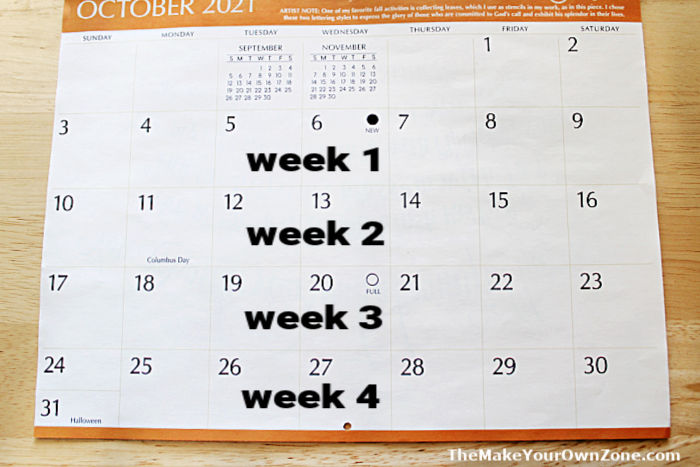
Now if we use the pattern of the back side of the page being printed with the first half of the week after, and the second half of the week before, then typing in the dates on our fillable pdf’s before printing would go like this for the month pictured above . . .
| Sunday – Wednesday | Thursday – Saturday | |
| 1st page | Week 1 (Oct 3, 4, 5, 6) | Week 1 (Oct 7, 8, 9) |
| Back of 1st page | Week 2 (Oct 10, 11, 12, 13) | Blank |
| 2nd page | Week 3 (Oct 17, 18, 19, 20) | Week 3 (Oct 21, 22, 23) |
| Back of 2nd page | Week 4 (Oct 24, 25, 26, 27) | Week 2 (Oct 14, 15, 16) |
| 3rd page | Week 5 (Oct 31, Nov 1, 2, 3) | Week 5 (Nov 4, 5, 6) |
| Back of 3rd page | Week 6 (Nov 7, 8, 9, 10) | Week 4 (Oct 28, 29, 30) |
. . . And so on and so on, until you’re done printing the amount of pages you need!
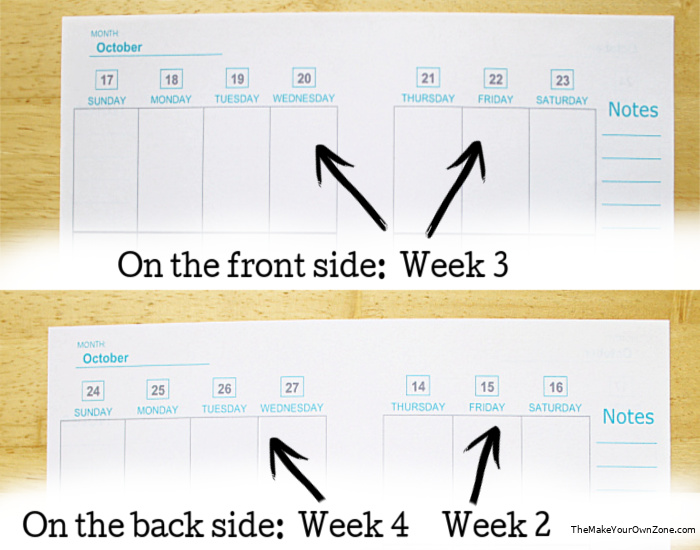
For a further visual, here’s how the pages would look for Week 3 of our example:
(You may have also noticed on that chart above, that on the back of the first week that I print I leave the “week before” dates blank on the back side as that would just be the last half of a week before the week I really want to get started with).
Here also is a quick little video to help you see how this 2 sided printing works (an ad will probably run first but stay tuned!):
So hopefully that can help you see the pattern to follow when the weekly layout is over two pages and you would like to print them back-to-back. Here’s a little cheat sheet that you can print out to show the pattern too: Instructions for printing 2 sided (back-to-back).
Printing 2 sided is a really nice option to use as it not only makes your homemade planner more like a store-bought planner, but it also saves paper when you’re printing your own too. Perhaps it sounds a bit confusing when you read through these instructions but trust me – once you give it a try, I know you’ll find it to be a simple process. Just remember that if you are printing on the back side of a junior size weekly page that will be cut in half – the dates typed onto the back side need to be the first half of the week after, and the second half of the week before. 🙂
Here again is the link to the free printable pages – – > Free Fillable Planner Pages
They are available in more colors, layouts and sizes than pictured here too!

You might also like:
- Make A “Getting Things Done” Planner
- No Discbound Punch? Try This DIY Hack!
- DIY Notepads and Padding Compound

I am loving these pages and have every planner made and cant get satisfied with any of them and this is definitely the answer however my printer prints double sided and I chose that one bc just the thought of putting the paper back through the right way and the time it will take to stand over the printer and do it will send my anxiety through the roof and I will quickly become discouraged and burnt out. would you please help me with how to fill them out if printer has printing on both sides or do you have a copy with dates filled in that I could use. I so want to use these beautiful pages and I love my printer paper which is why I can’t get happy with a lot of planners. they just don’t use my Hammermill 32lb awesome for my pen to write on bc it’s not too smooth and not to rough. any help so appreciated!
Sincerely
Kelli Kelly (I know, blame my Mom)
I’ve never attempted to use the two sided printing feature on my printer because I prefer to just put the papers in and out myself, because that’s something I can understand lol. So I don’t really have the answer for the two sided printing on your printer. But I have learned over the years that sometimes you just have to keep experimenting and after some trial and error, it finally gets figured out. If you have some scrap paper or cheaper paper, use that first and try a few things, and then if you get it all figured out, move on to printing your final copies on your nice heavy paper.
Print all the pages single sided then insert a blank page where you don’t want it to have anything on the back. That should allow you to use your printers double sided feature. You would just scan in the set of documents as you have them laid out. I hope that helps.