Sew A Bridal Veil Tutorial
A decision to sew a bridal veil can save you lots of money. You might find, just as we did, that your own homemade bridal veil might cost you only $5 as compared to about $100 at the bridal store. Those are big savings! If you have something simple in mind, it’s definitely worth considering and it’s not that hard to do although some basic sewing skills are helpful.
We decided to make our own wedding veil and were very happy with the results. My daughter just wanted something simple to go with the flower in her hair that would fit under an updo. A veil with lots of beading didn’t really match her dress anyway so we were the perfect candidates to make our own!

To make our own bridal veil we purchased tulle from the fabric store and a pack of hair combs at a craft store (we only needed to use one of the hair combs. We used a light ivory tulle for our veil. You will also need a sewing machine, a hand sewing needle, and matching thread.
We left the edges unfinished on our veil. This meant cutting very carefully so that the edges were as straight as possible. We left the veil in a rectangular shape, but you can also round the bottom corners if you wish.
I did not write down the exact measurements of our veil (so sorry!!) I just held the tulle up to my head and fiddled around until I had a good idea of what size I wanted it to be and then I cut it down to size. I would suggest getting at least 2 yards of tulle from the fabric store so that you have enough to gather up nicely.
Steps For Sewing Your Own Bridal Veil
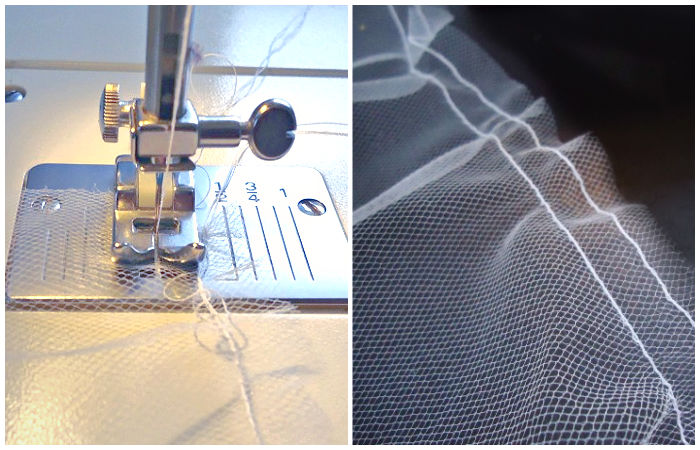
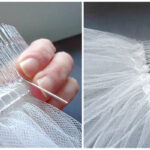
Step 1: Sew two lines of stitching at the top of the veil.
To begin, you will sew a couple of lines of stitching that will be used to gather the tulle. Set your sewing machine on the longest stitch length. For the first line of sewing, have the top edge of the fabric lined up with the edge of the presser foot. Leave a long tail of the bobbin thread as this will be used to gather the fabric.
Sew a second line of stitching next to the first one. You may need to pull the fabric to flatten it back down after sewing the first line of stitching. This time, line the edge of the presser foot up with the first line of stitching. You will now have two lines of stitching along the top edge of the veil that will be used for gathering the fabric.
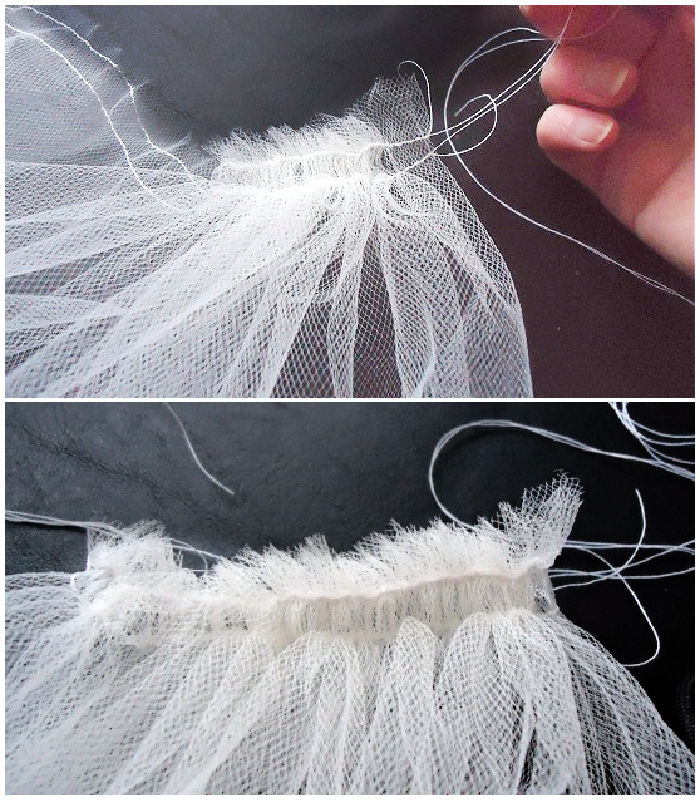
Step 2: Gather the fabric
Pull on the bobbin thread for both the lines of stitching and gather the fabric up. Once the fabric is all gathered, tie a knot in the strings of thread at each end to secure them and cut off the remaining excess thread.
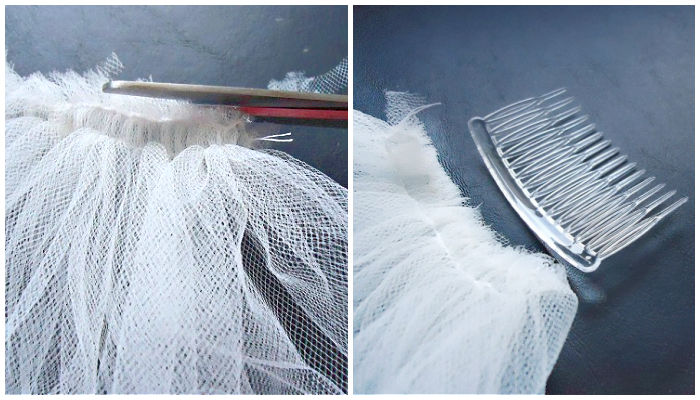
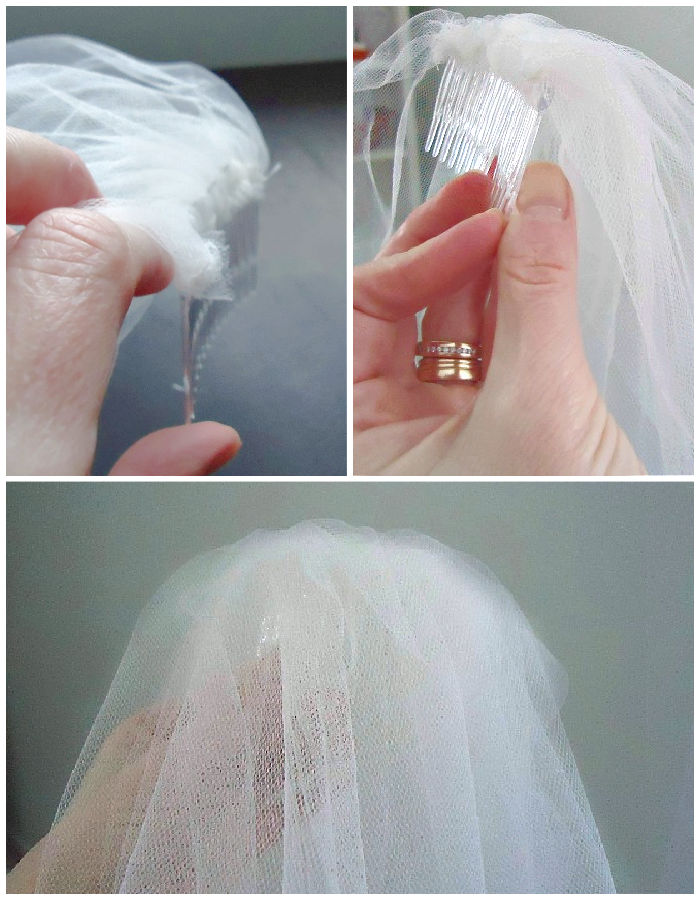
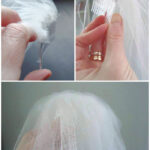
Step 3: Trim and position the comb
Use a scissors to trim off the excess tulle above the gathered stitching. To prepare to sew the tulle onto the hair comb, lay the comb so that it is curving up. You will be sewing the top edge of your veil to this side of the comb.
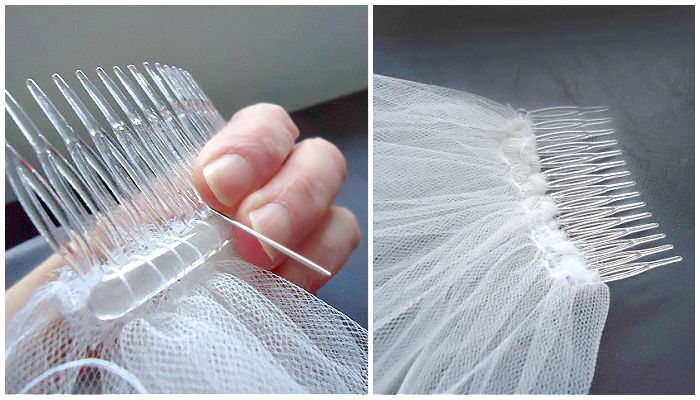
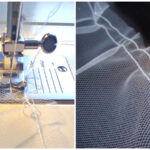
Step 4: Sew the veil to the comb
Using a hand needle and thread, sew the tulle to the comb with stitches going around the teeth of the comb and into the gathered edge of the tulle.
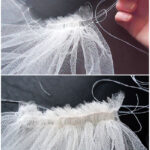
And now your homemade bridal veil is complete! To wear the veil, you will be pointing the comb downward with the veil coming over the top. This keeps the unfinished side of the veil against your head where it can’t be seen.
And then you can let your veil gently blow in the wind as the sun sets and you live happily ever after!
Related: We also saved money and made our own God’s Knot (Cord of Three Strands)


Simple Bridal Veil
Equipment:
- Sewing Machine
- Hand needle and thread
- Scissors
Materials:
- Tulle fabric (we used 2 yards of light ivory color)
- Hair comb
Instructions:
- Cut the tulle to a length you would like your veil to be, and a width that gives you the amount of gathering you would like. The bottom of the veil is left unfinished, so be sure to cut very straight and carefully on the bottom edge.
- Next you will sew a couple of lines of stitching that will be used to gather the tulle. Set your sewing machine on the longest stitch length. For the first line of sewing, have the top edge of the fabric lined up with the edge of the presser foot. Leave a long tail of the bobbin thread as this will be used to gather the fabric.Sew a second line of stitching next to the first one. You may need to pull the fabric to flatten it back down after sewing the first line of stitching. This time, line the edge of the presser foot up with the first line of stitching. You will now have two lines of stitching along the top edge of the veil that will be used for gathering the fabric.

- Pull on the bobbin thread for both the lines of stitching and gather the fabric up. Once the fabric is all gathered, tie a knot in the strings of thread at each end to secure them and cut off the remaining excess thread.
- Use a scissors to trim off the excess tulle above the gathered stitching. To prepare to sew the tulle onto the hair comb, lay the comb so that it is curving up. You will be sewing the top edge of your veil to this side of the comb.
- Using a hand needle and thread, sew the tulle to the comb with stitches going around the teeth of the comb and into the gathered edge of the tulle.
- To wear the veil, you will be pointing the comb downward with the veil coming over the top. This keeps the unfinished side of the veil against your head where it can't be seen.


How do you attach the comb to a cathedral length veil that is trimmed in lace all the way around?
I think you would still use the same strategy. The veil has to be gathered somewhat at the top where you want to attach it to the comb. You then want it stitched to the comb so that the stitched area is against the head, with the veil coming up and over the backside of the comb. Perhaps the lace could be trimmed a bit in this area or folded over to help you sew it to the comb.
I know I can make the short vail, I’m not sure how to finish off the bottom edge
If you cut the tulle carefully and as straight as you can, you can leave the bottom edge unfinished as it will not ravel.
Thank you for the veil tutorial you are very clever.
I can I do if I want to sew samething decorative over the combo after I sew the veil?
Thank you.
I think you could carefully sew something decorative over the veil, however I would still try to sew it close to the edge of the comb if possible.
Excellent tutorial! Thank you. Also, I believe you have a Bernina sewing machine ?
Glad you found the tutorial helpful Sara! Also, I have a 30 year old White brand sewing machine that stills works great 🙂
Great idea! I’m doing my daughters veil, with beads thanks for the idea!
It turned out lovely! You could use 4 of those five combs to do this for gifts: Beaded hair combs A friend made one for me.
Thanks Zombiemommy! I'm glad I took the time to figure out how to get that Pinterest button on there 😀
Great post Bev. I tweeted and pin it! Smooth move on getting the Pinterest button!