How To Make A String Christmas Tree
I’ve always thought that Christmas is a season that can bring out our inner craftiness. Even if you’re not willing to be crafty at other times of the year, you might just give it a go for the holidays. And there’s not much else to do during the cold months anyway so hey . . . let’s get crafty and Make Our Own!
This year as the Christmas season approached, I decided to indulge my crafty side by seeing what holiday goodies I could make using my homemade Mod Podge. One of the fun little crafts I tried were the homemade string Christmas trees that I’m sharing here today (and yes, the homemade Mod Podge worked perfectly for this project!)

Supplies To Make A String Christmas Tree
Only a few supplies are needed for these little trees. You need some kind of a cone shaped form covered in plastic wrap, crochet thread, Mod Podge, and a foam applicator brush. If you want to dress things up a little bit, you might also like to have some small adhesive gems for decorating your trees.
As mentioned above, I used my inexpensive homemade Mod Podge for this project and it worked great. It’s a simple mixture of glue and water and you can get the complete details for that here: How To Make Homemade Mod Podge
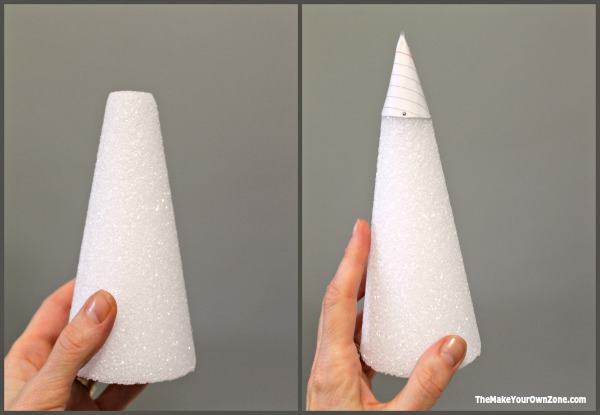
For the cone shaped form, I liked using a 6″ Styrofoam cone that I already had in my craft supply stash. This was a nice manageable size to work with and resulted in just the right sized little tree I wanted for my shelf. However if you use a Styrofoam cone, they often have flat tops so you may have to improvise and attach a little piece of paper rolled into a cone shape to make a pointy top (I used a piece of an index card attached to the cone with a couple straight pins).
I also made a slightly larger tree using a 12″ paper mache cone from the craft store. You could also make your own cone in any size you wish using a piece of lightweight cardboard (in a circle shape with a “pie sliced” piece cut out of it) that you roll into a cone.
You should be able to find crochet thread in the craft stores too. They usually come in spools of at least 100 yards which gives you plenty of thread so you can keep winding around and around the cone as you make these trees. You can also use metallic crochet thread (which I used in a silver color for the larger tree I made).
How To Make a Tabletop String Christmas Tree
Once all your supplies are gathered, here are the steps. (Printable instructions are at the end of this post too).
Step 1: Cover your cone with plastic wrap
Step 2: Make a small slip knot at the end of the crochet thread and slip it over the tip of you cone.
Step 3: Start winding some of your crochet thread around the top of the cone. After you’ve done a little bit, dip your applicator brush in the Mod Podge, and dab some on the string you have wrapped so far to help hold it in place. Keep wrapping the thread, and dabbing it with Mod Podge as you work along.
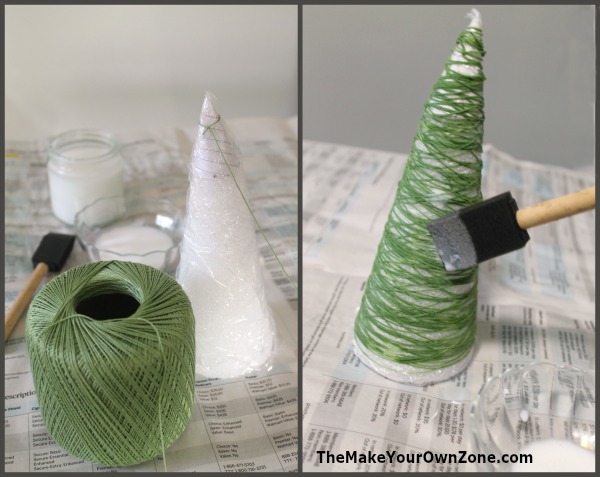
Step 4: Go up and down the cone several times, winding the thread around in random patterns, and dabbing with Mod Podge as needed to hold things in place, until you are happy with the amount of coverage of string on the cone. Be sure to do a couple of good wraps of string around the bottom of the cone to give the tree a bit of a base for standing.
Step 5: Cut the string and give it a dab of Mod Podge to hold it in place. Then do a final dabbing with Mod Podge over all of the cone.
Step 6: Let the tree dry for several hours. I always let mine dry over night to assure it is completely dry and stiff.
Removing The Tree From The Cone
Now this last part of the process may take just a bit of patience, especially if you have used a Styrofoam cone. If you use a paper cone of some sort, it’s easier to just kind of fold the cone a bit, which let’s you then slide your plastic off the cone, and then slide the tree off of the plastic.
However for a Styrofoam cone, you just sort of have to keep twisting and wiggling for a bit, until the tree starts coming loose from the plastic and then you can slip it off the cone. Don’t worry and keep calm. It’s not stuck on there forever!
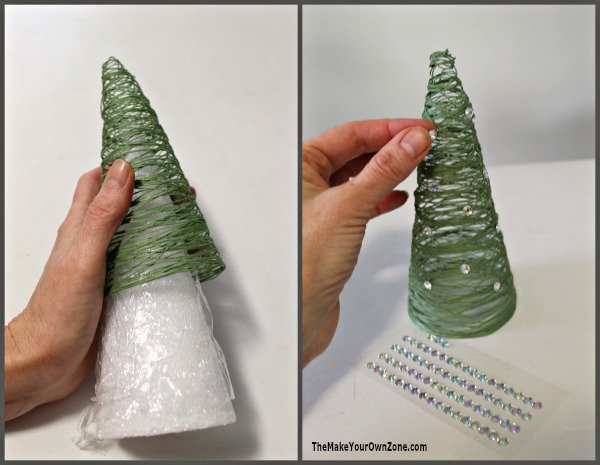
Once the tree is off the cone, you can decorate it with some small adhesive gems. These type of gems are usually sold in the scrapbooking area of craft stores.
And then your trees are complete! Set them out for display wherever you need a little extra Christmas cheer.
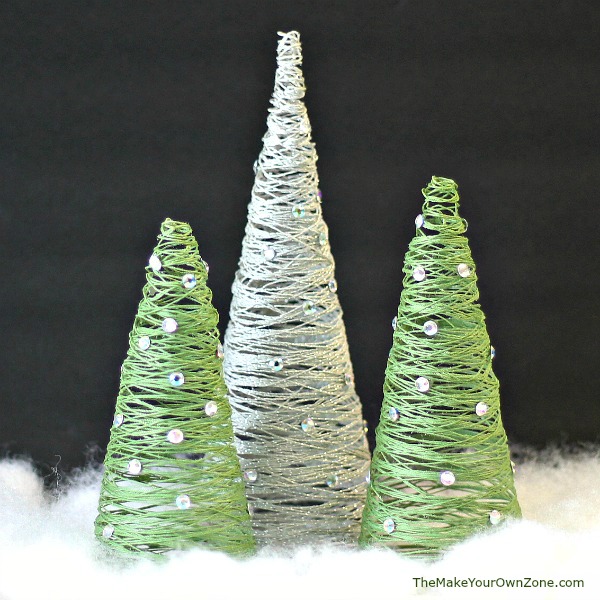
And finally, remember to enjoy that each of these trees is a one-of-a-kind creation and don’t stress too much about absolute perfection. Part of their charm is that these string trees have some homemade whimsy to them, so have fun and enjoy making your own!
DIY String Christmas Trees
Materials:
- Cone (Styrofoam, Paper Mache, or Homemade) (see note below)
- Plastic Wrap
- Crochet Thread
- Mod Podge
- Sponge Applicator Brush
- Adhesive gem rhinestones (optional)
Instructions:
- Wrap your cone in plastic wrap.
- Make a small slipknot in your crochet thread and slip it over the top of your cone.
- Begin winding your crochet thread around the cone. After you have done a bit, dip your applicator sponge brush in the mod podge, and dab some on what you have wrapped so far to help hold it in place.
- Continue wrapping, going up and down the cone in random patterns, dabbing it with mod podge as you go to help hold it in place. Be sure to do several good wraps around the bottom of the cone to help create a base for your tree.
- When you are satisfied with the amount of string coverage on the cone for your tree, cut the crochet thread and dab it with some mod podge to hold it in place. Then do a final dabbing with the mod podge all over the cone.
- Let the cone dry for several hours, and preferably overnight, to make sure everything has dried and is stiff.
- Remove the tree from the cone. This might take a little wiggling and twisting to release it from the plastic wrap.
- Add some adhesive rhinestones to the tree if you wish to give it some decoration.
Notes:

These look great! What size crochet thread did you use?
Just a suggestion- I did this with parchment paper and pinned it to my Styrofoam cone- came off perfect! Worked excellent…. do not use plastic wrap lol
I would like to know approximately how much crochet thread is needed for one tree.
I wish I had read these comments first. These do not work according to your instructions. They do not come come off of the Satan wrap. Then after 10 minutes of getting it off- the wrap stays stuck on. Then when you try to take the wrap offthe tree- the tree comes apart. And some of then the wrap will not come off. I love the way these looked but not a good project… thumbs down…
some really neat ideas.
I tried this project using Dollar Tree twine and dollar tree thread. Both materials worked very well, and my decorative holiday trees look amazing.
I tried this project three (3) different times with NO success…just a waste of time and money!
I’m sorry this project didn’t work out for you, and I’m often puzzled why different people can have such different results for something that worked well for me.
Use parchment paper pinned to your Styrofoam- worked great- the tree came right off…
You said yarn wouldn’t work but could embroidery thread be used? Hugs Barbara
Yes, I think embroidery thread could be used. I would wonder though if it might work best to not use all 6 strands of the floss and instead separate it to 2 strands or 3 strands so it is a bit thinner and more like string.
I made yarn trees like this this year. It worked well however I did have use more modpodge as yarn absorbs more. Also had to wrap more closely together. There are other postings on Pinterest for yarn trees.
Oh I just love these string Christmas trees. Thank you so much for this post. Best wishes, Barbara
Can you use yarn
I don’t recommend yarn as it would get very soggy when adding the mod podge and I don’t think it would dry up well like the string does.
Hi, so I started a project like yours that had very few instructions and failed to do a bit more research before… as I was reading your post I realized I didn’t put plastic wrap around the styrofoam cone before and I’m now wondering how to take out the cone without ruining it… any ideas?? I’m hoping the string doesn’t complete adhere to the cone!!
Without something protective over the styrofoam cone, chances are that the mod podge will indeed stick the string right onto the cone. You could try gently sticking something like a knife under the string and see if you can wiggle it free, but that might not be possible.
I like your work and I want to do some thank you!
They do look nice. I’m going to use liquid starch and dip my string in and the wrap. I’ve made ghosts like that by dipping material in starch and draping over a balloon or ball on a glass. When dry it was very stiff…lasted a couple yrs and then just re dipped and shaped again.
My string Christmas tree goes limp after a couple of days from removing it from the styrofoam. Is this supposed to happen? How do i make it stand up permanently??
can you use yarn??
I haven’t tried yarn, but I’m not sure if it would dry up as nicely as string after being saturated with the Mod Podge.
Hi. I have made 1 tree so far and am unable to remove the plastic which has adhered to the crochet thread. With much juggling, I was able to remove the styrofoam cone. The plastic seems to be 100% stuck to the thread. Is there a trick to removing or did I do something wrong? Any suggestions would be much appreciated.
Mine stuck to the plastic also.it will not turn loose.
Also my trees start to limp. I’m going to get spray starch & hope atleast something goes right
I have dried Modge Podge residue between the crochet yarn. Looks terrible
This is just NOT working for me and I’m so bummed! They won’t let go of the Saran Wrap and when I finally get them out they start falling over
Thank you so much for sharing these. I almost alway over investigate crafts, new recipes -everything really, before I dive in. I’m so glad I read through all of the comments below. I decided to use almost all the tips below.
I bought 1 large & 1 smaller styrofoam cone. I had just had great success with Mod Podge Hard (only comes in matte) so I got Mod Podge Furniture in Gloss (supposed to be very hard as well as coming in Gloss. ). I found 1 light green and 1 pearl white crochet thread locally so I bought DMC pearl cotton in dark green, and their gold and silver Metallics (pricy but ❤️ their metallics. ) I also made cones from poster board since that’s supposed to come out easier. And I wrapped them all in Ziplock bags that I’d cut the sealing strip off. I covered two trees with one gallon bag. I then opened my dishwasher and lightly sprayed the wrapped cones with Pam and then rubbed it around to make sure it was even. Spray against your dirty dishwasher door and it’s not on your floor or in your sink. And it gets cleaned with the dishes.
Then I used my foam brush, and started wrapping. I already had a fan set up with freezer paper taped down in front of it (plastic side up) for some Papier machet im doing. I dries so much faster and so did the trees.
The only one I had any trouble removing was the one I made on the actual styrofoam BUT I quickly reached for a skewer (another comment below) and pushed it up about half way, then went around and it popped right out!
They’re adorable and I can’t wIt to put my gems on them. Walmart was much cheaper on these gems than craft stores. 570 assorted size/self stick for about $4. I’m in Texas so they won’t go to waste. Lol
Now I just hope my daughters don’t beg for one or two when they’re here for Thanksgiving. Thank you again!
After reading about people having an issue getting the trees off of the cones I decided to make paper cones and covered it with parchment paper. I also used Stiffy and they came out great. When they were dry I took the inside and pulled the cone so it became smaller it came right out.
Have you tried this with anything else other then the crochet thread? Trying to make it a little more thrifty in cost. I’m thinking about trying it with yarn that I can get at DT. I just wonder how the mod podge would work with the yarn.
I haven’t tried this with yarn, but whatever type of thread or string you use gets very wet with the Mod Podge so I’m not sure if yarn would dry up nicely.
I had to cut out the styrofoam out of the string tree. The second one I just let the styrofoam remain inside. Love them both.
It’s fantastic! Very creative .i will try to start doing it for the next chistmas🎉
I love this!
I threw out 3 of them. The “glue” that remained after getting the Saran Wrap out was terrible and ugly. Should I use a lighter hand when making them?
Are you using a sponge brush? I find that is a good way to dab on the homemade mod podge which helps from doing it with too heavy of a hand.
I tried the cone like you showed but I couldn’t get them off. I don’t know what I did wrong .Maybe I did to much of the string. Any ideas how I can remove them. They are really hard they want to budge. Thank you.
Instead of glue and water mixture, I used sta-flo starch. It made the string very stiff, but it did not adhere to the cone as much as the glue seems to.
Wonderful thank you. Blessings
thankyou for all your instructions on how to make these pretty string Christmas trees, they were all so easy to follow, and a big thankyou for letting us know what you used to make them and where we could find them . I am going to have a go at making a couple xxx
To make it easier to get a styrofoam cone out, how about covering it with a layer of paper first. and THEN the plastic wrap. When it’s ready to be removed, it should slide right out of the paper, then scruntch up the paper, and remove it, then peel off the plastic wrap.
Just love it …. 🌼🌼🌼🌼🌼
Hello. Love these and would like to use them in the class of 8 year olds that I teach. I have a heap of wool and acylic yarn. Would that work instead of the crochet cotton?
I’ve have not personally tried yarn with this project and would wonder if it would get too “soggy” looking, even after the mod podge is dried. One alternative might be to wrap the yarn around the cone, spiraling it up with no gaps in it, and just leaving it on the cone after it is mod podged. That would be kind of a different look, but would still be cute. If you are doing this with younger kids, you might also want to make your own cardboard cones so that the cone can just be torn apart if that helps them to be able to get the string tree off the cone.
These are so beautiful. We are having trouble making ours stand. Also it seems there is excess mod podge . Did we put too much on it?
It does help to do a couple good rounds of string at the bottom of the cone which can help to make the tree stand level when it is off the cone. I like to use the sponge applicators for applying the mod podge as I think that can help you “dab” it on, which can also help to keep from putting it on too heavy.
I was struggling to get the tree and Saran off the styrofoam cone too! What worked for me is I took a metal skewer, starting at the bottom of the cone put the skewer under the Saran, so between the cone and Saran and pushed it up. Then I would wiggle the skewer around. I did this all around the base. Did a bit at the top too. The cone would then easily come out. Whatever Saran was stuck, I just used the skewer to gently pull it from the tree. Took some patience but I have made 6 already. Good luck everyone!
Wish I had read the comments first. Having an impossible time to get it off the saran wrap wouldn’t have made had I know it would be this annoying.
I covered my cone with Saran Wrap and sprayed it with PAM slipped right off. My Modge Podge is also rather “rubbery”. I made a big one and it collapsed on itself. I stuffed it with Saran Wrap.
These are nice, and I want to try but looking at comments it is a challenge to remove the saran wrap. Do you think if you spray the saran wrap with Pam first it would come off easy, and not ruin the glue process?
Thanks
Hi, I’m trying to do these and I am unable to pull the saran wrap off from the inside of the tree. The tree and the saran wrap removes easily from the cone. I have thrown 3 trees away trying to get the saran wrap off. I have let them dry overnight. Am I using too much Modge Podge?
I can’t get mine off either. Did I wind to tight? Also once my husband sawed one of the cones out of the tree, my plastic wrap wouldn’t come off. The pictures look like your plastic came off. HELP. I really would like to make them.
I found that it worked much better when I used a zip lock bag. I cut the zipper part off, slide the corner of the bag to the top of the cone and then taped the sides down. I’ve made 15 that way, pretty quickly too……
How much thread do you need for one tree, half a roll? Can you use one roll for 3-4 trees?
Yes, I would say you could get at least 3 or 4 trees from a roll of crochet thread, and maybe even a few more.
any other tips on getting the tree off the cone? I can’t seem to get mine to budge.
Could twine be used for a more rustic look? Also, Mod Podge makes a “stiffie” product….could that work? The trees are so cute!
Hmmm, twine might work, however, twine’s rustic look is partially because of the “dry” look of it and I’m not sure if once it is saturated with the Mod Podge, if it will dry up in a satisfactory way. But it might be fun to try it and see how it goes! Also, I think the Mod Podge “stiffie” version would work too.
I’ve seen similar trees made with twine. They used a cone but covered it entirely in twine and secured it with hot glue. So it’s not the stringy, negative space style tree, but it still looked nice!
What size thread?
I used the standard size 10 crochet thread
I made one of these trees. It won’t stand straight up. It starts to slouch to one side. Almost like it’s to heavy. Did I miss a step somewhere?
A couple things that could help avoid this are to make sure you wind the string around generously so that there is plenty of string used to help make the tree a little sturdier. Also be generous with the mod podge and let it dry thoroughly so it stiffens.
How do you store these without crushing them to reuse the next year?
You are correct that they are a little bit fragile. I keep my Christmas decorations in a couple of large Rubbermaid totes and I just put these trees in last so I can carefully lay them on the top of the other things in the tote before I close it up.
You can stuff them with old socks or a bunch of the left over tissue paper
Can you use craft yarn instead of crochet thread?
I don’t think yarn would work as well (although I have not personally tried it). The string gets very wet as you coat it with the mod podge. I’m not sure if wet yarn would dry as nicely or as quickly as the thinner string or crochet threads do.
So, the point of the slip knot at the top is to keep the thread in place while wrapping, correct? I thought it may be for help in removing the tree form. These are SO CUTE! I remember doing something like this in elementary school with small balloons – once the string was dry, we popped the balloons and had string Easter eggs. Thanks for the instructions and the memory!
Yes, the slipknot is just to help hold the string in place as you begin to wrap the thread. And if balloons were cone-shaped, they would definitely be helpful for this project! 🙂
This is not as easy as you explain, very messy and it’s just not as simple
Sorry you had that experience. I did not feel it was that messy of a project.