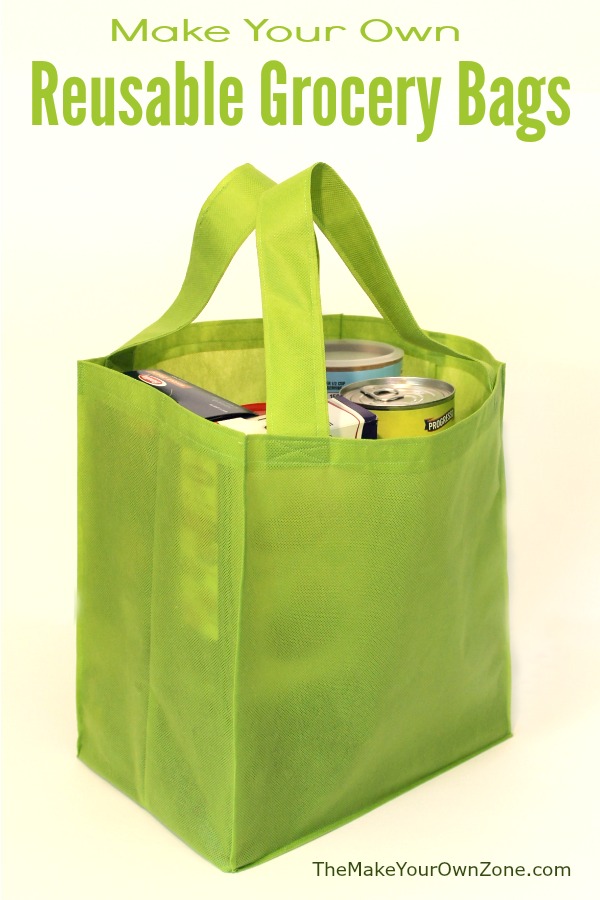
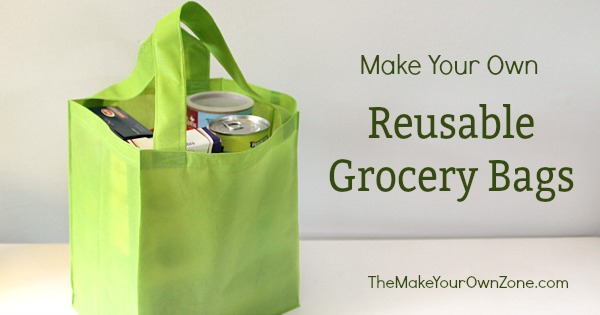
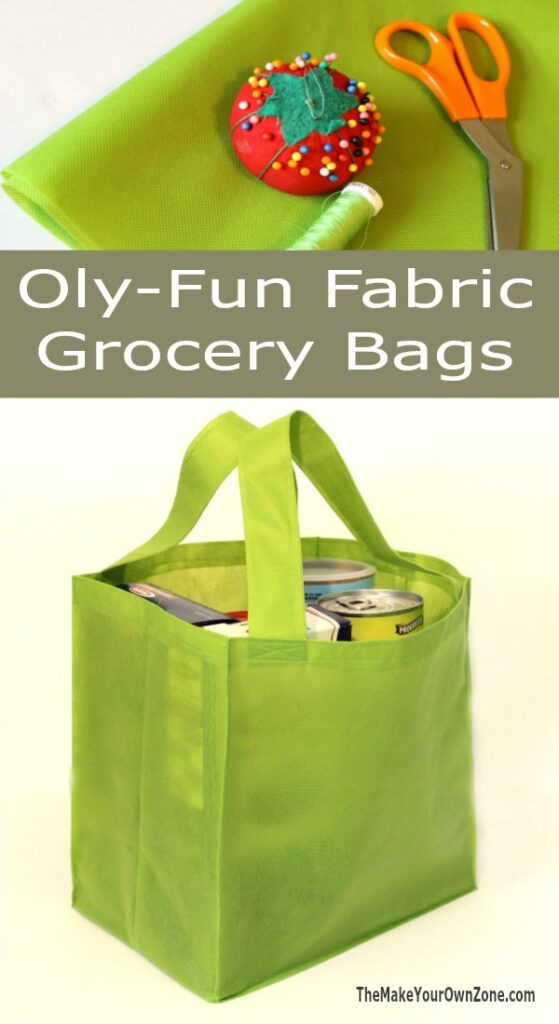
How To Make A Reusable Grocery Bag
This post may contain affiliate links. Please read my disclosure policy for more information.
I’ve been using reusable grocery bags for several years now and I must say, once you start using them, they really are nicer than those flimsy plastic bags. They’re sturdier, hold more groceries, and reduce disposable plastic waste. I don’t always remember to bring them into the store with me, but I probably do use them more often than not. And if you are an Aldi shopper (like me) then you definitely need some good reusable bags!
I was motivated to try to make my own reusable grocery bags after getting a book from the library called Hack That Tote. From that book I learned that you can make a variety of different sizes and shapes of bags using the same basic pattern – a couple of square-ish pieces of material with notches cut out of the bottom corners. Well, that sounded like something I could handle.
But on my first attempt I used cotton and made a lined bag, and it was nice, but it was very floppy. That got me looking closer at my reusable bags I bought from my grocery store. What exactly were they made from? Why did they stand up better than my floppy tote bag?
Discovering Oly-Fun Fabric
The answer came after I did a little research on reusable bags and if they are good or bad for the environment. (I found this article quite interesting and learned that it’s really all about how often you use the different types of bags). From there I started researching different fabrics and discovered something called Oly-Fun Fabric. It very much resembled the fabric my other reusable bags were made from so I decided to give it a try!
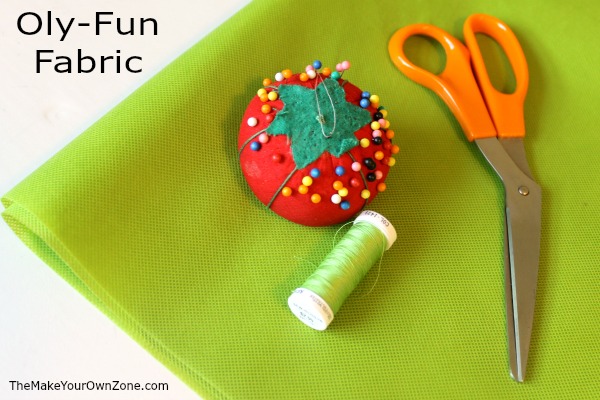
Oly-Fun fabric is an interesting material that’s a combination of fabric and paper. It was simple to sew with too because there’s no grain or bias, no right or wrong side, no fraying, and no pre-washing needed. AND, it was sturdy enough that when it was used to make a reusable bag, it was not so floppy anymore either! (You can learn more about Oly-Fun Fabric in this article).
I was able to buy my Oly-Fun fabric at Hobby Lobby at the reasonable price of $2.99 per yard. I used Oly Fun in the Kiwi color for my bags.
The one thing I had to get used to when sewing with Oly-Fun however, is that it’s not really meant to be ironed. I did try a cool iron with a pressing cloth, and it kind of worked. Instead, I found it easier to just use the “finger pressing” method if I wanted to open a seam a little bit, or press down a fold. Finger pressing is done simply by rubbing your fingernail over the area you want to press down.
Make Your Own Reusable Tote Bag
So here now is my method to make your own reusable grocery tote bag. It does involve sewing, but it’s a pretty easy process for beginners because the Oly-Fun fabric doesn’t fray or need to be hemmed in the same way as traditional fabric.
And best of all, it’s a pretty close DIY version of the type of reusable bags that you may already be using if you have previously purchased the familiar type sold by stores (usually with their name on it). I created this pattern to be the same size and shape as those type of bags – except now we can make our own in any color we want with no advertising on it!
Here are the complete instructions. I’ve included photos for each step which I hope helps to explain things a bit too.
Update Aug, 2020 – this pattern has been updated to add larger size and smaller size bag options too. You can read the follow up blog post here – Making Larger and Smaller Size Bags
Printable pattern here – – > DIY Reusable Grocery Bag Pattern
Materials Needed:
1 Yard of Oly Fun Fabric (I was actually able to get 2 bags from a yard)
Coordinating Color Thread
Sewing machine, scissors, tape measure, and pins.
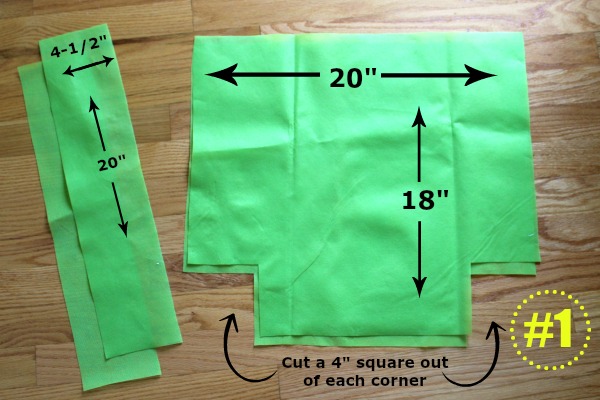
#1 – Cut Out Your Pieces
- Cut two pieces for the body of the bag that are 20″ wide by 18″ tall. Cut a 4″ square out of each bottom corner on both pieces.
- Cut two 4.5″ x 20″ pieces for the handles.
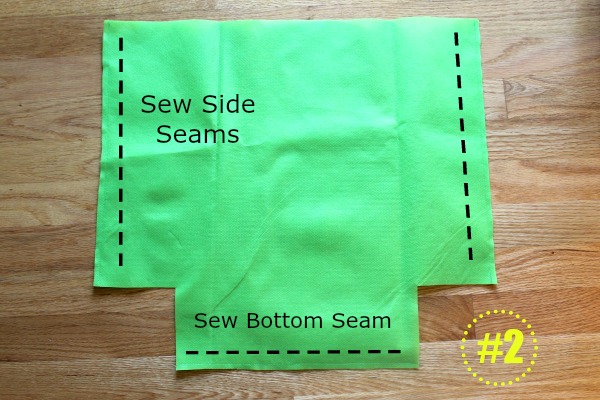
#2 – Sew Side and Bottom Seams
- Pin the two body pieces together (Note: There is no right or wrong side to the Oly-Fun fabric).
- Using a 1/4″ seam allowance, sew both side seams and the bottom seam, leaving the corners open.
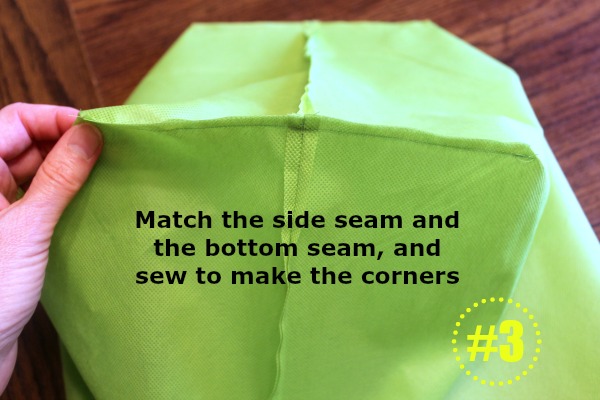
#3 – Sew Bottom Corners
- Open up one of the corners and match the side seam and the bottom seam. Pin, and then sew the corner seam using a 1/4″ seam allowance. Repeat for the other corner of the bag.
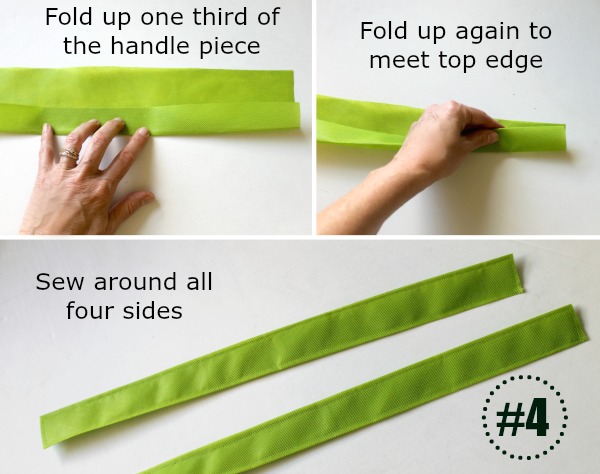
#4 – Sew the Handles
- For each handle piece, fold up 1/3 of the piece (1.5″) and then fold up again, lining up the fold with the top of the piece. Pin and then topstitch around all four sides of the handle piece. Repeat for other handle piece.
- (Alternatively, if you do not want to sew handles, you can use two pieces of cotton webbing, cut to a 20″ length.)
- Set aside.
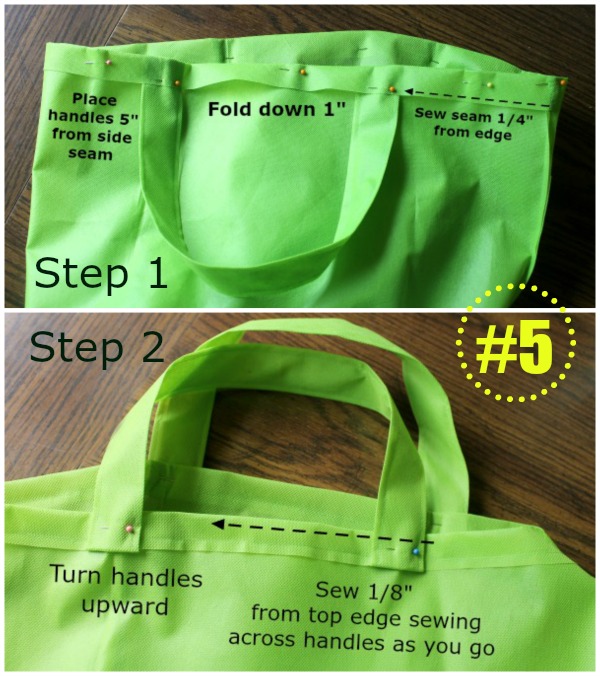
#5 – Finish the Top
- Turn the top edge down 1″ and pin.
- Insert one end of a handle piece under the fold, 5″ from the side seam. Insert the other end of the handle piece 5″ from the other side seam.
- Repeat with the other handle piece on the other side of the bag.
- Sew around the top, 1/4″ from the “raw” edge that was turned down, sewing the handles in as you come across them.
- Next, turn the handles upward and pin.
- Sew around the top again, 1/8″ from the top edge of the bag, sewing across the handles as you go so that they are now secured pointing upwards.
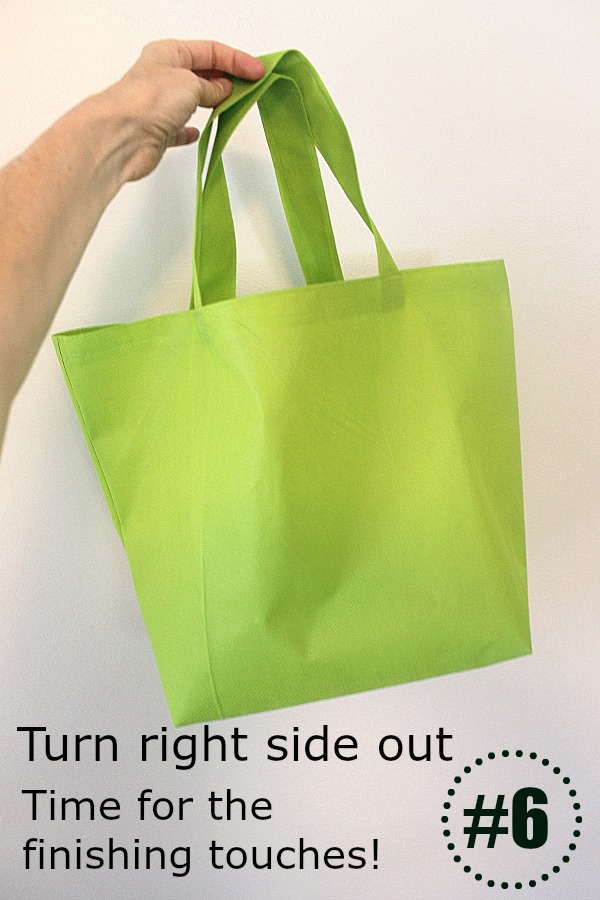
#6 – Turn the Bag Right Side Out
At this point, you have a tote bag that’s all put together and you can stop here if you want – BUT – a few more finishing touches will give you a tote bag with more defined edges and structure that will help it stand up better and more closely resemble the store brand reusable bags.
FINISHING TOUCHES:
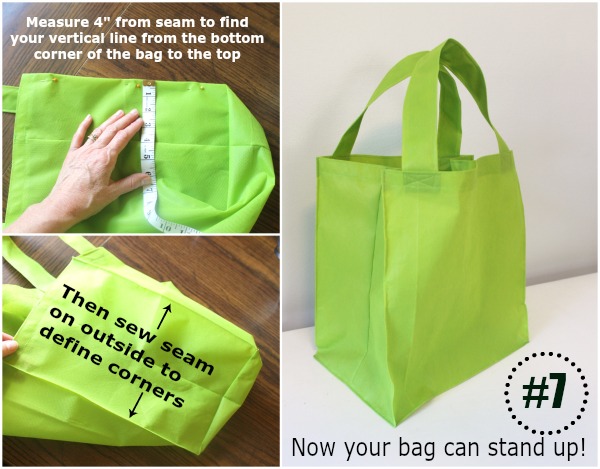
#7 – Define the Edges
- To define the sides of the bag, you will keep the bag turned right side out, and will be sewing “ridges” on the outside of the bag.
- Find your vertical line up the side of the bag by measuring 4″ from the side seam. Then sew an 1/8″ topstitching seam on this line, which will go from a bottom corner point to the top of the bag. Do this for each of the four corner points.
- Define the bottom edges in the same way, using a 1/8″ topstitching seam, measuring 4″ from the bottom seam to find the lines to sew along.
- You can also define the short sides of the bottom too, by sewing a 1/8″ topstitching seam on the outside of the bag, over the corner seam that was sewn.
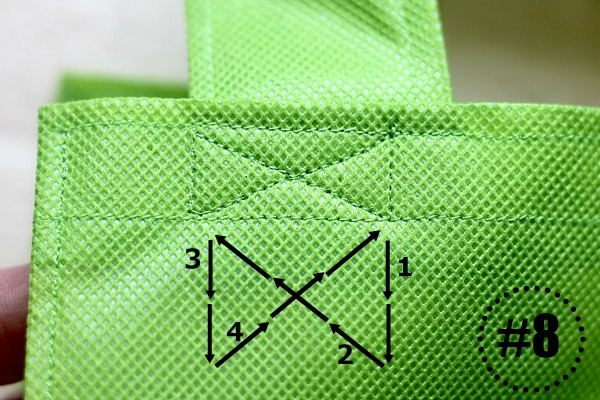
#8 – Reinforce the Handles
- You can also reinforce the handles at the top of the bag by sewing an “X” .
- Sew your “X” as shown below for each of the four handle areas.
One final optional step is that you can also create an insert for the bottom of your bag to make is just a little sturdier by cutting a piece of plastic needlepoint canvas to a size of 11″x7″ and laying inside the bag on the bottom.
Here’s the link again for the printable version of the pattern:
Printable Reusable Grocery Bag Pattern
And with those finishing touches, you’ve completed your homemade reusable grocery bag! The Oly-Fun fabric is water resistant, but the manufacturer also says it can be cleaned with soap and water if needed.

Thanks for the EXCELLENT INSTRUCTIONS re making bags! One of the best, detailed patterns & pictures to illustrate the instructions, that I have seen!
Wonderful! such a clear presentation 🙂. The instructions and accompanying photos were great, very easy to follow and understand ☺️. You inspired me to try and this afternoon I made this bag from recycled denim and it came out great! Thankyou for sharing your skills and expertise.
Thank you for the great tutorial. I am thinking of sewing a wire into the finishing creases to make the bag really stand up.
There is no need to buy lining just use the recycle bag as your lining. It has been very effective for me.
.
Great bag it is easy to make and really useful for my shopping’.
Thanks for the clear instruction and free PDF pattern 🙂
Thank you for all this information. I love the idea of using Oly-Fun fabric. I need a waterproof bag for carrying art supplies to class, especially the paper. Since I paint in watercolor, I can’t risk the paper getting wet, and have been using garbage bags. Now I can make a tote bag the specific size needed for the paper. This is great!
Thank you for this! I appreciate the pictures, and I especially like it that you’ve cut the corners from the fabric before sewing, instead of just sewing one big square and then cutting the corners off: this way, you can still easily use the cut-out small squares fro other projects. Finally, I came to this link bypass way of your other links showing adjusted sizes–super helpful!!
Thanks so much for the pattern. I didn’t have any of the oly fun fabric, but I have a lot of pieces of heavy cotton blends that I’ve used to make walker totes. They’re bright and colorful and make wonderful grocery bags. I added a piece of cardboard at the bottom, but covered it with matching fabric (kinda like a pillow slip) so I can remove the cardboard when I wash the bag. Great pattern and easy-to-follow instructions. You can make the bag larger or smaller depending on the size of the fabric you have, just use the same proportions.
What are the finished measurements? How wide is the front? How tall is it? Measurements of the bottom and how wide are the sides?
Thank you,
Carey
The front is 11″ wide, it is 12-1/2″ tall, and the bottom and sides are 8″ wide.
I’ll definitely be making these.. Also, could I use this technique to make a bag 23″ tall x 18″ wide with a depth of 4″?
Yes, that would be a taller, skinnier bag, but I think it would work.
Thank you so much for these easy and clear instructions! Because of the pandemic, I have switched to completely cloth bags so as to not add to the plastic pollution. I was using the semi plastic bags you could buy at the grocery store and reuse, but they are hard to wash, and cloth bags are so easy – just put them in the wash. Because I am also very thrifty, I took an old pair of corduroy pants destined for fabric recycling and repurposed them into the fabric I needed to make you bag. I even used the waist band to make the handles!
I just used the bag along with the other ones I already had when I went shopping on Thursday. It worked great!
Thanks again!
Thank you so much for these simple instructions. I wanted to use what I had on hand so I used a printed denim fabric.
I’m glad you were able to use what you had to make a useful bag Jackie!
Great project!! Clear instructions and makes a wonderful bag….. thank you
Can you make these bags bigger? How would you determine the new dimensions?
How wide was your fabric. On a 42 in fabric you can not get 2 bags
My fabric was 60″ wide. That was the size of the bolt at Hobby Lobby where I purchased my Oly-Fun fabric. I have updated the printable pattern to include that size info.
Thanks for the tutorial. I too am an Aldi shopper & so far I have a bunch of store plastic bags I keep in my trunk (until my hubby took them out & I thought they were there so cart got emptied in the trunk… not a good thing) but honestly would love to have bags that stand up. Are these bags strong enough for cans & gallon milk jugs? If I am baging my own I put all refrig. things together, all box pantry items & last all can, glass containers together.
Yes, these bags made from the Oly-Fun fabric should be strong enough for cans and gallons of milk. I think you’ll find they’re much nicer than re-using plastic bags when you go to Aldi.
Is Oly-fun fabric food safe? I know oilcloth is not. Thanks. Katherine
I checked the Oly-Fun website where someone else asked this same question wondering if the fabric is food safe. Their answer was “The material is used to make reusable grocery bags to carry items home from the store. It would be considered safe to use but not to directly serve food from”. I hope that helps!
Thank you so very much for this wonderful tutorial to make tote bags. I live in Mexico six months and WA State six months and use bags all the time. Now I can get rid of the cloth ones and make my own. Thanks again Beverly
Excellent tutorial. I made several bags & they turned out great. My State no longer provides grocery bags, so this tutorial was just what I needed.
I’m so glad this bag was a good solution for your Ellen!
Quick and easy. I sewed a little pocket onto the outside with a velcro flap closure for the little things. Like a coin for the grocery cart.
Good idea Bonnie – A perfect pocket for an Aldi quarter! 🙂
Oh – this looks fantastic – thanks for sharing – will be trying this tonight
This idea is great in every way. I surely would prefer to have my tote without ads, usable at the location of my choice with no awkwardness.
Could you give me a rough estimate of the length of time to complete the tote? I’m considering a project for a ladies group, but not sure if this would be overwhelming time wise.
Thank you for this wonderful zone you share with us.
If you have the pieces all cut out and ready to go for your ladies group, then I would say you could complete the sewing in about an hour.
If you used webbing instead of fabric for the handles, that would cut down on the sewing time considerably.