DIY Tin Can Planters with Knit Covers
This post may contain affiliate links. Please read my disclosure policy for more information.
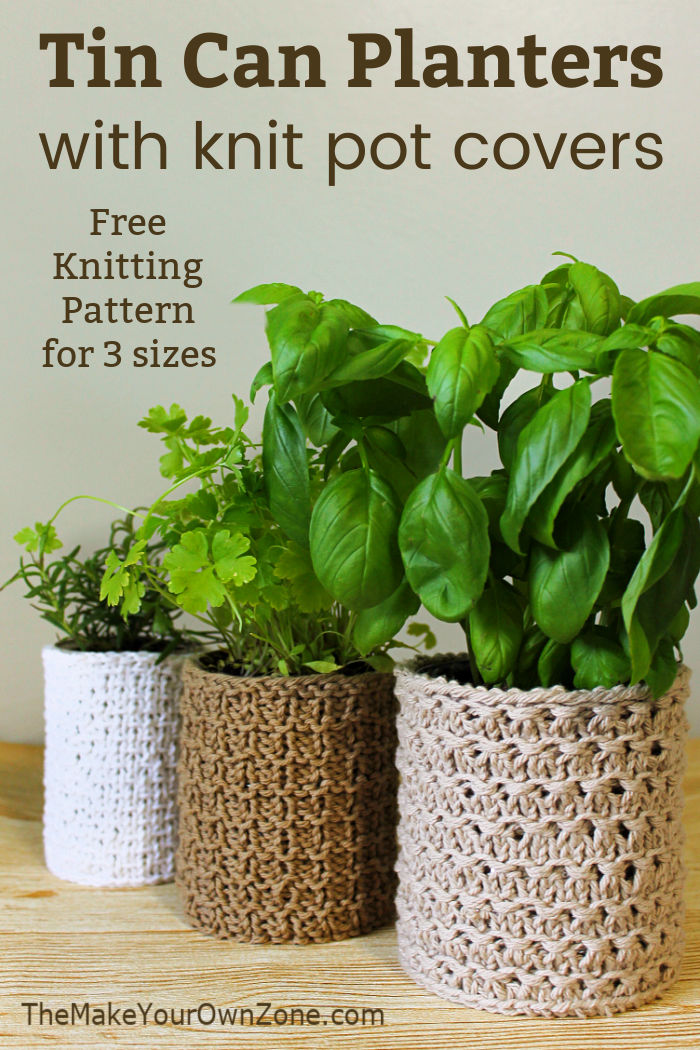
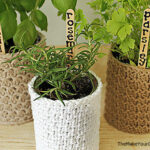
Today’s project came about all because I wanted to have a few live herb plants in my kitchen this summer. Yes, I wanted the plants but I did not want to keep them in the flimsy little plastic pots they were sold in. I wanted something just a little nicer looking, but didn’t currently have any nicer pots around the house. So after a little thinking and rummaging through my craft stash, I came up with my idea. I decided I could make some planters from tin cans and upcycle them a bit with a knit plant pot cozy. In the end I didn’t have to spend any additional money for my “new” planters and I’m so happy with how they turned out!
Are Tin Cans Good For Plants?
Before I started my project, I did some quick research to learn if my idea for keeping plants in tin cans was a good idea. I had already assumed (correctly so), that I would need to add some holes at the bottom to help with drainage. I also learned that if you are growing a plant to use in your food (as was the case with my herbs), you might want to take a few extra measures to provide an additional layer between the aluminum of the can and the soil inside. I came up with strategies for both drainage and lining my tin cans (more on that below), and decided to proceed.
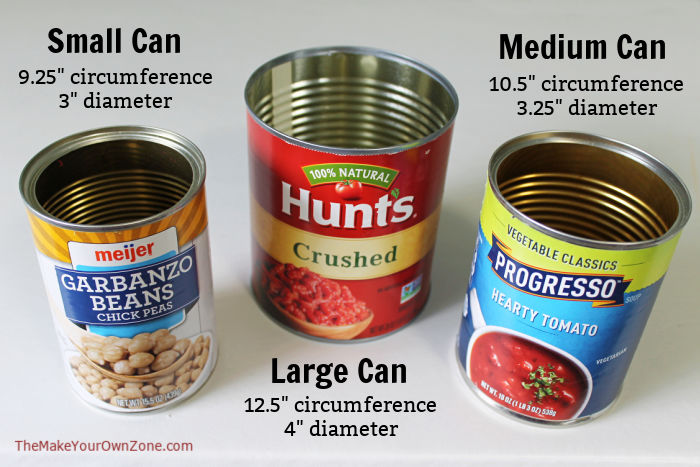
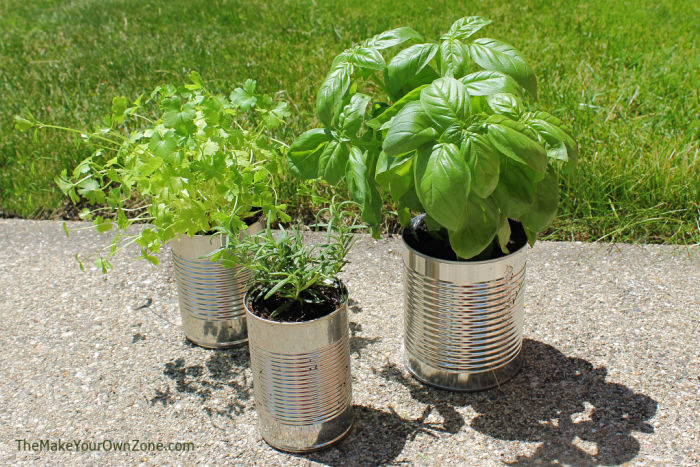
I saved three tin cans, each in a slightly different size to add a little variety. The largest can was from a 28 oz can of crushed tomatoes (I use these to make my own spaghetti sauce). The medium size can was from a 19 oz can of soup, and the smallest can was the most common size from a 15 oz can of beans.
Preparing my DIY Tin Can Planters for Planting
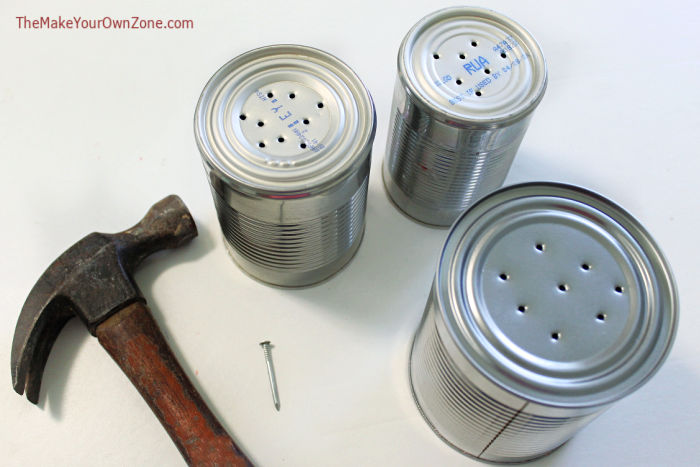
So now that I had three clean tin cans, I removed the labels and moved on to adding some drainage holes in the bottom of the cans. My low-tech method was simply to use a hammer and a nail. It takes two or three whacks on the nail with your hammer, but then the nail punches through. I poked several holes in each can and then moved on to the next step.
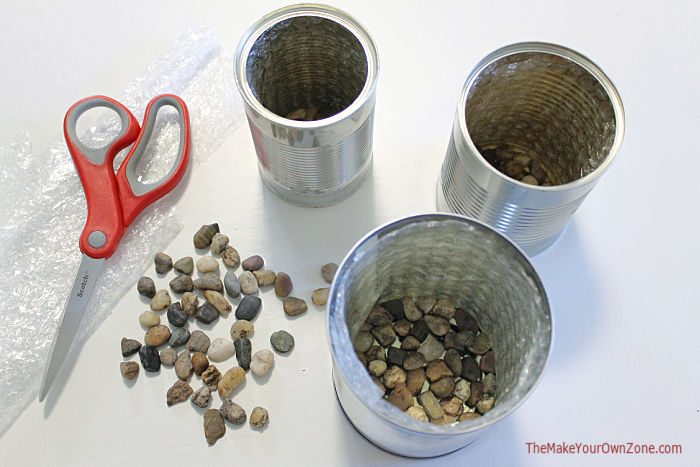
Next I wanted to add some kind of liner to my cans. I came across a couple suggestions online, one of which was to line the bottom with gravel, and another of which was to line the sides with bubble wrap. I already had some bubble wrap around the house so I cut some pieces to the appropriate sizes and put them inside my cans. I also had some very small stones in my craft stash that had been in another planter I had at one time, so I added a single layer of these stones on the bottom of each can too.
Now that the cans were ready, I trotted outside and transferred my herbs to my new handy-dandy tin can planters. I planted the bushy basil plant in the largest can, I put the parsley in the medium can, and the little rosemary plant fit nicely in the smallest can. I gave them a good watering, and the little drainage holes I made worked perfectly too!
And now, for all the knitters who are patiently waiting to find out how I made the knit planter covers, here’s what I did for that part of the project!

Free Knitting Pattern for Plant Pot Covers
To make my knit planter covers, I used US size 7 needles and leftover scrap cotton yarn I had around the house (which I think was still leftover from my knit mesh market bags). It doesn’t take much yarn to make each knit pot cover either; I probably used just a little less than an ounce of cotton yarn (such as the Sugar ‘N Cream brand) for each cover.
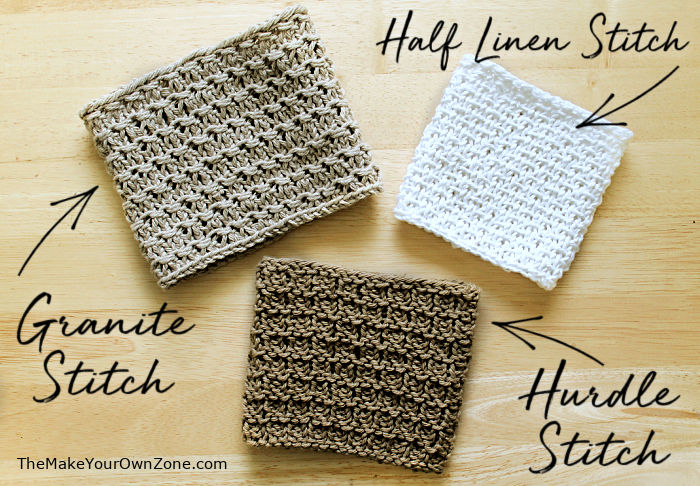
I also used a different knitting stitch for each pot cover to create a little interest. For the largest can, I used granite stitch knit in the round on circular needles. This saved me the step of having to sew a seam on my cover. I recently discovered the granite stitch and love how it has kind of a wavy look. This knit planter cover was my favorite!
For the two smaller cans, I knit my planter covers as a flat piece on straight needles because it was just a bit too tight on the circulars. This meant I had to sew a small seam but that was easy to do. For the medium can I used hurdle stitch, and for the smallest can I used half linen stitch. Complete info for knitting these stitches and making the pot covers are in the free printable knitting pattern instructions at the end of the post.
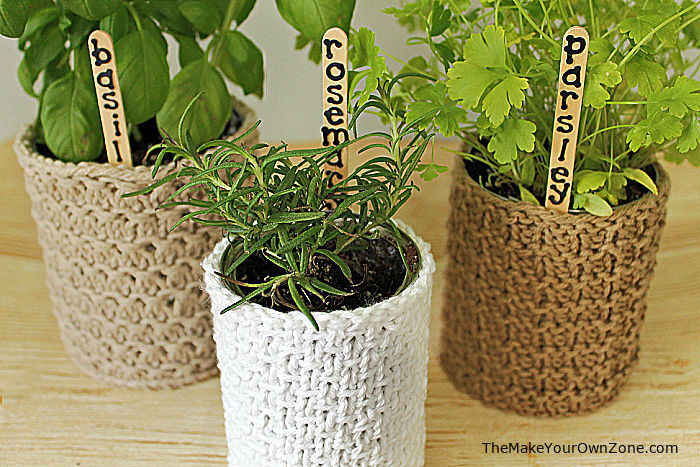
Once the knit plant covers are completed they slip easily on and off the cans too. I like to take the covers off when I water the plants (just to make sure they don’t get any wet dirt on them), and then I slip them back on again when I’m done.
And technically, I guess I’m putting my knit pot covers on “upside down”, because I liked how my long-tail cast on edge looked around the top of the can. When you make your own, you get to choose what looks the best to you!
A Few Fun Plant Sticks for my DIY Planters too!
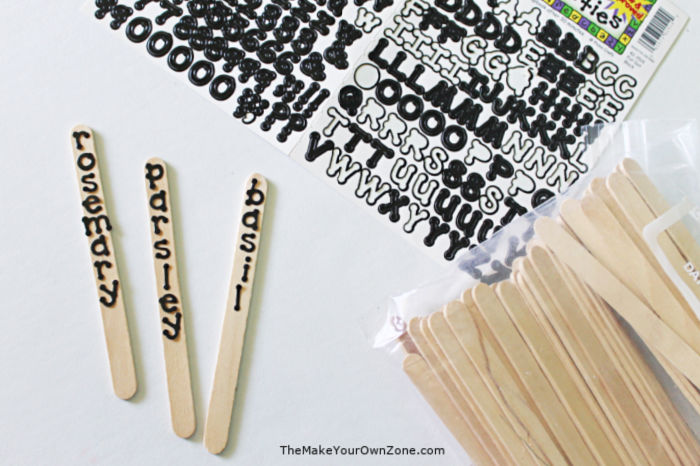
Finally, I went back to my craft stash one more time to create some plant sticks to label my new herb plants. I still had some stick-on alphabet letters that probably go back to my scrapbooking days, and I stuck those onto some craft popsicle sticks. I didn’t stress too much either about lining up all the letters perfectly – a little crooked seemed more whimsical and fun!
Rather than stick the plant markers in the dirt, I instead just tuck them between the knit plant cover and the can.
When it was all said and done, this was a very frugal project for me (even the herb plants were on sale at the grocery store!) and I loved that I was able to upcycle tin cans and use leftovers from craft supplies I already had on hand to create something pretty and new. It was a fun and satisfying way to just make my own!
More DIY Knitting Ideas:
DIY Tin Can Planters with Knit Covers
Equipment:
- 1 Clean tin can in a 28 oz size
- 1 Clean tin can in a 19 oz size
- 1 Clean tin can in a 15 oz size
- Hammer and Nail (for making drainage holes)
- Bubble wrap and small stones (optional for if you are planting edibles)
Materials:
- US Size 7 Knitting Needles (circular and straight)
- Small amounts of cotton yarn (about 1 oz per cover)
- Blunt Large Eye Needle (To sew seams on the smaller covers)
Instructions:
- Prepare your clean tin cans for planting by using the hammer and nail to create a few drainage holes in the bottom of the cans.
- If you are planting edible plants in your tin cans, you may also wish to line them with a layer of bubble wrap and add a single layer of small stones on the bottom of the can.

- Knit Cover for large 28 oz Can (12½" around with a 4" opening):Cast on 52 stitches on size 7 circular needles. Place a marker and join to begin knitting granite stitch in the round as follows:Row 1: Knit aroundRow 2: P2 tog aroundRow 3: KFB aroundRow 4: Knit aroundRepeat these four rows until piece measures about 4½". Bind off. Weave in any ends.(See notes below if you would like to knit granite stitch on straight needles).
- Knit Cover for Medium 19 oz can (10½" around with a 3¼" opening):Cast on 38 stitches on size 7 straight needles. Begin knitting Hurdle Stitch as follows:Row 1: KnitRow 2: KnitRow 3: K1, P1Row 4: K1, P1Repeat these four rows until piece measure about 4¼". Bind off leaving a long tail. Thread the long tail into a blunt, large eye needle and sew seam to create a tube shape. Weave in any ends.
- Knit Cover for Small 15 oz can (9¼" around with a 3" opening):Cast on 35 stitches on size 7 straight needles. Begin knitting Half Linen Stitch as follows:Row 1: *K1, yarn forward, Slip 1 purlwise, yarn back. Repeat from * across row ending with a K1.Row 2: PurlRow 3: K1, *K1, yarn forward, Slip 1 purlwise, yarn back. Repeat from * across row.Row 4: PurlRepeat these four rows until piece measures about 4¼". Bind off leaving a long tail. Thread the long tail into a blunt, large eye needle and sew seam to create a tube shape. Weave in any ends.
- Slip your completed knit covers over the tin cans. I use a long-tail cast on and like how this edge looks at the top of my cans. You can easily remove the knit covers when watering the plants too.

Notes:

This is great and I liked this so much.