Towel Topper Knitting Pattern
These knit tops for towels are a great way to use up odds and ends of yarn, and if you like to knit then you always have bits of yarn in you stash! Plus these towel tops create something useful for your kitchen, and they can be a quick homemade gift too.
This pattern is my adaptation of an “oldie but goodie” pattern I cut out of a magazine many years ago. In fact my original pattern is old enough that the instructions for creating holes in the towels for your beginning stitches said to use an ice pick. I don’t know about you, but I ain’t got no ice pick 🙂
The original pattern also had you cutting your towel in half and sewing the top with seam binding (ain’t got any of that either!)
So instead, I’ve modernized my old pattern to use a crochet hook to pick up the stitches, and I don’t cut the towel in half anymore either. I found it was just as easy to fold the towel in half and pick up the stitches through the double layer of towel. This saves the time and effort of cutting and sewing the towel, AND it gives you a nice double layer towel when you’re actually using it to wipe your hands.
Another nice modern twist? Many times the dish towels I find at the dollar store work the best. This pattern goes a little easier with towels that have a loose enough weave so you can poke through to pick up the stitches and sometimes the towels I find at the dollar store fall into this category.
I also find that some of my older, basic, knitting worsted type yarns in my leftover stash work best for this pattern too. They’re not quite as stretchy as some of the newer, softer yarns.
Picking Up Stitches to Begin Your Knit Towel Topper
The only slightly tedious part of this pattern is picking up the stitches on the top of the towel so you can begin knitting. I adapted my old pattern to use a few less stitches to make my new version a little easier. Here’s how I do it.
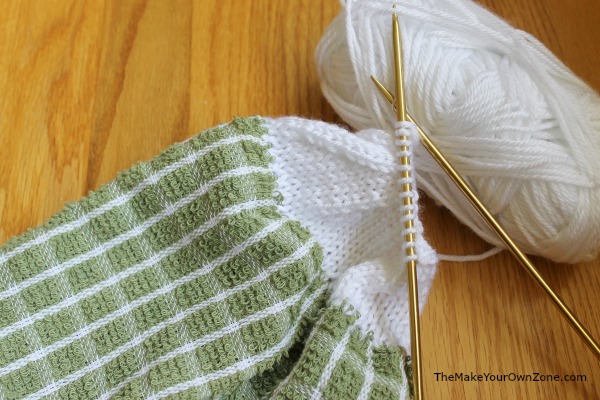
I fold my towel in half. (It can be helpful to pin the edges of the towel too to keep things in place).
I use 42 stitches to begin this pattern, so I figure out how I will space out my 42 stitches evenly along the top of the towel. I do not pick up stitches at the very edges of the towel in the edge binding. It’s usually too hard to poke through that area.
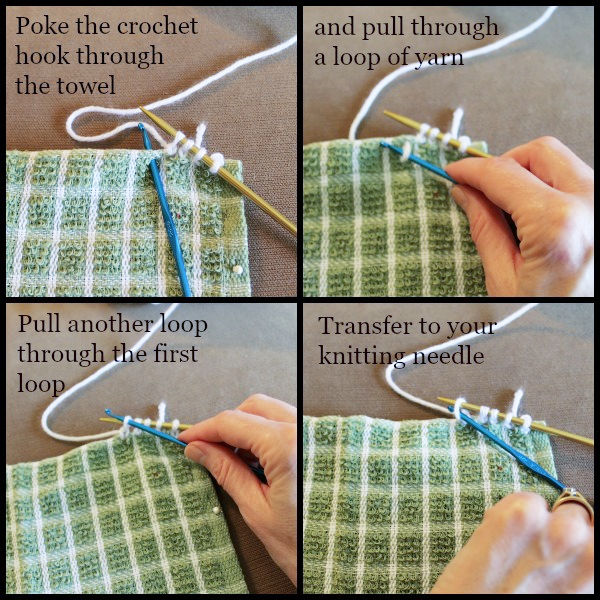
I use a crochet hook to poke through the towel and pull the yarn through (from the back to the front). I usually use my size F crochet hook although the size of the hook doesn’t matter too much.
I then pull one more stitch through the loop with my crochet hook (as if to single crochet). I then transfer that loop onto my knitting needle. I proceed in this way across the top of the towel, working from right to left, until I have all 42 stitches on my needle.
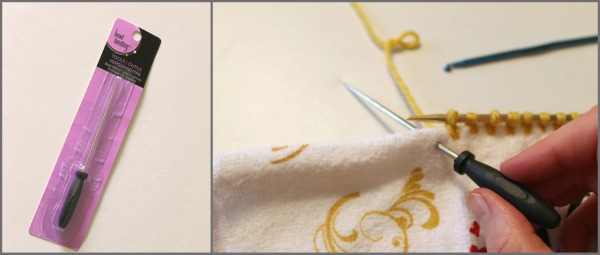
Update: A reader shared that a bead reamer can also be a good tool for poking holes in your towels. I gave it a try and it works very well! This is a tool you can often find in craft stores in the beading area, and it is normally used for clearing out the holes in beads for easier stringing.
In addition to the photos above, I thought it might be helpful to see what I’m doing as I pick up the stitches so I made my very first ever video tutorial for this blog. As with many things that are a first try, you learn as you go and future tries usually improve. Nevertheless I hope this beginning effort at a video will still allow you to see the process of how I pick up the stitches at the top of this knit towel topper pattern.
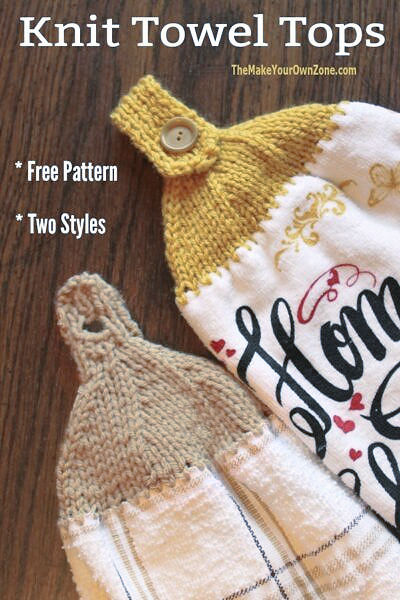
I’ve also adapted my pattern to include two options for the top portion of this pattern. You can either make a longer tab with a buttonhole that’s intended to hang over a bar or handle – OR – there’s a shorter top version that works better if you want to use the buttonhole to just stick over a drawer knob.

I’ve made many of these towels over the years and I’ve always liked that not only is it a quick knitting pattern , it also allows me to create something useful that I’ll be able to use for many months (and probably years) to come. Those are the kind of knitting patterns I like the best!
See more of my knitting patterns here – – > More Free Knitting Patterns
Knit Towel Topper Pattern
Materials:
- US Size 7 Knitting Needles
- Medium Weight (4) Yarn – only a small amount is needed
- Crochet Hook (for picking up stitches – I use an F hook)
- Button (if making version to hang over a bar or handle)
Instructions:
- Beginning and Picking Up Stitches At Top:To begin, fold your dish towel in half. Along the top folded edge you will pick up 42 stitches through both layers of the towel. (You do not have to try to pick up stitches at the very edges of the towel in the edge binding as it is usually too hard to poke through that part of the material.)To pick up stitches, begin at the right edge of the towel and poke your crochet hook through both layers of the material from front to back. Pull the yarn through to the front, making a loop. Then pull the yarn through that loop one more time, as if to single crochet. Transfer that loop to your knitting needle. Proceed this way across the towel, from right to left, until you have 42 stitches on your needle.(You may also find it helpful to poke holes through the fabric with another sharp pointed tool such as a bead reamer).
- Begin Knitting:Row 1: P (All odd numbered {wrong side} rows will be Purl rows until ribbing begins)Row 2: KRow 4: KRow 6: *K 5, K2 tog, Repeat from * across row (36 sts)Row 8: *K 4, K2 tog, Repeat from * across row (30 sts)Row 10: *K3, K2 tog, Repeat from * across row (24 sts)Row 12: *K2, K2 tog, Repeat from * across row (18 sts)Row 14: *K1, K2 tog, Repeat from * across row (12 sts)Row 16: K2 tog, K 3, K2 tog, K 3, K2 tog (9 sts)
- Begin Ribbing:Row 18: K 1, P 1 across rowRow 19: P 1, K 1 across rowRepeat these two rows until ribbing measure 3 inches. End on a wrong side row.Next Row: K 1, P1, K1, Bind off 3 sts, Finish last stitches in row in ribbingNext Row: P1, K1, P1, cast on 3 sts, P1, K1, P1 (buttonhole made)Work 2 more rows in ribbing pattern, ending wrong sideNext Row: K2 tog, rib 5, K2 tog (7sts)Next Row: K2 tog, rib 3, K2 tog (5 sts)Next Row: K2 tog, K, K2 tog (3 sts)Bind off remaining 3 sts. Weave in any yarn ends. Sew a large button to front of topper to line up with where the buttonhole on the topper will be when folded over a handle.
- Optional Ending for Shorter Version To Hang Over Drawer Knobs:After Row 19, do not knit the ribbing for 3 inches. Instead, just proceed with the pattern instructions to work the buttonhole and continue on to finish the pattern. There is no need to sew on a button using this option.

My attempt with this pattern was a disaster. It seems that decreasing stitches was only from one end? Resulted in a really wonky topper. Was I doing something wrong?
The decreases are evenly spaced along the right-side (knit) rows. Did you perhaps not continue to work the purl rows (wrong side rows?)
I don’t understand your answer. For the decrease/purl rows do we continue to purl them or do we decrease those rows as well? Thank you.
The decreases (which are done as K2 tog) are only on the knit rows (right side). The purl rows (the odd numbered, wrong side rows) have no decreases and you just purl across the row. I hope that helps!
Do you have an idea of the diameter of the button size? it just says large.
The button is about a 1″ size
What size towel do you use? The towels I have to use are 17 inches by 28 inches, will I be able to use these?
You can use slightly different sized towels (most kitchen towels are between 15 to 18″ wide). As long as you pick up the beginning 42 stitches somewhat evenly along the top, this pattern will still work for any slight difference in towel size and your 17×28 towels should work fine.
To punch holes and cut my towel in half (to get two towels out of one) I ordered a fabric rotary cutter that came with 6 blades (2 straight cutters, 2 crimp blades and 2 skip blades). The skip blades make small holes.
Thanks for sharing that helpful suggestion Cathy – I didn’t know skip blades even existed for rotary cutters but after checking them out I think they would work great for this project too!
I love these towels, and wanted to make some for gifts.. I was wondering if you ever crochet one instead of knit one? I’m not very talented to knit. Lol but I can crochet.
Thank you
Currently I only have a knit pattern for the towel toppers because I am not very talented at crochet, but I can knit. 🙂
Please indicate the direction you fold the towel (long wise – side to side or short dimensions top to bottom —-showing it would be best.
AND are you putting the topper on the open end or over the fold?
Tks
The towel is folded in half, top to bottom. When you pick up the stitches for the towel topper, it is over the folded edge.
Thank you for this pattern. I have just retired and have been wanting to make some of these. I, too, am better at knitting than crochet, so this is perfect. I expanded the pattern for a wider towel and cast on 48 stitches; than at row 6, I k6, k2 tog to end of row and stayed with your pattern for the remainder of the project. Just a question, I am having trouble finding cotton yarn, what does everyone else use? Is wool and acrylic okay? And what about putting in dryer? Will that shrink? Thank you again.
I have used acrylic yarn on quite a few towel toppers (just the ordinary Red Heart type of yarn), and it works just fine. They come through the washer and dryer without any problems. In fact I have made more towel toppers with this type of yarn than with the cotton yarn.
Very easy knits in one evening. Make holes with skewer and crochet hook .
Th ank you Beverly. I have a friend that is handicapped and this towel will work well for her. I plan on making several
for her.
Rob Jarrad
I am so excited to find your pattern for a knitted towel topper. I have been wanting to make these but only found crochet pattern and I don’t crochet. Your pattern seems very well written with good instructions. Thank you I will be making some of these
Made it love the knit pattern
Thank you for this, a classic pattern with an update! I was looking for something to poke through my tea towels and I have a tool that came with a cookie decorating kit to pull the icing through to make designs. It looks like a lot like the bead reamer above and pokes through perfectly. 🙂
Great
My sister-in-law requested that I knit towels with toppers. I didn’t know such a pattern existed. Have only seen crocheted. WHEE!! I love making stuff for her. Can’t wait to try this.
They’re fun to make Peggy and I think you’ll enjoy knitting them!
THanks for the pattern. It was easy to follow and knits up quickly!
Another way of creating the first row of stitches is to do a blanket stitch along the top and then it is easy to just slip into the blanket stitch and knit.
That’s what I DO ALSO.
Thought could do a running stitch, but not sure how to get them on the needle.
is there a different way to attach stitches
This is the only way I know of to attach the stitches.
Different to anything I’ve seen before, thank you, I’m planning on trying out your pattern.
I bought a beautifully simple knitted towel pattern from knitpicks.com that would compliment beautifully to your knitted topper just a thought
Great pattern! Thank you! I used cotton yarn and thus when the dish towel shrank up a bit, my yarn did the same! For me this worked out well! I love the button version! Add a cute button and it adds to the cute towel!!
I want to make the shorter version with the button hole but I’m confused on where to go after row 19. It says to proceed to the button hole part.. not sure which exact line that is.
After Row 19, the next row you will do is the row that has the bind off of 3 stitches in the middle, and proceed with the rest of the pattern from there.
I am going to try this thank you.
I think you’ll enjoy the pattern Caroline!
Thanks for this pattern! I’m going to make some for Mother’s Day gifts. Can you clarify – are the even numbered rows considered the right side?
Yes, the even numbered rows are the right side rows. And yes, these towel toppers make great gifts!
Thank you so much for the excellent pattern!! I don’t know if other people do this, but I always end up picking up more than 42 stitches. Instead of ripping everything out and starting again, for row 1, I purl 2 together and space them evenly across the row until I have exactly 42 stitches. Then I continue with row 2 and knit the pattern as written. That way I don’t have to keep ripping out and trying to re-space the stitches I pick up until I have exactly 42 stitches. I used to make crocheted towel toppers until I found your pattern. Now this is my go-to pattern. Thanks again!
I tried it and it worked! Thanks for the pattern.
I’m glad you were able to make some of these towels Sue! They come in very handy. 🙂
Do you start by going up inside the towel with a knot ? If not, how do you keep yarn from coming apart/or out of the 1st hole at starting point? Hope I’m making sense. Thank you
After you have pulled the first stitch through, you can make a small knot on the back with the tail end of the yarn to keep it from pulling through.
Thank you so much for sharing your pattern. People have been amazed when they see me knitting the towel toppers and are even more amazed when I offer them your pattern. They say that most people won’t usually share. What goes around comes around, it’s good karma. In appreciation, Jan ?
It makes me happy to know you’re getting good use out of the pattern Jan! 🙂
Thanks for sharing this pattern have been looking for some time for the knit version.
I like too make the length to the buttonhole longer so that it fits on the refrigerator door handle and is easier to button.
Glad you found a way to adapt the pattern so you can hang the towel where it’s needed most for you 🙂
Thank you so much for this pattern. I have been looking for ages for a simple knitted topper with great instructions and now I have found it. I can’t wait to make my first one. X
So glad this pattern was the answer to what you were looking for Barbara!
Thank you. I am sorry I did not look this up before. I know how to knit better than to crochet, and am teaching my little one. It will be a nice gift for relatives, teachers and such for Christmas. We are leaving on a car trip and if she doesn’t get car sick, this will be so fun for her to do. Thanks so much for the video and easy direction!
This is indeed a fun and quick project Helen and perfect for a car trip!
Found this pattern and I am a beginner knitter and my Aunt asked if I could make the towel toppers. This pattern looks simple and I hope to have fun shopping for towels at the $ stores to do these. Thank you for the video too, it really helps.
One of my favorite parts of making these towels is looking for towels at the Dollar Store too! 🙂 And I think you will find this pattern something you can complete even as a beginning knitter.
I just found the pattern. Going to try it! Hope it’s an easy one!!
Once you have the stitches picked up along the top of the towel, the rest of the pattern moves along pretty quickly and easily!
Thank you,thank you,so much.I have searched for a pattern for these forever.Never could understand the directions they gave.Then I found this one.
You give the best ,I mean best detailed directions,with video.I am so excited to make these.Thank you very much.
Thanks, I’ve knitted for 65 yrs. first time I’ve seen this and have been looking for help for a knit towel topper.
I’m glad you found this helpful Nancy and I hope you like the towels if you try knitting a few!
Much easier to knit the towel topper and sew it onto the towel, with the same yarn – that way when towel wears out you can take the topper off and put it onto another towel
Thanks for sharing this pattern i have made 3 now love how easy it was to do lol
Have put it on Ravelry page with a link back to you here hope that is ok
Glad you found this pattern easy to do – I also love how quickly I can knit one of these up! (and it’s fine to share to Ravelry too) 🙂
Nice idea , you may want to try skewers for shish kabobs , I use these to put holes in the edging of fleece fabric and crochet and edging for Christmas gifts . I tried metal crochet hooks but the holes aren’t big enough , with the skewers your can put 5-6 holes at a time judging the distance about a half inch. Hope this helps.
I like that idea Janet! Skewers sound like a helpful way to get those holes along the top if you’re struggling to get it done with just a crochet hook. Thanks for sharing that tip!
Can I use cotton yarn for this
Yes, I have made one of these towel toppers using cotton yarn. It worked fine and looked nice! The only small thing you might notice is there is not quite as much stretch in the cotton yarn for the buttonhole.
Plan to make these to match the cotton dishcloths that I knit. Thank you so much. I hate the idea of cutting the towels, and this will make them so much nicer.
The folded towel is one of my favorite things about this pattern too. 🙂
My question is, if the towel is folded, wouldn’t it gape at the sides?
Even though the towel is folded, the sides will be in the back because the knit towel topper naturally curls around the towel. So the sides of the towel are not seen when the towel is hanging up, and there is no gaping because they are in the back.
I can’t wait to make these!!!! Thanks so much. I only knit so this helps me SOOOO much.
I have cut off toppers from old stained towels and used them on newer towels that are dark in color (never could figure out why most hand towels sold are mostly white!). I also thought of cutting the too long towels, but out of laziness I folded it almost in half and really like the thickness. I don’t knit, but I can do a little crocheting. Thank you for the idea. I enjoy your browsing your site.