Make Your Own Mod Podge for Decoupage Crafts
If you’ve done any amount of crafting, you’ve probably heard of Mod Podge, a product that’s been around since the 1960’s and calls itself an all-in-one glue, sealer, and finish. It’s most often used for decoupage crafts which is the art of decorating surfaces with paper cutouts that are sealed, glued and finished. But did you know you can make your own Mod Podge? I’ve been doing this for some time now and love it!
Now I know there’s some debate on if homemade Mod Podge is as good as the real thing, but I’m here to tell you that I’ve been using my simple 2 ingredient homemade version for several years and I have always had good results and success using it on my projects – AND – I love that it’s a great money saver too.
So yes, my feeling and experience is that you can definitely make your own decoupage glue and it’s a very easy process too. It’s simply a matter of combining white craft glue and water.
Glue To Water Ratio For Mod Podge
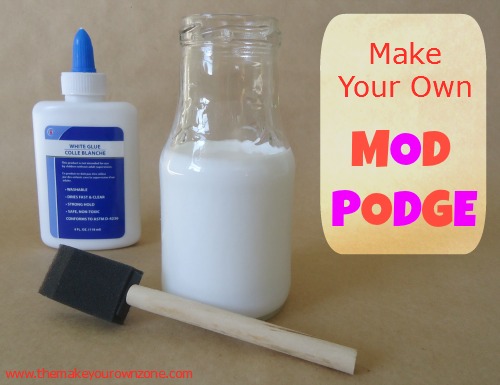
I always use equal parts of water and glue when I make my own Mod Podge. A very easy way to use equal parts is to just use the empty glue bottle for measuring the water.
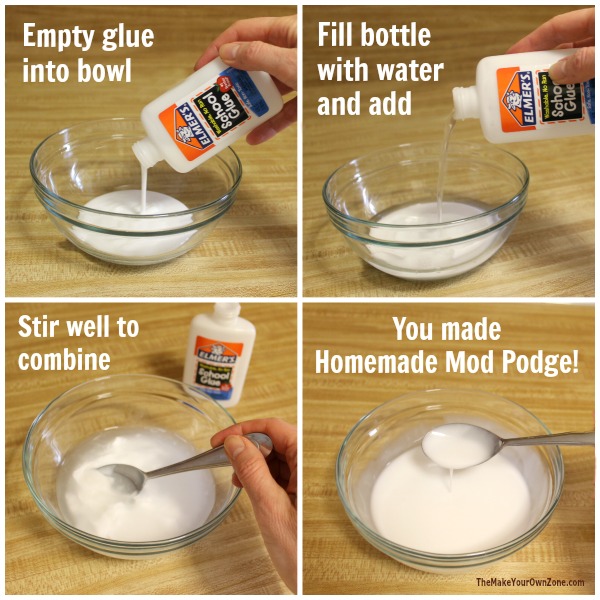
First, I empty my bottle of glue into a mixing bowl. Now that the glue bottle is empty, I can then fill it with water, (which I think is the easiest way to measure out an equal amount of water), and add that water to the mixing bowl. Then I stir the glue and water together until the mixture is well combined, and that’s it!
I made my most recent batch of homemade Mod Podge with Elmers Glue, but I have also made my homemade Mod Podge with inexpensive glue from the Dollar Store, and it worked great. So my experience has also been that you don’t have to worry about any specific brand, and that any ordinary white craft glue should work.
And of course if you would rather make a smaller sized batch of DIY Mod Podge rather than using the full bottle of glue, that’s simple to do as well. Just remember to measure out the same amount of glue and water (for instance 2 tablespoons of each), and mix them together.

Storing Your Homemade Mod Podge
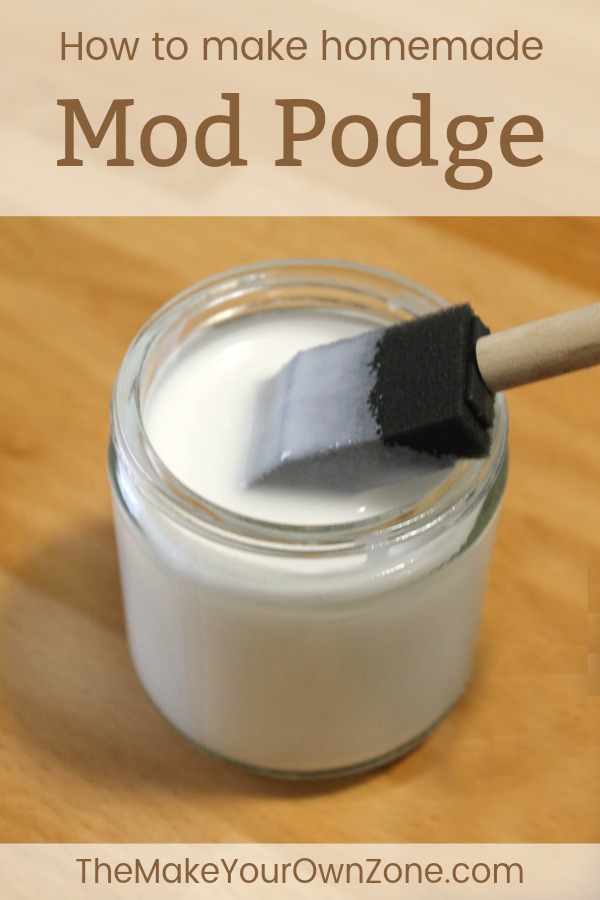
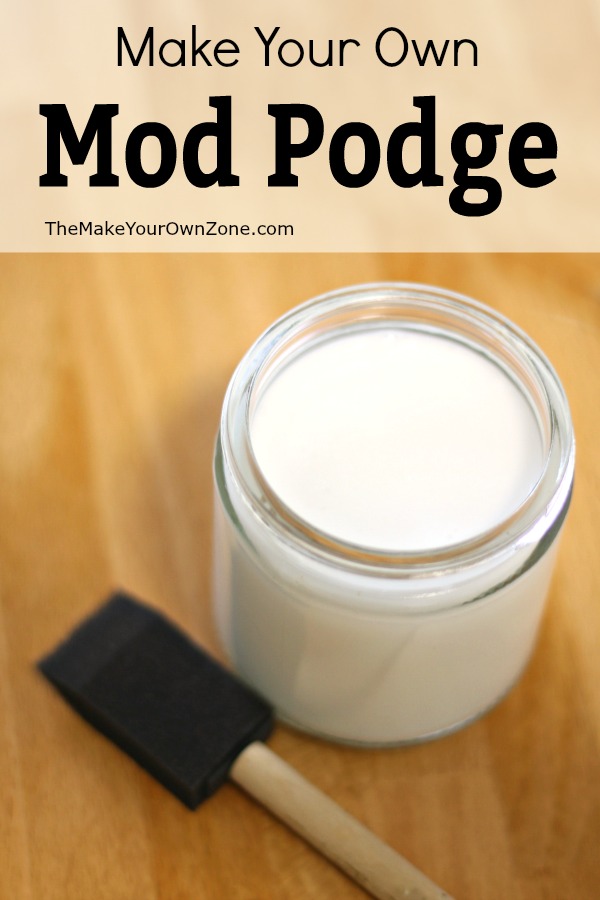
Once you’re done making your own Mod Podge, you can store it in a jar with a lid. I usually just use some type of recycled jar such as a jelly jar or something. (I love to save little recycled jars that I clean with my homemade goo gone). The jar in these photos is a recycled 8 oz Better Than Bouillon jar which was the perfect size for my most recent batch made with a 4 oz bottle of glue with the equal amount (4 oz) of water added.

I’ve also been really pleased that I’ve been able to keep a batch of homemade Mod Podge for a long time without any problems. In fact I’ve been able to keep it for months and months (and years!) at a time and it doesn’t go bad in any way.
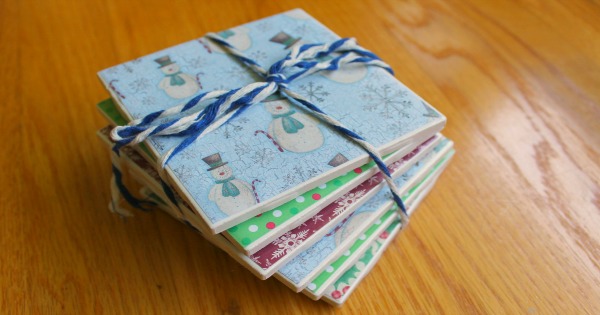
And if you’d like an idea to get you started using your homemade Mod Podge, I love, love, love to make these DIY tile coasters. I look for excuses to make more tile coasters (#truth). They’re fun and easy to make and they’re practical and useful too.
Here’s the complete printable instructions for DIY Mod Podge:
Homemade Mod Podge
Materials:
- 1 Bottle White Craft Glue
- Water (measure by refilling empty glue bottle)
Instructions:
- Empty the bottle of glue into a small bowl.
- Next, fill your empty glue bottle with water and add it to the glue in the bowl.
- Stir until things are combined together well.
- Transfer the mixture to a container with a lid for storage.
- Use in the same way as you would use store bought Mod Podge for crafting.
Notes:
This post was first written February, 2013 and was updated November, 2019. Here’s the original picture you may have seen floating around Pinterest.

thank you so much but I have a question can you use Elmer’s clear glue for making mod podge?
I have never tried the clear glue in this recipe, but if the consistency of the clear is the same as the regular Elmers glue, then I think it would work out OK.
how long do you have to let the water and glue sit after mixing it together
You can use it immediately once it’s mixed together.
Can you use the coasters to place a hot cup on?
Yes, I use my homemade coasters all the time for my cup of hot tea!
Fab, thank you. I’d read somewhere it is 1 part glue to 3 parts water? Wouldn’t that make the glue/mod podge too thin?
Yes, I think that would make it too thin. I’ve found that equal parts glue and water have worked very well for me.
Love all the helpful tips! Thank you SO MUCH for sharing! I crafted in my 30’s to 50’s and, since I’m now 80, I’ve forgotten how we made our “stuff”!!! Trying to create some crafts for my friends in our facility, and need to make it on the inexpensive side. Mod Podge wasn’t even invented when I was doing it, so I did a search. Is there a way to put this on Pinterest? I decoupaged a powder room cabinet, and my sister decoupaged her wooden out door furniture, with color comic strips!!! Thanks again!
yea thats not mod podge… that’s watered down glue. this is what i dip paper mache in because its non toxic but its definitely not how i clear coat things… it definitely has its own great uses but not like mod podge does.. i think keeping both in mind, through ur crafting ventures, can be useful though.
maybe the glue brand??
I have been interested Un Mod Podge for a long time and used it a few times and after seeing your post I’,m finally going to do something with it. BUT I don’t need costers. Ready to learn.
Will it break down if it gets wet?
I’m not quite sure what you mean by “break down”, however when I use my homemade mod podge on an item that might get wet (such as my homemade coasters), I use a coat of spray acrylic sealer which does help protect the surface.
Here’s a good idea too. I coat my coasters with the dishwasher mod podge, works great!!!!
No sticking or lifting of artwork!!’
Can’t wait to try this receipe!!
can’t wait to try this!!! Thanks!
hi there ,
my mod podge turned grey on my black background….too much glue???
thanks for the mod podge recipe to make my own. I use Mod Podge a lot sometimes… My headboard for my bed is a stained plywood board nailed to the wall .. then I took some stick on flowers and vines and then covered with mod podge…
What a creative idea for designing your own furniture! I love crafting and you filled my head with ideas bkaur….. thank you and happy crafting 🙂
I use the dishwasher safe mod podge. Would yours be dishwasher safe? Not sure if I am getting ripped off.
I don’t think this homemade mixture would be dishwasher safe. When I use this mixture to make my Christmas plates, I always hand wash them.
will the hm one turn yellow?
No, I have not had any of the plates turn yellow.
Wow I thank you for sharing every time I go to PNA to buy some mod podge but I see the price and then I don’t want to buy it because is to expensive now I can make a lot of it thank you very much God bless you
Catch it on sale on Amazon!
Big sale coming up Oct!!!
Hi Bev,
Just seen your post on Pinterest, wow this is a great help. Thank you for sharing your tips and expertise! I am only new to this and the store bought one is quite expensive. I look forward to your newsletter. Cheers Mary
Does this ratio dry without feeling tacky later??
My experience has been that it dries just fine without feeling tacky.
Simple and authentic content. Thank you💜
I have been using glue for at least 25 years now. I made a huge shell mirror about 20 years ago and not one shell has fell off ! I put the glue on thick first to make sure the shells stay on and adhere to the mirror. When you live over seas you have to improvise, and we had never heard of modge podge!
Thankyou very much
I am like other people—thanks so much for the good deal on making something I use a lot of. Thanks again!!!!
Love this idea. Thank you!
Thanks for the mod podge idea!!! I sure will use it!!!!
Je vais l’essayer. Merci.
WOW Bev. Could it be easier? Thank you.
I love this idea! Does the homemade version turn yellow eventually? Thanks!
No, I have not had any yellowing with my homemade Mod Podge.
Hi, here is a BIG THANK YOU from an avid DIYer in South Africa. I have been checking Pinterest on how to make ModPodge that I am so grateful to have found your recipe and easy-to-follow instructions! 🙏 Take care 😷
It’s great to hear that these DIY ideas can be used in many ways and in many places!
Ik bescherm mijn diamond paintings altijd met modge Podge, ik vraag me af of ik deze zelfgemaakte ModgePodge ook goede resultaten geeft????
Thank you so much!!!
Does this work for things with pages? I need something that is not going to leave a sticky finish or stick pages together.
This is not Mod Podge, it is school glue, real Mod Podge has a gel
That may be true, but as a homemade substitute I’ve had very good results with it every time!
l have been a woodwork teacher for years and agree with your recipe, Bev.
When you say real stuff has gel what exactly do you mean by that?
Gum powder? Isn’t gel made from a couple components?
When you say real stuff has gel what exactly do you mean by that?
Gum powder? Isn’t gel made from a couple components?
Hi, can this recipe work on canvas art , thanks
I have never tried the homemade mod podge on a canvas art type of craft project, however I have had good results using the homemade version in the other craft projects I have tried.
I ran across your web site,WOW! I have never tried to make Mod Podge. But now I will try it.It is very expensive in the store.Especially on a fixed income. Thank You very much! I am going to look at the other projects also.
can i use it for transformation of my pictures as well on wooden borad or glass .
I have not tried that personally with my homemade mod podge, but so far every time I have used it as a substitute for the store bought in a craft project, it has performed just as well.
Hi I’ve just read your post n going to give it a go,can I ask you if it would stick leather to wood hope you can help.
Thank you wendy
Because leather is a bit of a heavier material, I’m not sure if this mixture will saturate the leather completely enough to make it stick. But my approach is usually that everything is worth a try and I hope it’s successful if you test it out!
Hi Bev, Just found your MakeYour Own Zone page(s) and I love it! You’ve made making a planner to easy and Mod Podge, too. I have a bunch of supplies already and now I can easily organize thanks to you.
Hi, everywhere else on the internet says to use 2 parts glue to 1 part water, but I like that yours would be a thinner consistency which is what I’m needing for my projects. I’m curious how you arrived at the 1:1 ratio, and have you tried the 2:1 ratio? If so, how did they compare? Thanks!
I was only familiar with the 1:1 formula and didn’t know some folks use the 2:1 formula! I’ve been happy with how mine has worked using equal parts so I think I’ll be sticking with it.
hi Beverly…..this is in part my question from above. I did a 2;1 and am thinking that’s why result on my black background for painted rocks is grey and cloudy.
Very interesting. Going to try it today, How long will it last. I havent done my first project, just gathering research as the do’s and not’s, along with other pointers.
Thanks
Christina
Ontario, Canada
The homemade mod podge will last a long time. I had a batch I used for several years.
How do make glossy modge podge?
Thank you
Sam🌺
I don’t have a recipe for glossy mod podge, but I often put a spray sealant on my projects made with my homemade mod podge and it gives them a nice shiny finish.
Can you tell us how to make the spray sealant, please. I was just about to buy some Mod Podge spray. I am a beginner at crafting and I am making paper dolls. Thank you.
I think spray sealant is something you still want to buy at the store rather than attempting to make your own.
I love your diy items!!! Thank you so much!
Would clear glue work or do I have to use white? The clear clue is Elmer’s from the dollar store.
I have always used the white glue so I’m not sure. However it seems to me like the clear glue should work in the same way so it seems like it be worth a try.
Can this be used for photo transfer to wood
I think it would be worth trying as this mixture has been a good substitute for me with every project I have tried.
Is it dish water safe?
When I make my Christmas decoupage plates with this homemade mod podge, I do not run them through the dishwasher and just do a very quick handwashing instead.
I gad to try your mod podge recipe. It was a success! Very pleased plus it saves money. Thanks for sharing.
wonderful idea, thank you, blessings
This is d best ever receipe you can ever share .Thks a ton ,God u hv saved me time & money.sometime amazone takes time to deliver. God bless u a million times for sharing this little secret.
Thank you for sharing the homemade modpog glue recipe.
Can’t wait to try it.
Thank you,
Gloria
I’m sorry, but made this three days ago. Very diappointed. Used equal amount of glue and water. Plate was not dried the next day. Added another bottle of glue and plate still not dried. What I’m doing wrong?
I’m not sure what might be causing that problem as my plates were dried in a few hours. I did make mine during the cold months when the air is quite dry in my house. Perhaps it could be a humidity issue?
Thanks! Am going to try this especially when I am home and RUN OUT now I can keep the glue on hand to make as needed.
Beverly
Thank you for your writing and sharing best site!
Thank you
Bev
After you have been here all these crafty years, I have finally found your splendid site! I am thrilled to find you and that you are so kind to share so much for us to do and learn. Your directions are easy for( even me) to follow. May your week be beautiful, sincerely, Judy,in Tn.
Thank you for your kind words Judy and I’m glad you’re finding some helpful info here!
Love the idea of making the tile coasters. I don’t see directions for creating them though. Could you help me with the instructions?
Thank you.
Sherri
Here’s the link to my tutorial on homemade coasters: https://www.themakeyourownzone.com/diy-tile-coasters-a-great-way-to-use-homemade-mod-podge/
Thanks for the DIY Mod Podge mix recipe. As an acrylic pouring paint beginning student I must find ways to be thrifty as it is an expensive art skill to learn unless sponsored or able to sell ones pieces. Sponsor anyone?
As a side note, I look forward to trying the Goo Gone recipe. Be well!
White glue plus water is school glue, no mod podge. real thing has a gel
It’s probably true that this DIY mixture is not an exact replica of the store brand, but I’ve had very good success crafting with it and I love that it’s saved me a lot of money.
It’s so much cheaper to make your own! I will make it soon! Thanks
I haven’t tried it yet but home made mod podge sound very simple to make and an awesome dollar saver.
You are so clever and also so kind to share all of your wonderful, helpful and economic ideas with everyone. Thank you so much.
Thank you so much for sharing. You said you make homemade goo-gone ?? can you explain
Just combine 1 tsp of oil with 2 tsp of baking soda and you’ve got homemade Goo Gone! 🙂 Here’s the link to read more: https://www.themakeyourownzone.com/remove-sticky-label-glue-from-glass-with-homemade-goo-gone/
Hi, my background is in construction, woodworking and virtually all of the other disciplines there in. I have a question regarding making “Mod Podge”, I should inject here I had never heard of or at least I had not committed to memory the existence of it, I read a post this week that mentioned it. We always used Elmers Glue for the projects that apparently MP (Mod Podge) is used for. Mid fifties our Cub Scouts made items using the glue version. Long story for a simple request,.. have/can you tell me, is Elmers WoodGlue MAX still waterproof if diluted by equal parts recipe alluded to above? I have a project I’m working on, hoping you might have already tried it? Thank you for your answer in advance. P.S. love the concept of your page. Makeyourownzone cool!
To make extra sure the mod podge crafts are waterproof, I like to use n spray acrylic sealer as a final coat for my projects.
Thank you for this info. I have a couple of acrylic paintings I’ve completed and have already put a couple of layers of spray varnish on them. I want them to be shinier than they turned out. Does anyone know what reaction I would get using this recipe over that varnish spray?
Can I use this homemaded Mod Podge for making a cookie dish with cloth material
It will not cone off the plate when watching it or if I make this dish to someone as a present
Because the cloth is on the underside of the plate it is safe to put food on it. However the plate should just be given a quick washing by hand as it is not dishwasher safe.
Wow! I wouldn’t have thought that it’s so simple! I’m definitely going to try. Thanks for the tip!
( Found you via Kristie Hill. :))
Yes, homemade mod podge is one of the easiest mixtures I make!
Hi everyone, I had a recipe years back, when I used to make decoupage the recipe called for vinegar ( I suppose it was a few drops? cannot remember) to be added to the mix of carpenter glue (that’s a bit thicker than Elmer’s) and water. The projects done back then (1999 to 2001 are still alive and kicking. And the coat of watered down carpenter glue (white thick like Elmer’s) which I gave the projects once dried as a finish, gave it a shiny gloss that still lasts today. Hope this helps!
Okay so i saw this diy to make a note book and it said to mod podge it will it work on that?
Yes, I think you could definitely try this DIY substitute with any project that calls for Mod Podge
Will it transfer print onto fabric
Decoupage glues are more than just watered-down cheap white glue. If they weren’t, they’d cost a lot less than cheap white glue because there’d be less actual glue in it. They contain sealers and varnishes and have better adhering qualities than school glue, which is why they are so expensive. If you want something similar, you might want to experiment with white glue to which you’ve added a water-based varnish/sealer and NO water. That would be far closer to decoupage glue than a mix of water and Elmer’s, and might last longer. I plan to try it with the artists’ varnishes that I already have, that are designed for use on acrylic paints.
I would say that’s true that the store bought formulas have more in them, and yet I’ve had good results with using watered down glue so I believe it’s still a worthwhile alternative that can work for many types of projects.
I think that it all depends on what you’re using to decoupage with. For example regular paper and tissue paper glue and water can work just fine but thicker things like leaves may require the extra ingredients
Thank you for writing this…..I’ve grown really tired of finding COUNTLESS ‘recipes’ for homemade mod podge online that amount to watered down glue. And the idea people need recipe for how to water down glue to make it less effective as an adhesive, and then recommend adding a sealant on top of that? Does anyone listen to themselves? So rather than using one product that works, people would prefer on product that works less well and a second product to cover up the deficiencies? Why would anyone do that? EXCEPT a million people do with their ‘homemade’ mod podge….. I’d be really interested poster to hear how your glue/varnish experiment worked. I plan to try the same, and this will hopefully yield far more comprehensive results that watered down glue………….sheesh…
When I was very young, in the 60’s, we used the glue+water combination for decoupage. NOT only did it ahear well but a coat of the water glue painted on with a brush gave our projects a shiny finish.
Note that the projects were not “waterproof”; but the vases we made for Mom using syrup or dressing bottles and colorful tissue paper lasted years and years.
Yes, the oldies (but goodies) often work great! This is also why I put the spray coating of acrylic sealer on my coasters, because it helps to waterproof.
To answer your question, we use it because A) 4 oz of glue is $0.50, while 4 oz of Mod Podge is over $2.50. That doesn’t matter much personally or for a project or two, but when you have a class of 20 with a $500 budget for the year, it matters a great deal. B) Not everyone lives close enough to just run to the store to get some. Regular white glue is found everywhere, even in towns of less than 500 people and we don’t have to wait two (or more) days for things to get here by mail.
Thank you for posting this. My class will now be able to do several projects I thought would be too expensive.
Yes but is it water proof like mod podge?
My project has been waterproof, but I did use the sealant which I’m sure helped.
be waterproof, finish them off with a coat of spray acrylic sealer
Thank you for this tip. I have a large project so this tip will sae me lots of $$$$!