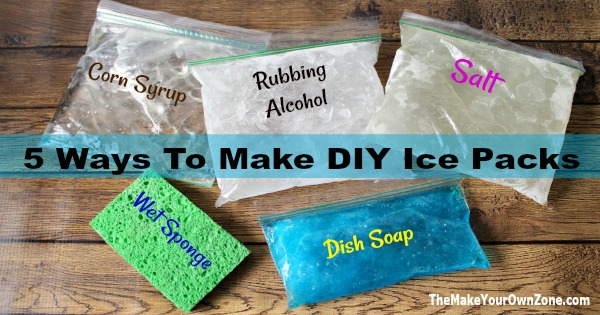
5 Ways to Make Homemade Ice Packs
Every now and then life hands you a situation that says “I need an icepack!!”
Maybe you’ve had an injury or a sprain, perhaps a hurt child needs to soothe a boo boo, someone might be recovering from surgery. . .
Or maybe you just need to keep your lunch cold. (That’s an important situation too!)
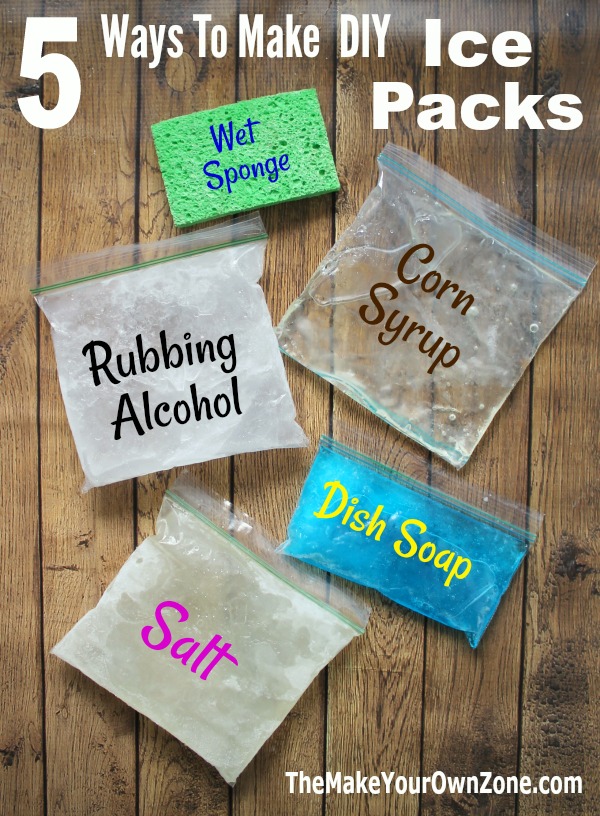
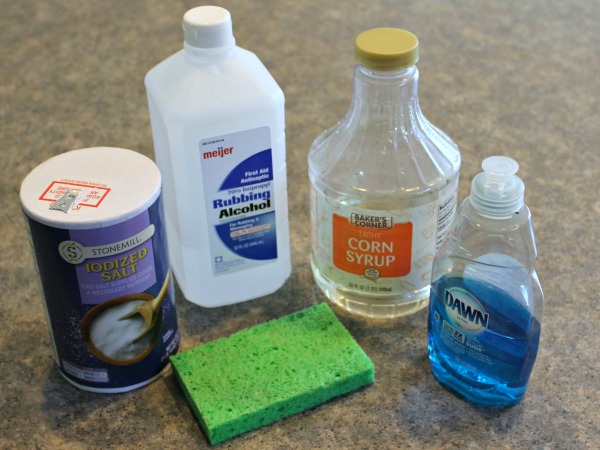
When you find yourself needing an ice pack, why not Make Your Own? I’ve got five easy ways that you can make a homemade ice pack and they’re all easy to do with using common household items that can be put in ziploc bags and then popped in the freezer. We’ll look at methods using corn syrup, dish soap, rubbing alcohol, and salt.
If you want a little extra security against leakage, you can also double bag your ice packs by putting the ziploc bag inside a second ziploc bag, with the zippered side facing down toward the bottom. And one of the methods is even easier – just use a wet sponge!
5 Ideas for DIY Ice Packs
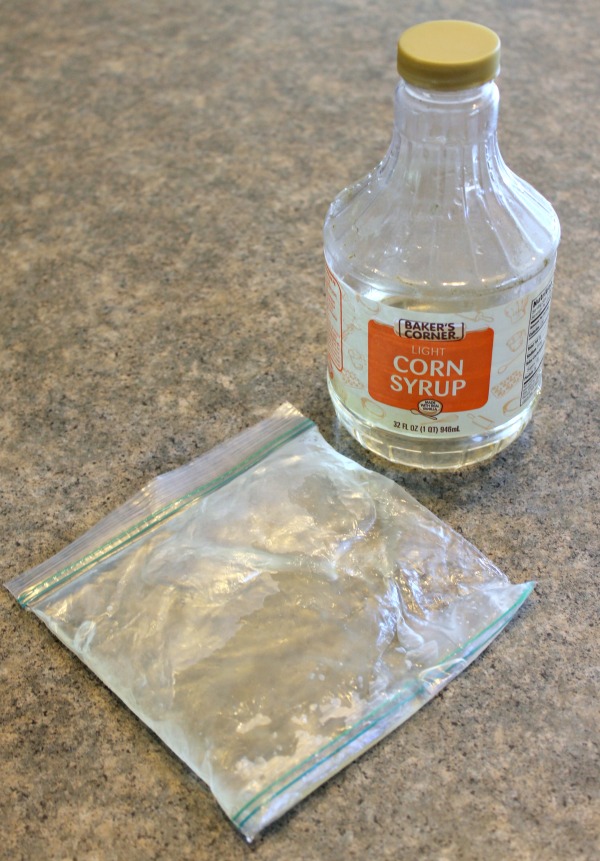
#1 – Corn Syrup Ice Pack
Corn syrup (such as a brand like Karo Light Corn Syrup makes an excellent gel type of ice pack. It stays nice and squishy and flexible and doesn’t change texture or color in the freezer. It also contains nothing harmful if it would accidentally puncture or leak in a lunch, aside from things getting a little sticky. It can be made using any size ziploc bag. Simply pour some corn syrup into the bag, seal, and put in the freezer for several hours. This is my favorite method for making a homemade ice pack and I keep one in the freezer all the time. It’s especially good for injuries because it stays flexible and can be molded around ankles, knees, wrists or other sore areas.
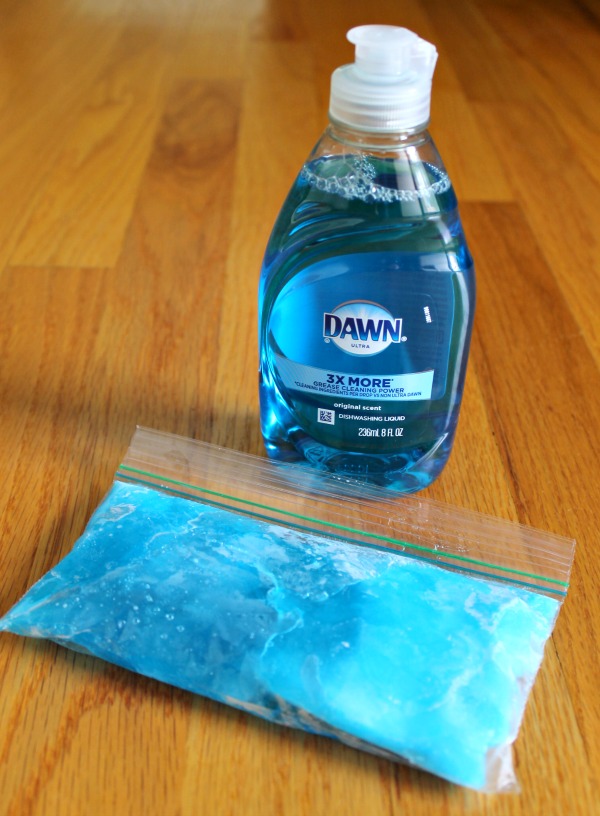
#2 – Dish Soap Ice Pack
Dish soap can also be used to make a simple homemade ice pack and depending on how long you leave it in the freezer, it can be more gel like and flexible or firmer and icier. I prefer to take it back out of the freezer after just 2 hours because then it will still be flexible and squishy (much like the corn syrup). If you leave the dish soap ice pack in the freezer for longer than a couple hours, it will be much more icy and firm. So the time frame for this method is more important, depending on what type of ice pack you want. Either way, it’s a simple method that can be made in any size ziploc bag by just pouring in dish soap. No measuring is needed. I’ve tried this method with both Dawn dish soap and Ajax dish soap which both worked well, and I would think that other brands of dish soap should work for making an ice pack too.
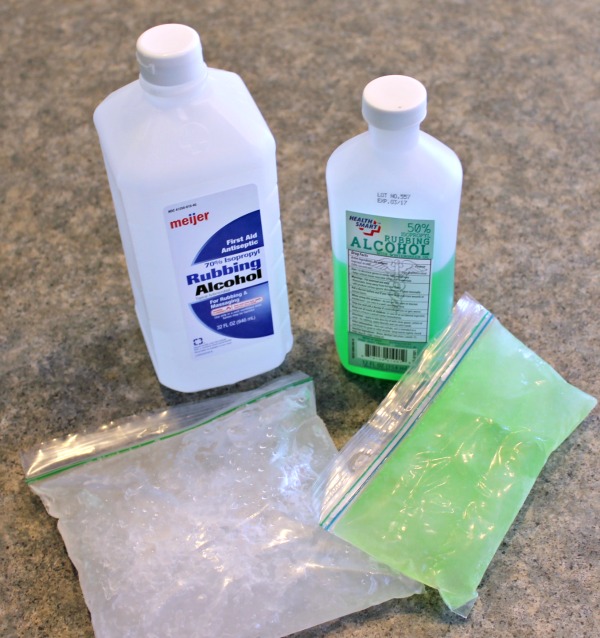
#3 – Rubbing Alcohol and Water Ice Pack
The addition of alcohol to water will keep it from freezing completely which makes it an easy way to create a homemade ice pack. To make this method in a quart size ziploc bag, combine 1½ cups of water with a ½ cup of rubbing alcohol. Seal and put in the freezer for several hours or overnight. Sometimes you can also find a Green Colored Wintergreen Rubbing Alcohol which gives the ice pack a little bit of color. I made this version in the smaller snack size ziploc bags and simply cut the recipe in half, combining¾ cup water with ¼ cup of the rubbing alcohol.
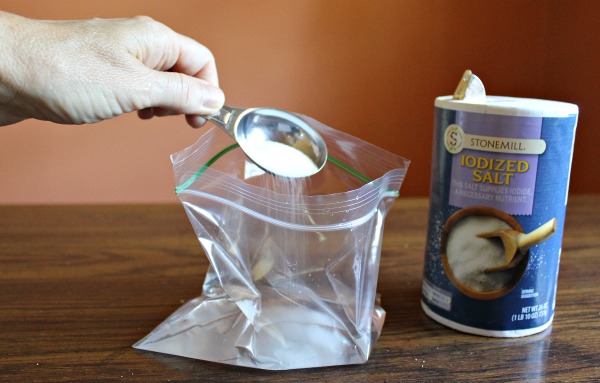
#4 – Salt and Water Ice Pack
For a really cheap and easy DIY ice pack, simply add some ordinary table salt to water. Salt is another ingredient that when added to water will keep it from freezing completely. Use a sandwich size or quart size ziploc bag and add 2 tablespoons of salt to 2 cups of water. Seal and put in the freezer for several hours or overnight.
#5 – Wet Sponge Ice Pack
Finally, you can create an ice pack by using a clean sponge, getting it wet with water and putting it in the freezer. This is a good method for an ice pack for lunches as it’s just water with no other possibly harmful substances. The sponge will be hard and firm with no flexibility when first taken out of the freezer. As it warms up it becomes moist and soft again, but not drippy. You can put it in a baggie if you want, but it isn’t absolutely necessary.
Bonus Idea for DIY Ice Packs

– You can freeze the small packets of ketchup or other condiments from fast food restaurants for teeny tiny ice packs for the little ones.

5 Ways To Make Homemade Ice Packs
Instructions:
- Option 1 using Corn Syrup: Pour some corn syrup into a ziploc bag and place in the freezer. It will become gel-like and not freeze solid.
- Option 2 using Dish Soap: Pour some dish soap into a ziploc bag and place in the freezer. After about 2 hours it will be a softer type of ice pack. If left in the freezer longer, it will become a harder ice pack.
- Option 3 using Rubbing Alcohol: Pour 1½ cups water and ½ cup rubbing alcohol (I use 70% isopropyl alcohol) into a quart size ziploc bag and place in the freezer. You can make a smaller version by combing ¾ cup water and ¼ cup rubbing alcohol in a snack size ziploc bag.
- Option 4 using Salt: Combine 2 cups water and 2 tablespoons salt (I use regular table salt) in a quart size ziploc bag and place in the freezer.
- Option 5 using a Sponge: Get a sponge wet with water and squeeze it just a bit so it is not dripping. Place in the freezer until the sponge feels hard and solid.
Notes:

i tried everything that i could find for my siatica nerve damage but your homemade icepack with water and alcohol worked almost instantly and way better than any thing ive tried
Especially loved all the ideas for DIY body ice packs. Are dish soap or sponge best for firm packs for insulated coolers outside in the summer heat? I need something that will stay coldest/longest for daytime backyard entertaining (above ground pool great for kids and parents). In a perfect world, I’d have a small (compact) 2 door fridge freezer on the patio. Even lower end ones are expensive and not recommended for outdoor use in the heat and many reviews find these fridges unsatisfactory, even inside the home. I understand there are “outdoor kitchen” fridges, but they are way above my budget. Looking for low cost, convenient solution. Dawn dish soap has less water (more concentrated) than bargain brands, but it would be quite expensive to make large ice packs for cooler. Even bargain brand dish soap would get pricey if making large packs.
Perhaps to make a large, hard-sided ice packs for a cooler, you could simply try freezing water in plastic containers. As long as the containers seal tightly, as the ice melts the water would just stay in the container. You would want to leave enough head-space in the container to allow for expansion while freezing, but I think that could work!
Thanks! This was so helpful!
You can deconstruct a cheap recyclable shopping bag that is either propylene plastic ($ dollar stores have these) or use the cheaper shopping bags with velcro closures (I have done quick sews on mine for the velcro) so you can get the pack in and out of the cover to avoid direct skin burns
Also, I have bought bargain sale scrap materials from the bin that are usually cotton or polyester. If you are worried about the intensity of the cold, a light batting lining can be used to offer that buffer
Great idea! Does anyone on here know the best small insulator for these? I have a condition called CMT and never know when my feet will suddenly need these…so I’m trying to find a good way to carry these around. I refuse to sit home!!
Thanks in advance-
Thank you for your ice bag opts Beverly..I’ve been using my Karo syrup gallon sized ice bag for a couple of years on my lower back. I didn’t have time to read more than a couple of your reader’s comments, so i’m sorry if the following tip has already been shared-when I made my Karo syrup ice bag I used the liquid food coloring to make it bright orange, but also every 6 months or so it gets a little sticky so I peel that outer, (2nd), ziplock off & replace it with a new ziplock. I love the name of your site and I will return when I have my entire evening free. Thanks again✌️
I have been using one with isopropyl alcohol and water, and due to occasional spills and refills, I have no idea what my current ratio is (have seen recommended anywhere from 1/3 to 1/1). Furthermore, I am wondering whether increasing or decreasing the proportion of alcohol will cause the bag to stay cold on my ankle longer prior to returning to the freezer. The chemistry/physics escapes me. Clearly I need enough alcohol to keep it from getting too stiff to mold around the joint, but will more alcohol keep it cold longer or the opposite? I’m thinking that the actual melting consumes more heat than the warming of a liquid (up to the point of not being cold enough to be therapeutic–?35 degrees Fahrenheit), so that would suggest the melting of water is more useful that the warming of either ingredient, so more water is better. But that is just a guess. Any ideas?
use a freezer zip lock back then super glue the seams before closing. The more water, the harder the liquid so it depends on your goals and moldability you are seeking. If you can use a cylinder that can stand up to the freezer and be a similar cricumference to your ankle, i.e. fruit concentrate in a can, partially wrap your bag around it with rubber bands or velcro straps to freeze it into shape is my suggestion
I have used the same Alcohol/water ice packs for over 5 years now. I used the best quality freezer storage Ziploc bags. I used my vacuum food sealer to seal the Ziploc bag inside with a double seal to keep them from leaking. I made sure I got all of the air bubbles out of the Ziploc bag before sealing it, then placed the zip seal at the bottom of the vacuum bag, making sure all the air was removed before sealing the vacuum bag. VERY DURABLE and work great!
Can I use Ethanol instead of isopropyl alcohol?
Yes, I think you could substitute ethanol because it also has a much lower freezing point that water does
Thank you for the options!
On the dish soap or syrup options are they supposed to also have water??? If not can you? I may sound stupid asking….
It’s OK to ask questions 🙂 No, the dish soap and corn syrup options do not need any water added. If you add water, they will be more likely to freeze more solidly as water freezes.
How long can these last in a freezer before using? I want to have them ready for postpartum, but don’t know if they can be stored for 2+ weeks before being used.
They keep for a long time in the freezer and will definitely keep for 2 weeks. I think I have had the corn syrup version in my freezer for a couple of years now and it’s just fine!
Cotton socks or a sock that no longer has a mate makes an excellent cover for ice packs. Cotton socks aren’t too thick or too thin
And now long will these ice packs. Stay cold in an ice chest? I have made them using the inside material of newborn diapers.
They will stay cold for several hours like most any other ice pack would.
Thanks for sharing these tips!
Can you refreeze used ice packs that are home made
Yes, you can refreeze the homemade ice packs. I have done that numerous times.
meths should be ok instead of surgical spirit shouldn’t it.
Made me laugh 😂
Will one method get colder or stay cold longer than another?
In my experience they are all about the same. My personal favorite is the corn syrup method.
You should only use for no more than 20 minutes at a time or you can restrict blood flow and slow recovery.
The 2o minute rule is correct, but you can move the ice around to another close by area. Example: Knee: Ice top of knee 20 minutes, move to back of knee( ice for 20 minutes), move to thigh just above knee 20 minutes. ETC. I am an RN teach this method to all surgical patients that the doctor has ordered ice therapy on. Always check with your MD prior to using ice or heat as their use is contraindicated for some surgeries.
I make with vodka instead and it congels – if it burst I drink them – sometime i eat them – it takes the pain of me then
I usually mix a cheap liquid dish soap with some rubbing alcohol. Then I use my seal-a-meal bags (roll). I can adjust the ratios for firmer or more flexible gel type ice pack & using the seal-a-meal (or FoodSaver) bags has worked out VERY well for me as they are MUCH more durable than any freezer /zip lock type of bag. I have several that I’ve had for years, literally with no problems what so ever. I also like that I can customize the size of the ice pack for whatever I may be needing to ice.
Christina Smith, may I ask how you sealed the 2nd end with liquid in it? Unless you have a system that pulls the liquid, which I might have but have never used nor understand. This is great for my Lab with advanced Lar Par now that summer heat is near. Thank you.
Freeze it first then use the sealer to seal the bags.
My Foodsaver has a seal-only option that is used to make bags out of a roll. I would assume you could use this option to seal the bag, removing most of the air by hand before sealing. Freezing first might not help, if you’re using a solution that doesn’t freeze solid.
Make the bag a little bigger than the amount of liquid in it and push all the air out that you can. You need a sealer that will seal without vacuuming the bag so you don’t suck the liquid out.
Would hydrogen peroxide work instead of rubbing alcohol? I also have witch hazel. I don’t usually keep rubbing alcohol in the house.
No, I don’t think either of those would work. Both peroxide and witch hazel have too high of a freezing point so your ice pack will most likely freeze solid if you use those additions with water. The salt method might be a good solution for you. Otherwise, the corn syrup method is my favorite!
The alcohol one works for me every time for years now
Ella freeze water and pop bottles, they will snuggle around them
Or you can go to the drugstore and buy ready-made ice packs for less than the price of alcohol or corn syrup at least. (BTW I tried the alcohol recipe and it didn’t work. The salt would be the cheapest so I will try that. But the store bought packs are a bargain because they last for years and years. I’ve had one for at least ten years and I use it regularly and it’s still usable. I once had one spring a small leak; I sealed it with tape and continued to use it for a long time).
I made an ice pack for my bunny to keep it cool, but after a couple of days I noticed that some of the water had came out. A couple days after that, I went outside only to find that all of the water had leaked out. I discovered that the corners of the ice had poked holes in the bag. I know that my bunny did not chew it, because I had made a cover for the bag and the cover had no holes. What should I do to make one that will last a long time? Using ice cubes does not create holes but after a little bit all of our ice was gone.
Perhaps you could put the ice in a disposable plastic container instead (like the lighter weight Ziploc containers you can buy at the store, or the kind sold at dollar stores). The ice should not be able to poke through those. You might want to put the empty container in the freezer for a few hours so it is nice and cold, then fill it with ice, maybe wrap it with a cover, and then put it in by your bunny.
Buy a solid plastic type ice pack like for lunches. They are less than $3 each and last forever. Plus no way to leak like soft type bag icepacks.
Freeze water in 2 liter bottles then set in rabbits cage. They will lay up against them as needed.
I am freezing in large water bottles to use in the hop-n-flop mat for my bunny:). He absolutely LOVES it!
You should only use for no more than 20 minutes at a time or you can restrict blood flow and slow recovery.
Hello! Thank you for sharing. I have been making the alcohol bags for a while and love them. For some reason lately the mixture isn’t congealing? I have tried it a few times now and it remains liquefied. They used to be gel like and perfect.
Thank you
That seems strange if it was working for you previously. Try reducing the amount of alcohol a little bit and see if that helps them be less liquid-like.
I’ve found that the felt bags that come with Crown Royal make perfect ice pack covers for the ziplock bags.
I have been using the water and alcohol ice packs for years. I have had 19 surgeries and 10-11 of them have been bone and joint fusions/replacements.With knee replacements and major foot surgery, you will use ice a long time – I had major foot surgery almost 8 months ago and still need ice if I have a day where I sit too long. We always make 2 and they keep for months of daily use. We wrap in a hand towel or dish towel before using as they are really cold.
Thanks for an interesting page. I’m hoping to try one of these methods, to make a better freezer pack out of some cheap plastic pocket flasks. The idea is that I want something that will give me maximum cooling when I put the “flasks” into a small cooler to keep the contents colder as long as possible.
Salt sounds like a good idea because I’d hope that even if it stays in the freezer for several days, it would never break the container. I wonder if the other methods would cause a stiff container to possibly burst.
If anyone has any info, which of these five methods would lose their coldness at the slowest rate?
I am a school nurse and want to make ice packs that can be disposed of safely after use. The corVicm syrup seems good as it stays soft, but concern for it puncturing?
How do I actually make it. How much corn syrup to water to fill a bag. Any suggestions are welcomed please for ideas for the school age child ice pack
The corn syrup version of these ice packs is definitely my favorite for using on injuries. I’ve never measured the corn syrup when making these and just put enough in so that the bag feels somewhat filled and squishy when laying flat, but not so full that it is stretching the bag to capacity. I just use the ordinary everyday sized ziploc bags when making these too.
I think using two ziploc bags is a way to help protect against punctures. Once you have one bag filled and sealed, put it inside another ziploc bag with the sealed edge of the bag going in first. Another option is to make a cover for the bag from cloth. I have a blog post about how to make one using fabric glue (so no sewing needed!) at this link: https://www.themakeyourownzone.com/2010/08/make-your-own-heating-pads-and-ice-packs.html
Or …put a sock on it…! ;o)
Try using a food saver or other vacuum sealing machine. The plastic is much surdier than ziplock bags and the seams are safely sealed. They can be defrosted and refrozen over and over again. Or, if you don’t wish to reuse, just slice the top off the bag, empty the contents in the sink amd recycle the bag. The bags may be washed in the sink or the dishwasher and reused/resealed if you wish.
Thanks for the ideas I didn’t have a sponge so I used a washcloth instead and it works.
To make a gallon baggie from dish soap, will I only use dish soap or mix with water?
It would probably work best if you just use dish soap. You could try diluting it a bit with water but remember that the more water you use, the more likely it will freeze harder as water freezes more solid.
Amazing ideas !!! I am 100% going to make a bunch tomorrow ? Thank you for the suggestions !
I know you’ll find these homemade ice packs to be very useful Natasha!
How long does the corn syrup ice pack take to melt. How long would it last?
Whenever I have used the corn syrup ice packs it has been for icing an injury. The corn syrup ice packs are very cold, but still flexible and pliable. So when they warm up, they don’t really melt. They are just not cold anymore and a bit more squishier than before. I would say it takes about an hour before you notice it is not very cold anymore and it needs to go back in the freezer.
okay thank you for the advice
Slight variation. I modded the core of my cooler water bottle with the salt water concept, works a charm at getting it cooler faster, and can often go for a refill before it completely melts
Which method gets coldest? Has anyone used a kitchen thermometer to check each one?
Salt style reduces the freezing point, so it gets colder faster and it retains its cold for almost 2x than alcohol. The others are not worth mentioning bc they don’t hold s candle to alcohol ot salt…
Thanks. I’m making my own cooling vest for riding motorcycles. I over heat easily so was hoping to find a good concoction that would stay cold at least an hour then I can switch out the packs with ones from my cooler 🙂
How long does it take the alcohol ones to freeze? mine has been in for about 5 hours and still no luck yet? Thank you!
The alcohol ones will get slushy but will not freeze completely. This should happen after several hours, so I’m kind of surprised that after 5 hours you have not seen at least some freezing. If it continues to not get slushy, try again with a new mixture that uses a little more water, and a little less alcohol (because it’s the alcohol that keeps it from freezing).
Does it matter if the alcohol is 91% or 71%
No, it shouldn’t matter, both should work.
You will need higher % of water with the 91% alcohol. The alcohol is what keeps the bag from freezing solid so the higher the alcohol content the less slushier it will be
I did a science fair project on this and I found that 100 mL of dish soap and 75 mL of H2O works the best. The melting average is the best.
Cool science project. What ice pack fillers did you compare?
I have my flours tripple bagged and frozen. I have found it is an excellentt ice pack. And no condensation.
Hey would you happen to know if I can use any of these to keep breast milk good, I gotta go back to work in a few days and I would like to be able to use any of this 🙂
Well, I have never used them for that exact purpose but I think they would work because they are icey cold when you take them out of the freezer and are just as cold as any other ice pack you might use.
I LOVE the ketchup packets for ice packs! Such a good idea!
As a reply to the “or you could just shop at the dollar store comment”….I am currently recovering from surgery and need another ice pack. I can’t go to the store so this is better.
That’s what I like about homemade solutions too Annie. Sometimes you need to make due with what’s on hand rather than being able to shop and that’s when DIY solutions come in handy.
Well said, Beverly. “A penny saved is a penny earned”.
Some of the dollar store dish detergents contain more water than Dawn. More water makes it more kcy and therefore freezing solid.
Or you can get a Re-freezable, re-usable SoothieQ. So much easier, safer and convenient. No toxic chemicals. Made of food grade materials and 100% Pure Water. check it out at soothieq.com
On my ice packs I use the different size zippered curtain panel bags over my zip loc bags.I also dampen an old hand towel dipped or sprayed with rubbing alcohol. I freeze several different sizes.you can scrunch it up before using.last a long time.
I use these in my cooler. Keeps things very cold. Just put them back in the freezer and ready to travel again. I do double and triple bag the ice packs. Keeps bottle waters very cold.
this is an excelent idea.I am teaching a survival class with my neihgborhood before we go on a camping trip in the woods
Do you know if you could soak the sponge in the alcohol/water solution for a less firm result?
Meagan – I’ve never tried an alcohol/water mixture with a sponge so I’m not sure how that would work. My first thought was that alcohol evaporates quickly so a sponge soaked in this mixture would probably have to be in some kind of a container or the alcohol would just evaporate away. This might defeat the purpose of using a sponge.
Do you know which of these pack will stay cold the longest?
They all seem to stay frozen for about the same length of time.
Hello! Can you advise how long that is? I need them to stay VERY cold at least for an hour! Thanks for getting back to me!!!
I would think you would get at least an hour out of these ice packs. I often use mine in an insulated bag and they last that long, but of course the insulated bag helps things along.
I use my food saver to make ice packs for the kiddos.
Great to see all the possibilities in one spot. I am making ice packs up for a team so the Rubbing Alcohol method is appealing because of the cost saving. Thanks.
I tried the salt method and rubbing alcohol method last night. I also tried straight hair gel. I heard you could make an ice pack with hair gel. It froze solid and is not flexible at all. I’m wondering if it’s because the one I got didn’t have alcohol in it. I believe hair gel typically has alcohol in it.
Also, I wonder if pancake syrup would work. It’s cheaper than corn syrup.
Sfrancisk, if you need to make lots of them, I’d go with making the salt ice packs. While rubbing alcohol is cheap, salt is cheaper and you don’t have to utilize nearly as much salt (2 tablespoons salt : 2 cups water) as you do rubbing alcohol (1:3 ratio – 1 cup rubbing alcohol : 3 cup water), which makes it extremely cheap.
how can i share this post to FB? thx
There should be a little gadget that appears to the left of this blog post where you can “Like” on facebook and which lets you share this post. You should get the option to add your own message with it too if you want. -OR- you can always just copy the URL address of this post (up in the address bar portion of your browser) and just paste it into your Facebbok post. Thanks for wanting to share 🙂
Could u explain if the salt ice pack gets hard ir stays flexible??
The water/salt ice pack combo does stay somewhat flexible because the salt keeps the water from freezing solid. It’s kind of like “slushy” ice.
Or you could just buy them at the $1.00 store.
Well that’s true, but what fun would that be? 🙂 I do my share of shopping at the dollar stores too, but I also like having alternative strategies for those times when I want to use what I have to make what I need.
True, that and if you have to use other people to do all your errands for you, this is something you defiantly want done right!
I work for two different chiropractors, and have had to purchase ice packs for a number of orthopedic issues in my life. Sure, for an emergency, a $1.00 break and squish instant ice pack can be fine, but for chronic inflammatory conditions, sometimes you need a larger overall, our something heavier. I can attest that a QUALITY ice pack purchases from a store that is large enough for orthopedic applications (especially for while rotator cuff inflammation our low back pain) is going to run you a MINIMUM of $20-$30. And as anyone who uses them frequent will yell you, it’s good to have spares, so rather than spend $60 for a couple ice packs, why not pay $20 total and make quite a few? This is an excellent way to save money, and if one punctures, you can just change out the Ziploc bag!
But, we love the idea of the malleable ice packs and our dollar store carries only the hardpack.
Sounds easy enough
So true! All these ideas are super easy to do with things you probably already have around the house.
Hi! Great article. I want to make these gel ice packs to cool my insulin while on travel. How long before they melt or lose their cool? Thanks!
You should be able to get at least a couple hours of cooling out of these ice packs, however it could be more or less depending on the temperature of the conditions you are using them in.
Also a very good idea when you’re road tripping it in an RV.
I use the small bottles of alcohol pour about half in a zip lock bag and add water to the alcohol bottle. Stays very cold. The Zip locks will leak a little after a while the alcohol bottles last a long time. I have had hambu Still frozen even after 5 hours.
Thanks so much. I have arthritis in my shoulder, and I need a chill pack, but ice is too cold . I made the corn syrup pack with my FoodSaver and some expired syrup (eew) I found in the back of the pantry. I keep it in the fridge for after PT. Terrific!
That’s great that the corn syrup ice pack is working out for you Lisa! I thought the corn syrup made a nice squishy cold pack too and most of us have corn syrup around the house (even if it is expired!)
I LOVE this idea! Definitely going to be doing this!
I shared this at Hawkes’ Health – an online health forum. http://www.hawkeshealth.net/community/showthread.php?t=11950
Thank you so much for this info. 🙂
Ooh! I love these! What a great idea to use the Zip Lock bags!
I will be featuring your ice packs at my Super Link Party on Wednesday!
If you have a blog button, I’d love to display it under Featured Guests on my sidebar for the week. 🙂