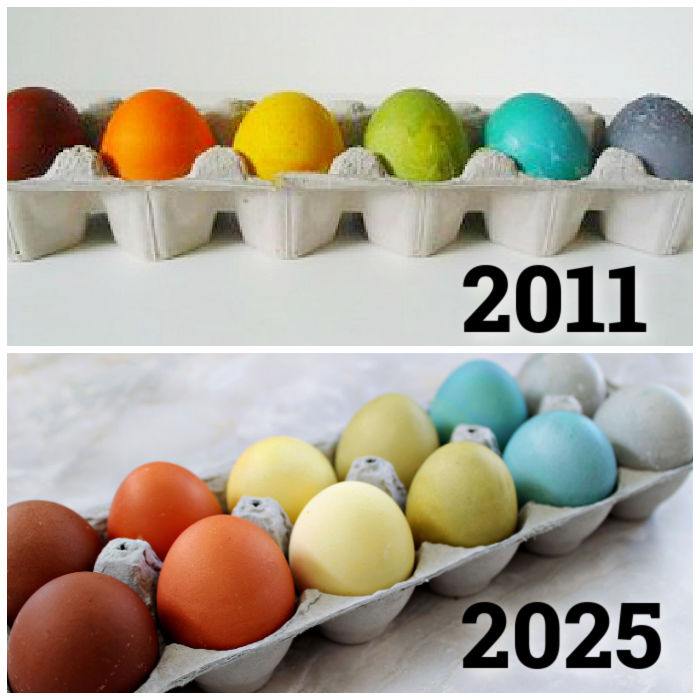
Homemade Natural Easter Egg Dyes

Looking for a natural way to dye Easter eggs this year? Why not try these simple ideas for ways you can make your own Easter egg dyes that use safe and ordinary kitchen ingredients. The end result will be a rainbow of colors and the fun of feeling just a little bit like a mad scientist as you boil and stir and transform your plain white eggs into festive Easter eggs.

homemade natural easter egg dyes

How To Dye Easter Eggs Naturally

The basic method is pretty easy. You put whatever food you’re using (which I’m going call “dye stuff”) into a small pan and cover with water. I used about two cups of water for each of these recipes. Also add a tablespoon of vinegar for each cup of water you use. Bring your dye stuff/water mixture to a boil. Then reduce the heat to low and let the mixture just hang out and simmer for 30 minutes.

After the 30 minutes of simmering, strain off the liquid into a bowl and let it cool down a bit. You can discard the mushy cooked dye stuff as you will only be using the liquid.

Then put your dyed liquid back into a pan with a room temperature egg (or eggs) and bring to a boil. Boil for at least 10 minutes for the egg to cook and the color to absorb. If after that time the egg isn’t a very dark color yet, you can transfer the liquid and the egg to a jar or other container and let it soak in the refrigerator for a few more hours until the color has darkened.

Another method is to boil the egg in the first step along with your dye stuff. This will give you more of a speckled egg, as the egg will bump against the dye stuff as it boils.

The only exception to this method is the yellow egg I made using Turmeric. (more on that below).

homemade natural easter egg dyes

A Rainbow of Homemade Easter Egg Dyes

Did you ever learn this little trick for memorizing the colors of the rainbow? You remember “Roy G. Biv” and each of those letters stands for Red, Orange, Yellow, Green, Blue, Indigo, and Violet. Well with the exception of indigo (which *ahem* is really just blue anyway), here are natural ways to make your own ROY G BIV rainbow of colors:

Red – Use Red Onion Skins

The red onion skins resulted in a very deep red egg. When I went to the produce department to buy some red onions I noticed there were all kinds of loose skins laying in the bin. So I picked through the bin and got myself a nice bagful of skins. The other shoppers probably thought I was not the sharpest knife in the drawer putting just skins in my bag instead of some actual onions 🙂 Anyway, I had quite a few skins and I think that’s why my egg turned such a nice dark color.

Orange – Use Yellow Onion Skins

For my orange egg I used the skins from three average sized yellow onions, plus all the other little loose skin pieces laying around in the bottom of the mesh bag the onions came in. The dye liquid looked light gold, but when the egg was cooked in it, it turned a very nice shade of orange.

Yellow – Use Turmeric

This was the only egg that used a different method. You simply soak a hard boiled egg in a mixture of water with some turmeric and vinegar added. I used about a cup of water with 1 tablespoon of turmeric and 1 tablespoon of vinegar. I used an old spaghetti sauce jar to soak the egg. After a couple of hours the egg was a nice yellow color with some orange specks. Be careful of your clothing and countertop, however, as turmeric can easily stain.
(I also tried this with paprika hoping to get an orange egg, but that was a big disappointment. Didn’t work at all).

Green – Use Blueberries and Turmeric

This one was the biggest surprise for me. I had tried boiling an egg directly in with the blueberries first which gave me a speckled grayish blue egg. Before I tossed out my blueberry water mixture, I tossed in about a teaspoon of turmeric and boiled another egg and Viola! It turned green! The only drawback to this mixture is the blueberries and turmeric boiling together is a bit funky smelling to say the least.

Blue – Use Red Cabbage

I used about a half a head of red cabbage (chopped up) for my blue egg. I thought at first this one was going to be a failure because after 10 minutes of boiling the egg was still pretty white. But after about 5 hours of soaking in the refrigerator I finally had a Robin’s egg shade of blue.

Violet – Use Blueberries

A blueberry dye liquid will result in a grayish violet egg. Mine was a little bit speckled too. I used frozen blueberries and didn’t measure how many I used – I just dumped some in my pan. This was another egg that had to set in the liquid for an hour or so before the color was dark enough.

Keep your egg carton container too. It makes a good place to set the eggs to dry. You can also just set your eggs on paper toweling. If you handle them too much before they dry, they can get a few white marks on them, which isn’t necessarily a bad thing. It can actually add a bit of design and interest to the eggs.

Have fun!

Need a few more bright ideas?
Sign up for the monthly email newsletter to learn about my latest content and tips for frugal homemade living.

Leave a Comment

Your email address will not be published. Required fields are marked *

5 Comments

  1. I do Easter deviled eggs. Boil the eggs, cut in half lengthwise, remove the yolk. Rinse the whites. Then take about a cup of water add a drop of vinegar and liquid food colouring of your choice, in separate glasses. Take eggs white halves and drop them gently into each glass. Leave for a few mins or until you have the shade you like. Remove to a paper towel, then fill with your deviled egg yolks, sprinkle the top of the yolks with a small sprinkle of paprika and serve.

  2. Hi Bev, I love your post on natural egg dyes! You totally inspired me to give it a try. 🙂 I’m doing an Easter link up today over on my blog…http://rustsunshine.blogspot.com. Would love it if you joined us!

  3. Hi Bev, I love your post on natural egg dyes! You totally inspired me to give it a try. 🙂 I’m doing an Easter link up today over on my blog…http://rustsunshine.blogspot.com. Would love it if you joined us!