Knitting Newborn Hats for Hospitals
This post may contain affiliate links. Please read my disclosure policy for more information.
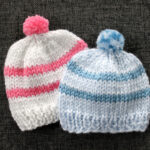
Knitters often love to find quick little knitting projects. I know I do! And that’s why I love these little knit newborn hats. Not only are they a quick knit, but they’re also a newborn size hat that can be knit for hospital donation.

I used to donate these hats through a local yarn shop that gave them to hospitals. But some of my local hospitals no longer accept homemade knit hats, so if you are knitting these for donations, be sure to check with your chosen hospital or charity first to be sure they will accept them. If they do, then you can get busy and knit up these little hats that you can complete in just a couple of hours.
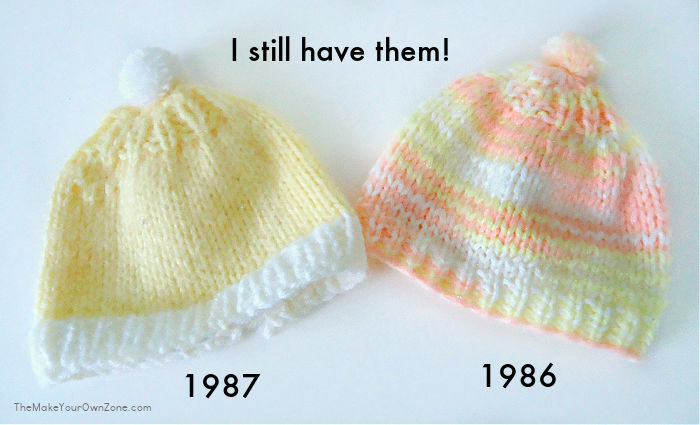
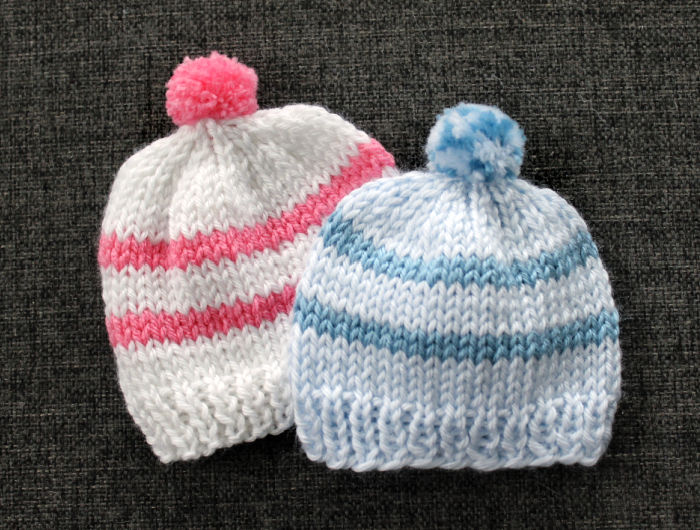
I used the baby hats my own two kids came home with from the hospital as my starting point for creating this pattern Yes, I’ve kept them all these years and I remember they fit my babies very nicely too. This free newborn knit hat pattern will make a hat the same size as the little knit hats my children were given at the hospital – about 4″ high and about a 10″ circumference.
This pattern is also created to be knit on two straight needles so it’s an easy knit for beginners as well. It uses the size 4, medium weight yarn, and I try to find a soft yarn such as the Red Heart Soft Yarn. And I always like it if I can find a pretty baby yarn with a tweed or speckled look that adds a little interest. But I also like to use two colors to make stripes and I’ll give more info below on making striped hats using this pattern.
How To Knit A Newborn Baby Hat
To make these newborn knit baby hats you will need US size 6 knitting needles and size 4 yarn (you’ll need about 35 yards per hat). There’s a printable pattern at the end of this post, but here’s also a quick look at what to do.
Begin by casting on 48 stitches. Then you’ll work in K1, P1 ribbing for 1″ (about 6 rows). Next you’ll knit in stockinette stitch (knit 1 row, purl 1 row) for 3″ ending with a purl row. Your hat will now be 4″ from the cast on edge.
Now you’ll begin the decreases for the top of the hat:
Next Row: Knit 2 together across row (24 stitches)
Next Row: Purl across
Next Row: Knit 2 together across row (12 stitches)
Next Row: Purl across
Next Row: Knit 2 together across row (6 stitches)
To finish, you’ll cut the yarn, leaving a long tail for sewing up seam. Thread the tail of yarn through a large eye tapestry needle and then pull through the stitches to remove them from the needle. Pull the stitches tight to gather. Sew the seam down side of hat with remaining yarn. Make a pom pom and fasten it to the top of the hat. I’m currently using this type of pom pom maker and they are very helpful!
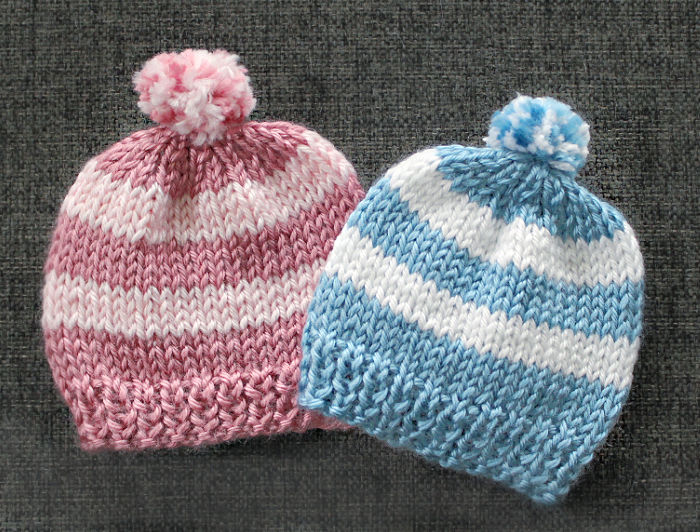
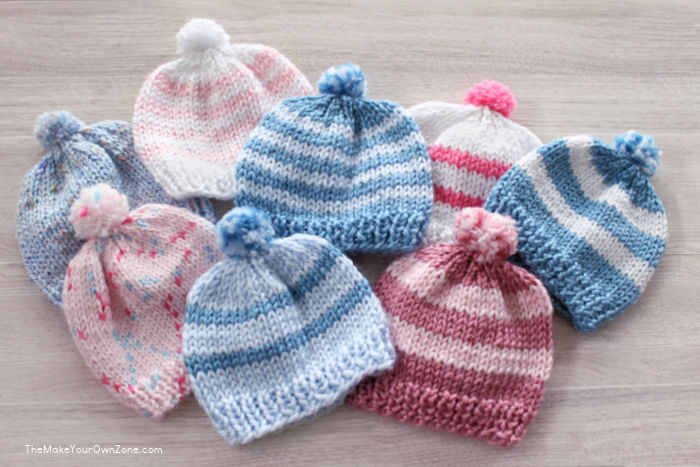
Ideas For Striped Baby Hats
Here are a few ways you can add stripes to the knit newborn baby hat pattern. I find it usually takes me 18 rows to make the 3” body portion of the hat after the ribbing. Therefore all these stripe patterns are for 18 rows but they are simple patterns that you could easily adjust as needed. I always do the ribbing in the main color, and then proceed on to do the stripes.
Note: MC = Main Color; CC = Contrasting Color
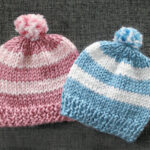
Wide Stripe Pattern:
Do Ribbing in MC
Then in stockinette stitch:
4 rows: MC
4 rows: CC
4 rows: MC
4 rows: CC (break off contrasting color)
2 rows: MC
Continuing in main color, begin decrease rows and complete the hat
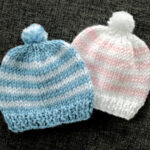
Skinny Stripe Pattern:
Do Ribbing in MC
Then in stockinette stitch:
2 rows: MC
2 rows: CC
2 rows: MC
2 rows: CC
2 rows: MC
2 rows: CC
2 rows: MC
2 rows: CC (break off contrasting color)
2 rows: MC
Continuing in main color, begin decrease rows and complete the hat.
2 Stripe Pattern:
Do Ribbing in MC
Then in stockinette stitch:
4 rows: MC
2 rows: CC
4 rows: MC
2 rows: CC (break off contrasting color)
6 rows MC
Continuing in main color, begin decrease rows and complete the hat.
So those are a few color ideas for making your own newborn knit hats for hospitals. Once you get started it’s hard to stop and the next thing you know you’ll have a whole bunch of little newborn baby hats ready for donation.
Newborn Knit Baby Hat
Materials:
- US Size 6 straight knitting needles
- Size 4 Soft Yarn (about 35 yards are needed)
- Tapestry Needle
- Pom Pom Maker (Optional)
Instructions:
To Begin:
- Cast on 48 stitches.Work in K1, P1 ribbing for 1" (about 6 rows).
Body of Hat:
- Work in stockinette stitch (knit 1 row, purl 1 row) for 3" (this will be about 18 rows). The hat will now measure 4" from the cast-on edge.
Top of Hat:
- Next Row: K2 tog across the row (24 sts)Next Row: Purl acrossNext Row: K2 tog across the row (12 sts)Next Row: Purl acrossNext Row: K2 tog across the row (6 sts)
- Cut yarn leaving a long tail for sewing up the seam. Thread the tail of yarn through a tapestry needle and then pull through the stitches to remove them from the needle. Pull stitches tight to gather. Sew seam down side of hat with remaining yarn.
- Make a pom pom if desired and attach to top of hat.
Color Stripe Ideas: MC = Main Color CC = Contrasting Color
- Wide Stripe Pattern:Do ribbing in MC, then work stockinette portion as follows:4 rows: MC4 rows: CC4 rows: MC4 rows: CC (break off CC)2 rows: MCContinue with MC and begin decrease rows to complete the hat.

- Skinny Stripe Pattern:Do ribbing in MC, then work stockinette portion as follows:2 rows: MC2 rows: CC2 rows: MC2 rows: CC2 rows: MC2 rows: CC2 rows: MC2 rows: CC (break off CC)2 Rows: MCContinue with MC and begin decrease rows to complete the hat.
- 2 Stripe Pattern:Do ribbing in MC, then work stockinette portion as follows:4 rows: MC2 rows: CC4 rows: MC2 rows: CC (break off CC)6 rows: MCContinue with MC and begin decrease rows to complete the hat.

Nice easy pattern that knits up quickly and is perfect for new born babies
I have quite a few bay hats I have knitted my local hospital don’t want them they have enough for now , I would like to donate them to a hospital that need them can u help .?
Thank u
One charity idea would be to send them to Preemies of the Carolinas, a charity that supplies little hats and blankets to NICU’s of hospitals. And even though their site says “preemie” hats, their page about hats has info for the different sizes and says “3-5lbs most popular and most needed / 1-3lbs / 6-8lbs / 9-11lbs / Newborn” so I would think the hats you’ve already made would be accepted. They particularly like to receive little hats that are holiday themed.
Thank you so much for these hat pattern ideas. I hadn’t knitted for years until there was a tiny little girl born into the family (a great-niece!) and decided to try. I bought a pink ball of yarn and a graduated type with different colours in – before I knew it, I had knitted three hats in one night!! Thanks again.
PS For UK info, I bought DK yarn for babies and I used 4mm pins (the 6mm made the hat up too big for this 6lb baby girl!). I will do a selection though for the hospital – so they might suit small or larger babies. I used the very same measurements of knitting rows for the 6mm but they came out more inches than the pattern – the 4mm worked perfectly for me. I guess it is also to do with the tension of the knitter! It’s such a good pattern you can play around with it size wise and colour/stripe wise too! Thanks again. xx
is this pattern only for newborn or can I use it for knitting for preemie babies as well
This pattern makes a very small hat, but preemies would probably need it just a bit smaller. You could maybe try casting on 44 stitches, and knit to about 3.5″ before the decreases.
thank you for sharing your pattern and variations for the stripes.
great idea to knit for hospitals, thank you for sharing.
thank you for the pattern it is super cute.
Thanks for your great pattern. I am addicted now! Best regards, Elizabeth
I see this is for a newborn, how many stiches would you cast on for a 9 month old baby?
I love ❤ your simple baby hat pattern. I’ve now made around 6 so far. It’s great for using up all those ends of balls that I would normally just hoard forever. Now they’re going to the maternity and neonatal units close to me. 3 of my 4 children were born locally and all 13 grandchildren, plus a great one on the way, it’s a great way to give back. However, I’ve now got orders for the Great Granddaughter to do. All 13 Grandchildren are great too though. lol. But no doubt when I’ve finished these orders I’ll have lots more end of balls to use. So thank you for enabling me to get rid of them without putting them in the bin, which I can’t do. Nooo, I’m a wool hoarder. Aar well, that’s life. 👌
I also love finding small projects that can help me use up odds and ends of my yarn. I’m glad these little hats are helping you put your yarn to good use too.
I have made a few of these for our hospital and am now doing a few for the ambulance service. pom poms font stand up well in the hospitals
aundry so I’d leave them off even though they are really cute.
what happens to the pom poms in the hospital laundry? Just wanted to know before I make pompoms. Melissa
I don’t think the hospitals are laundering the donated baby hats. My understanding is the new knit hats are given to newborns to wear in the hospital and the parents can then take the hats home.
What size circular needles would I use for this pattern. I have 16″ and I think it would stretch it too much.
Thank you
I have made this pattern using 16″ circulars and it is a bit tight getting started but it does work out. I change to DP needles for the top of the hat if using circulars.
Super fun trying this out for a baby care unit in Glasgow for sick or newborn babies who are just so tiny can you please give me ideas on how to make it smaller please thanks
Enjoying your blog! Would love to get your newsletter! Thank you!
I have been looking for a pattern for quite some time, I will give it a try.
Thank you
Do you have a baby hat pattern for loom knitters ?
I don’t currently have any patterns for loom knitting (I’m not much of a loom knitter myself).
I knit with a group in Maryland called the “Tiny Toppers”. Have found that unless all the pompoms are sewn on very tight, (some of) the hospitals will cut them off after receiving the hats. Also, I would make medium to small pompoms (not large). The requirements can differ from hospital to hospital.
I also have asked those who receive our hats in “Labor and Delivery”, if they would mind emailing me a thank you, and then I would copy their thanks and print it out and pass it around for our 25+ ladies to read. The gals who make our hats are very happy (and proud) to read the notes. It is not that the hospitals don’t want to do this, it’s that they are very busy, but do not mind emailing me the notes!! Once I remind them, then we get them on a regular basis.
Have you designed for 6month, 9month or 12month. My great niece will make an appearance in September and I’d like to have some on hand as she grows during the cold months. I thought of changing needles size for the next size but don’t think I’ll get away with that for the next few sizes. Your post was very helpful. I also agree if you have the talent share it for the community where you live. Besides its so fun to make them. Thanks!
I don’t currently have any size adjustment for this pattern, but if you wanted to play with the pattern, you would probably need to add about 1″ to the circumference and a 1/2″ to the height for a 3 to 6 month size. If you wanted to you use the pattern for a 6 to 12 months size, you would need to add about 2″ to the circumference and 1″ to the height.
What ply is 4 wool? I am from Australia. Regards Janine
The “4” weight yarn is a worsted yarn that is equal to 10 ply in Australia.
Great pattern – quick and easy to follow. I just struggled with weaving the ends together to finish it. Tried a couple Youtube videos… – Do you have any suggestions? Thank you again for the great pattern.
What I usually do for weaving in ends that has helped me is that I leave a long enough end to be able to thread it through a large eye blunt needle. I find it easier to use a needle to help weave the end through a few nearby stitches, as compared to when I used to use a crochet hook. After using the needle to pull the end through a few nearby stitches, I then trim off any excess of the end that I’m weaving in.
Thank you for the baby hat pattern I make them for the local hospital. Best wishes to you all.
Do you have a pattern with an opening for tubes to go through when baby has pressure on their brain I’ve seen some on babies in the incubators but can’t find a pattern I’ve made about 20 prem hats to donate to my local hospital and would like to make some of these as well
I don’t currently have a pattern like this, however you could probably create a small hole in the hat by just doing a YO, followed by a K2 together, somewhere on a row in the middle area of the hat.
Just what I was looking for. Thank you 🙏
I also make knit hats for hospital & other organizations. I do them in the round so as not to have a seam & our hospital doesn’t allow Pom poms. Sweaters also no buttons or snaps. Safety for the babies.
can i put all these patterns on a usb
The pattern is a pdf that you can download, and once on your computer you can save it to a USB/stick drive.
Knitting hat for new born thank you x
Great found just what I needed thankyou
It’s not a good idea to put pompoms on these little hats. The pieces of yarn are short and even tiny hands can pull them out and pop into mouths. Choking hazard. I usually finish the hats with a crocheted flower (girls) or curlicue (boys). Anchored securely to the top of the hats.
These hats are sized for and worn by newborns that are only a few weeks old before they can reach and grab for anything. By the time they are two or three months old they have most likely already outgrown these hats so I don’t think the pom poms pose any danger.
Thanks for this. It was very helpful
How would I re-gauge this for DK yarns???
Cute pattern! If I may ask, where can I get the tag used on your Pinterest page? Or did you design it yourself?
https://www.pinterest.com/pin/9218374227573537/
That is a cute tag, however it’s not my photo and I’m not even sure how it got on Pinterest!
Do you have this pattern in a 3-6 month size?
Hi can you make the hats in a larger size, 0-3, 3-6 months x
The hospitals I have dealt with do not want Red Heart yarn used. Why would that be?
I usually try to use one of the yarns labeled as soft, and Red Heart does currently have a yarn labeled as Red Heart Soft. I wonder if that would be acceptable?
Thanks for the directions! I’m not a knitter, but the details will help me for a character I’m crafting for a novel (writing is my craft of choice). I may even name her Beverly in your honor.
Well I have never had a book character named after me, so that would be totally cool. 🙂
Thank you for this quick and easy pattern.
Hi I am knitting for charity hospitals for babies birth to 3months.i came across your site and definitely going to use it and also the striped with pompoms look so cute Thank you once again.
Hi Bev, my name is Vivienne Dillon and I’m from Bangor Co Down, Northern Ireland .
I have been looking for a baby hats pattern for the hospitals and I came across your website. The hat pattern is so easy and I’ve got hooked now. Many thanks for your help. Two of my grandchildren needed care in hospital after birth and were given hats initially. I feel now I am doing something worthwhile . Kind regards.v
Thanks for the cute pattern. I knit hats for the Navy NICU and PICU here in San Diego area. Where can I get the cute “Welcome Baby ” tag? They would be perfect to attach to my hats.
The tag was pictured by someone on Instagram who used my knitting pattern, but made her own tag. I’m not sure where to find it either!
Love this hat and the adorable tag that is with it. Could you please inform us where we could get the tag information. Many thanks!
Been looking for this pattern a long time
I’m glad you were able to find the pattern here! 🙂
Thank you Beverly for all of your free patterns. They are really appreciated.
I am working on the keyhole scarf right now then the sweet baby hats for charity
Thank you! How do I do decrease if I cast on 60 stitches?
If you start with 60 stitches, I would do the last 5 rows as follows:
K2 tog across (30 sts)
Purl
K2 tog across (15 sts)
purl
K2 tog across to last stitch, K1 (8 sts)
Remove from needles and gather
Hi, do the hospitals accept hats with pom-poms?
I have donated hats with pom poms and have never heard of any objection. Always make sure the pom poms are very securely attached with any donated hats too.
I just finished my first baby hat and am very pleased with how it turned out. Thank you so much for an easy and quick pattern. Is there any possibility that you would have an easy knit pattern for a pair of booties?
At this time I don’t have a bootie pattern, but I will put it on my to-do list!
i love this pattern.
I love this pattern!! Thank you so much for sharing. You are so correct that it is addicting. I made two solid hats in three days. I am looking forward to getting some time this weekend to knit more of these adorable hats. I am going to start donating them to a local charity for children with health issues. Do you have this pattern for older children? If so, can you share with me? Thanks again! You’ve brought purpose to my life during this challenging time!
❤️🥰
Thank you for your patience and understanding you have just helped me to make a hat with your pattern 🙂🙂🙂 l have just lost my mum and fee very low and your pattern has been just what I need to keep me busy thank you ❤️
So sorry about the loss of your mum. These little hats are definitely a simple and quick project to keep your hands busy and I’m glad it could be of some help to you.
Thank You so much for sharing this good piece of information as I was seeking baby caps for my Lil princess.
Thank You so much for sharing this information about baby caps. Now it will be easier for me to know and perform the same.
Hi there. Loved making your hat. I am going to try and make it bigger.
AWESOME – I MAKE THIS HATS FOR HOSPITALS !!! THANK YOU VERY MUCH FOR SHARING.
Sounds easy to do will try as s00n as I can for our new premi great grand daughter. Thank you so much for the pattern.
I was at a loss for a pattern for someone so small.
8mm needles for uk size seems quite large, is this the size I should be using? I am very new to knitting and am trying to knit my first baby hat. What size of yarn, in uk mm should I be buying and what size of needles should I use for this? Or do you have a link for yarn that works well with this, I’m a total beginner teaching myself and have only knitted a basic baby blanket before.
Thank you!
in UK this would be dk yarn and 4mm needles. I have a similar pattern in the uk and was amazed how small it is but was assured it was fine. Good luck.
Yes, UK size 8 is equal to the US size 6 that I use for this pattern. I also use the yarn labeled as “4” weight which I believe is sometimes called Aran yarn in the UK.
Beverly,just found your patterns for the baby beanies and am starting right now to kni them up. Last year I turned 90 in Sept. well in Feb. my daughter asked me what I wanted to do for my 90th birthday and I said I was going to make 90 beanie hats in various designs for the kids at St. Judes Hospital. I finished the 90th on Aug. 21,one month before my birthday. Since my daughter and her husband and I are full time rovers,my knitting was done last year from Ga. to Ohio to Colorado and back to Ga. I have 10 great grandchildren so they have my knitting and now I am set on the newborns can’t wait. Thank you for the patterns. Margorie.
Your comment warmed my heart Margorie ❤️ I hope if I make it to 90 that I’ll be able to still knit at that kind of pace! And thank you for blessing the children at St. Jude’s with your handiwork too. 🙂
I would like to make n donate to hosp
Hi . Can you please advise me on the baby hats you have knitted. I have followed instructions. But my hat has turned out very small.i used double knitting wool on size 4 mm . Can you explain were I am going wrong please
These hats are about 10″ around so they are quite small and intended for newborns. However if yours is still a bit smaller, I would try going up a needle size and see if that gives you a little hat that has a 10″ circumference.
YOUR REPLY TO JUNE WAS FINE. THE HATS ARE EXTREMELY SMALL BUT I AM TOLD JUST PERFECT FOR PREMMIE BABIES. SO TELL HER TO KEEP KNITTING. GOOD LUCK
If I want to make a hat for a 3-6 month old how many stitches could I cast in?
I have made a slightly larger version of this hat where I cast on 72 stitches and knit the hat until it was 5″ from the beginning. (I think I had to improvise a bit on the last decrease row as the stitch count did not come out quite the same).
Fabulously simple pattern .
I loved this pattern… so so easy to do I’m making a whole bunch for the Orem babies at my local hospital!!!
THANKYOU!!!!
May I ask how you would resize these hats to make bigger for older babies please
Knitting for fifty years and this is the best instructions for making a
Lovely Pom Pom.
I am a “new again” knitter who loved it as a new mom. After my 2nd child life sped up and knitting was left behind. As a grandmother, I have begun to knit again after 50 years – yikes!
All that to say that your instructions are the best and easiest to follow that I’ve seen! I’ve researched a lot of patterns – my 4th blanket since Covid is almost done. Thanks sooooo much for your outstanding instructions! I’ll be looking for more of your patterns 😘💕
Thanks so much for your pattern. I signed up for the newsletter.
My 14 year old granddaughter, an 8th grader, is trying very hard to knit. I have not knitted for the past 7 to 8 years, but I am now interested once again – thanks to Nina.
What kind of yarm do you recommend for the newborn hat pattern?
Thanks ~ Ann. K
Denver, CO
This pattern uses “4” weight yarn (worsted) and I usually suggest looking for a soft one such as Caron Simply Soft. I hope you and your granddaughter have some good times knitting together!
Thank you so much. Such a cute baby hat. I am currently using your pattern in pink for my first grandchild. I was wondering what method you use to stitch the seam? I have only tried the mattress stitch (on a baby sleep sack) and it left a very bulky seam and I don’t think it will work for this hat.
Thanks!
Hi
I’ve done one of these using UK size 5 needles, because UK size 8 are really big, so I wasn’t sure if that was right.
I don’t suppose you can let me know the dimensions of one of the finished hats – just so I can check what I’ve produced isn’t too small?
Thanks very much 😊
The knit newborn hats are quite small. I measured one I did and it has an 11 inch circumference and is about 4.5 inches high. If you need that in centimeters that would be about a 28 cm circumference and about 11.5 cm high.
Thank you so much for posting such an easy-to-follow pattern! I only learned to knit 3 years ago (lifelong crocheter). I’m expecting my 7th baby and this is the first baby I’m having since learning to knit, so I’m excited to make some baby things.
Also, do you have a pattern for a very small baby blanket- almost like a “lovie”?
One thing you can try for knitting a small Lovey, is to use my diagonal dishcloth pattern. Just use a soft baby yarn, and make it a larger square (perhaps a 14″ square instead of the 9″ size of a dishcloth). Here’s the link to that dishcloth pattern: https://www.themakeyourownzone.com/2-ways-to-knit-diagonal-dishcloths-holes-or-no-holes/
Hi, can you knit this hat on circular needles?
If you use circular needles, this hat will get too small with too few stitches at the top to keep using them. However you could try then switching to DP’s or using the magic loop to finish things off.
Thank you for this pattern. I’m so happy to have one that’s done on straight needles
I have been knitting baby hats (new-born) every time I finish something and have wool to spare. I feel I should manage a round needle, but so far I don’t like using it much. Now I’ve been asked for similar hats for 6 – 9 months old, so I’d appreciate a pattern. All my knitting goes for charity. apart from presents for friends and family. Thank you for practical advice. Sincerely, Marjorie Quarton.
Thank you
Thank you so much for this pattern. My grand daughter has just had premmie twins at 28 weeks, so I am going to just love making these for them. Kindest regards.
Thank you! I loved your story about your two little baby hats Very generous of you to share. I hope to make some for my “wanna be a Grandmother stash” and family friends.
Just like this one
Lovely pattern and very easy to do… giving them to a local hospital for the prem babies…
Thanks for this pattern Bev, I made the small 5 hour sweater and brought the pattern forth on this hat. Such a cute gift for a new babe.
A very easy pattern to follow, thank you.
Thank you so much for the simple pattern! I’ve been knitting piles of these cuties!!!!
Do you have a pattern for the next size hat.i knitted this one and i think it’s for a prem.baby
This knitting pattern does create quite a small hat as they are intended for newborns. However if you are a little bit of a tighter knitter, yours may have turned out closer to a preemie size. When I want to make this pattern slightly larger, I cast on 72, and instead of knitting until 4″ from the beginning, I knit until 5″ from the beginning. From there you can proceed on with the decrease rows at the top.
thanx so very much great help
Addendum to previous comment. I do like baby yarn 3 weight on #6 needles. I find a 54 or 64 Cast on a good size.
When you do 54 and 64 when do you start to decrease and do you follow the same instructions for decrease as this pattern does?
I also make baby hats for our local hospital. Your pattern is pretty straight forward but I prefer a no seam. I use Magic Loop.
Hi. Do you have a picture of what the hat will look like with the seam? I’d rather not have a seam, if possible. I’m going to try it with round needles and then gather it up on the top to avoid the seam. Has anyone tried this yet?
Sorry. I meant without decreasing at the top.
I make knitted newborn hats all the time and donate them to the local hospital. I use size 8 needles – 16” circular and size 8 double pointed to finish the top. I usually cast on about 60 – 64 stitches in a baby weight yarn although I’ve used worsted weight as well (I don’t like worsted weight, they are too stiff for a baby). This pattern makes a bit bigger hat – about 28 to 30 cm. I haven’t put pompoms on mine but I certainly could. Thank you for sharing!
Thank you so much for the pattern. The hats are going to the Maternity Unit at Ninewells Hospital in Dundee, Scotland.
I’m sure your generosity to those little ones will be appreciated!
I love this pattern! But I found it to be a little small – about 28cm using the recommended 48 stitches and size 6 needles. The average newborn head measures between 32-38cm, so I think next time, I’ll need to make it a little bigger.
Thank you. Need to knit a hat and it’s a nice simple pattern for a beginner.
Thank you. Just became great grandmother again last night nd need to knit a hat for it it’s a nice simply pattern.
Thank you for the pattern, from a neighbor in Ionia. Love Country Needleworks!
I also make hats and donate them all, had75 last year I donated. Which hospital in GR takes donated hats? Thanks Pam
It would be helpful if you said what size circular needle for us beginners even though you used straight needles.
Because this is a very small hat, circular needles can be hard to use. I don’t recommend it unless you are using circulars with the magic loop method.
I have knit for years and do not know what a “4” yarn is.
This is a newer numbering system that is on all yarn now (in the info on the yarn label, there will be a small black & white picture of a skein of yarn with a number on it, the numbers go from 1 through 7). The 4 weight is the traditional worsted weight yarn. I was unsure of this system at first too as I’ve also been knitting for years, but it’s actually very helpful because there are so many fancy specialty yarns now and it’s a good way to be able to determine their thickness so you know if you can use them in a pattern.
I crochet only !
Thank you for your patterns .I’m going to try to make for a friend who works in a Maternity unit .
I’d like to knit a hat for a 2year old toddler. They live in another country so I can’t take the measurements. Could and would you help me? I thought of giving it together with a vest in similar colors. Thanks in advance
Hadass Rosenthal
I have this pattern on my clipboard. Made 25 hats for newborns using Loops & Threads yarn from Michaels last year.
This is my ‘go-to’ pattern because I can use up my stash for stripping and pom poms.
Have also made simple knitted booties matching the stripes.
Love this pattern but I found it a little small , so I will adjust it till it measures about 40cm in diameter. I used 4.5mm Aust needles and followed the pattern but it was only about 26cm in diameter . 😀
Love this baby hat! Do you have a baby mitten pattern?
No, I’m sorry I don’t currently have a baby mitten pattern. I do remember making my own pattern for knit baby mittens for my children 30 years ago, but I didn’t write down what I did. Never dreamed I would have a blog someday and the pattern might come in handy again!
Have you a premature baby booties
Dk I can print
Sorry Yvonne, I do not have any bootie patterns at this time.
Found to be relaxing,and something towards a charity
After looking for a free pattern for knitting hats for newborns and not finding anything (maybe it’s me as I am not very computer savvy) I found your site. Thank you, thank you. thank you for actually having a pattern that I could print out!
This pattern is so easy I can remember it. Changed it up slightly by doing K2, P2 instead of K1, P1 for the first six rows because I like the look better. I also used the tail cast on method because it allows for more stretch.
Agree with Beverly. Garter stitch is pretty especially with variegated baby yarn. However, using two sets of circulars and knitting in the round is all stockinette. You might want to practice the purl, though, because a ribbed edge won’t curl. Try practicing with a DK weight on US size 8s till that is comfortable then do a swatch with 6s till that is comfortable. After that you will feel like a PRO ! Happy Knitting.
Can this hat be made with circular needles and if so what size?
The top of these hats are very small so circular needles will probably not work unless you do the magic loop method.
You can use double pointed needles at the top
What do I do with the 6 stitches? I’m a crocheter and this is my first time knitting.
When you get to the end and have the six stitches left on your needle, you will cut the yarn, leaving a long tail. Thread that tail of yarn onto a blunt, large-eye needle and thread it through the stitches on the needle, then remove the stitches from the needle and pull them tight to gather them together. Then sew the seam and your hat will be complete!
I love this pattern, but how can I also make newborn. I have been making the preemie for the hospital and they would also like some for newborn. I’m a beginner knitter. Thank you.
For me, this pattern does make a newborn hat so if you are getting a preemie size you are probably a “tighter” knitter than I am. Perhaps to get a newborn size you could switch to a larger needle and/or try a heavier yarn. There are some fuzzy baby yarns that are labeled as Bulky 5 size, but are still soft and would probably work for a newborn hat.
Circulars; absolutely! The secret is to use two sets or circulars with half the stitches on each set. I usually use sets with different colored needles or different colored cables. That way you can easily pick up the right needle for the side on which you are working. There are plenty of YouTube videos which demonstrate this technique.
HI CAN I MAKE THEM IN JUST KNIT AND LEAVE THE PURL AS MY PURL ISNT VERY GOOD THANKS.
Well if you do only knit stitch you will have a much different looking garter stitch hat with a roll brim, but it might work!
great little pattern i do loads for the prem unit
This is beautiful I am trying this myself thanks for the pattern
As a neonatal nurse, please don’t knit them any smaller than 28cm or 11 inches round. Babies have big heads, same goes for their feet, dolls booties aren’t not suitable as they are too short and too narrow. Hate to see people wasting there time and wool on unsuitable items.
This was my first time following a knitting pattern and changing colours, but it was surprisingly easy, and quick to make! This is the perfect pattern for beginners (and I know my soon-to-be baby cousin will be happy too!) Thank you very much. 🙂
I’m so glad you had success with this pattern as a beginner Ruby! Small projects like this are indeed a good way to learn knitting skills.
Can u help me I need a pattern for premy baby’s for the hospital the top of the hat u can open to test baby without removing the hat I have looked everywhere can’t find one hope I wil be lucky with u Regards Margaret .
Hello! How can I get the pink or blue yarn. Love the color. Thank You
Most of the yarns I used for these baby hats were the Bernat Satin yarns that I buy at Michaels Crafts. However they change the colors they manufacture as the years go along so some of the colors pictured here might not be available anymore.
i have not made these for some time and started one with some left over yarn . how do you donate it where it is needed We used to take them to one of the Drug stores I live in the North Bay area in Northern Ontario
Helen – you could try contacting local yarn shops who might know about where knitted goods can be sent for donation. Otherwise you could contact your local hospital directly about giving them a donation of hand knitted hats for the natal unit.
Can you give the directions for a 6-12 month baby please
Thank you so much, I am a complete novice and left handed knitter and found the pattern really easy to follow. I even made the babies hat in one evening, It has given me confidence to try other things.
I love that this pattern has helped you feel confident to try more knitting projects. Even the best knitters get started in this same way. You start small and work your way up from there!
Thank you so much for the patterns. They are so clear and easy to read.
I just found out this morning that one of my best friends is unexpectedly pregnant so I am getting busy with the needles
Love this pattern, thank you for sharing.
I am looking for hat, bootie, cardigan patterns for baby weighing 2.5 lbs any help would be much appreciated.
I don’t have any preemie patterns in my stash but here is a a link to a web page with a list of quite of few preemie patterns. Maybe one of those will work for you! http://www.knittingwomen.com/35-free-knitting-patterns-for-preemie-babies/
Thanks for this lovely little pattern. I found it this afternoon and have made 2 and started looking for infant mitts pattern as well but think I can modify this one a bit. I had leftover yarn from a small baby blanket so this hat is just perfect to add to the blanket.
I did the same thing with a leftover yarn after making a baby afghan! I used this pattern to make an extra little matching hat. Works great!
Do you have a similar pattern for babies older than newborn and toddlers ?
Currently I don’t have larger sized patterns, but it’s something I hope to work on in the future.
Your pattern is one of the best I have ever seen. Your directions are very easy to follow also. I have made a dozen changing the size by changing needle size cast on number and yarn type. Most of the ones I have made however are newborn size. But I made a few changes for the other sizes. I just finished one where I used size 7 (us)needle for cast on.and the beginning rows of rib. Then changed to size 6 needles for the pattern of body.which is a simple k1 yo k2together. This produces a bit of a lacy look. I used #4 yarn . Followed the decrease row pattern you wrote. And it worked.when finished it turned out to be approximately the next size from newborn.I love all your suggested color schemes. So knitters just experiment with her pattern and adjust if necessary an increase of 4 stitches to get the size you desire. Then for decrease just divide stitches to even numbers. Thank you so much Beverley for your talent and gift to us all. Oh. Did I forget to say I LOVE THIS PATTERN!
Thanks for your kind words Martha . . so glad you have enjoyed the pattern! 🙂
Thank you for publishing this pattern, My local maternity unit is asking for hats in red, amber and green so I can use up some of my leftovers for a good cause. Great it does not need to be done in the round as that would be beyond me, kind regards from Devon, UK
Many thanks for sharing the pattern, 6th great grand child due this week so I’d better get busy.
Thank you so much. Am doing hats for Glasgow Mat and most sites ask for payment for patterns!
This is a great pattern! I have adapted it for double pointed needles to avoid the seam as well. This pattern works up quickly so it doesn’t take long to have a collection of hats ready to donate to the local birthing unit! Thank you!
Do you mean you are knitting them in the round so you have no seam, that is what I would like to do but not sure how to adapt pattern to do it .
Thank you for sharing. So often I look for patterns that are labeled free, however there usually a catch. Plus this a great community mission?❤️
I too make baby and chemo hats using the Magic Loop method thus eliminating the seam.
So sorry for multiple comments. I didn’t realize I was on the same post.
Thanks for the patterns Dorothy Sweeting
I am interested in making these hats. Can you help me to get started?
I appreciate this pattern but I would not seam a hat. I use the circular needle Magic Loop method.
I wish I was good at Magic Loop Marilyn! I’ve tried it several times but I just don’t seem to be getting the hang of it very well. For others with this same dilemma, this seamed hat is an alternative that even beginners can usually make.
I love your Knit baby hats but not in favor of seams. I use the Magic Loop technique.
I found your pattern online and am very keen to give it a try. However, I am in New Zealand and have no idea what the yarn you mentioned is. We have 4ply, 8 ply etc.
Would 8 ply (also known as double knit) be the correct equivalent? Thank you
Hi Christine – Yes, I did some quick research and the 8 ply should be the equivalent of what we call worsted yarn in the U.S. I didn’t know those terms were used in New Zealand so you helped me learn something today too!
Thank you very much – can’t wait to get cracking with your lovely pattern.
Hi! I have been making blankets/scarfs/sweaters for “World Vision” (knit for kids). They are now requesting hats and I am not good at making hats and wanted something simple. I came upon your blog —- This is great —- and for free. Most blogs wanted money for their patters. Thank you so much.
Jeannette
[email protected]
Oh Bev, these are so adorable! Looking for something to do while watching TV (need to keep my hands out of the cookie jar!!). Just had my first grandbaby so excited to try this. My goal is to get good enough to be able to donate to hospitals.
These are perfect to make while watching TV Lori! I am often “half” watching TV while my husband watches sports, news, and etc., and these hats are a nice little project to stay busy with on these types of evenings.
Great pattern. Thank you!
Sigh. Absolutely adorable. If only i had read the comments first. I need to use the baby yarn, to match thw booties etc. My hat came out doll sized. Would it work with bigger needles? I am such a beginner knitwise.
Perhaps you could try using two strands of your lighter weight baby yarn held together as you knit to get a larger finished hat.I think if you use the bigger needles with the thinner baby yarn the stitches will look too loose and stretchy, but you could give it a try.
Thank you for the pattern I loved knitting these hats knowing they are helping hospitals.
I saw the appeal on facebook. Thank you.
I will try the stockings nex they look nice and will cheer people up too. I did some mini hats for the elderly help the aged for the smoothly bottles they are so easy and fun to make.
Hey! I am so excited to start using this pattern. I have been looking for a simple pattern to make hats to donate. Just one question, though. If you were to down size them for a preemie, how many stitches would you cast on? I have a hard time down sizes things.
I’ve never used my pattern to knit a preemie size newborn hat, but my first thought would be to try making it about an inch smaller around, so I would try casting on 44 stitches. You would also want to knit a few less rows before starting the decrease rows too.
I love this pattern, but I’m a little confused! I made 5 today and they turned out great, but one turned out being 6″ tall and the rest only about 4-4’5″
Reading online it seems like a newborn baby hat is supposed to be 6″ tall, so am I somehow doing something wrong?
They measured 4″ when I started to decrease, and the rib was 1″ doing 6 rows 🙂
My finished hats are about 4.5″ and they should fit most very newborn babies. So your hats that are turning out 4.5″ are correct. I’m not sure how you ended up with a 6″ hat, unless perhaps it was a stretchier yarn.
thankyou for the pattern just knitted 4 for the baby unit will start 4 more tomorrow
Glad you are enjoying the pattern Lucy! I know the baby unit will appreciate your donation too.
How do you seam the hats? What kind of stitch do you use?
I have recently discovered Mattress Stitch which is a very invisible way of seaming. You might like to try that on these little hats.
Hi do you have a easy bootie pattern you can recommend
Thank you
Hello Beverly! Thank you so much for the knitting pattern. I am thirteen, and have been knitting for a few years. I’m going to donate all the hats I’ve made the the children’s hospital:)
That’s great Maddie! These little knit hats are a perfect pattern for when you’re learning to knit and I love that you’re able to donate the hats too 🙂
Looks good will give them a try thanks
Do you have directions for caps for older kids. My group makes knit and crochet blankets for foster children and this would be good for the leftover yarn.
Love to do older also need a pattern please
Crochet or knitting! Thnk u!
Hi, I’m a newbie. Would this pattern work on 3 DPN? I’m not good at seams. Thank you.
Yes, I think this pattern would work on double pointed needles. I don’t often use DPN, but if you divide the stitches evenly between the needles when casting on, I think you should be able to proceed with the rest of the pattern OK.
DPN works well. I’m not good at seaming either. I like crochet better.
When you use double point needles, you need to knit all stitches for the stockinette portion.
Hi Bev, Thank you for an excellent pattern. I use size 8 sock needles ( 5 short needles with 12 stitches on 4 needles) and there is no problem knitting in the round and decreasing at the top.
I wish I was better at using sock/double pointed needles. Like you said, they’re a good way to do small things in the round!
Thank you for so many great ideas for knitting hats for babies in hospitals. I have just started this project but am running out of ideas. Thanks again. Vera Staruch
Glad to hear you are enjoying some of the stripe pattern ideas Vera!
My hat turned out tiny with 20cm (8 inches) circumference…iv made it for a friends baby…are they meant to be for full term babies cause my babies had way bigger heads … 35cm (14 inches) and 36cm (14 1/4 inches) or are we supposed to make 2 sides
Yes, that sounds too small Alison. One of my finished hats with this pattern has about an 11″ total circumference. You need a gauge of about 4 stitches per inch to get a properly sized hat. Did you use a worsted weight yarn (labeled as 4)? Sometimes it’s tempting to want to use the baby weight yarns (labeled as 2 or 3) but those will result in very small hats.
Love, the hats. Just starting back to knitting after 40 some years. (very basic knitting) Would love to know if you have larger sizes. Youngest grand babies are almost a year old. (and almost 3, 3 year olds.
I have done a little bit of experimenting with some larger hats but have not really got it all figured out with a pattern to share yet. I’ll keep working on it!
Bonnie the trick to making larger hat’s is to know your tension. I knit with red heart yarn (#4) which calls for a size 7 needle. So knowing that it is 5 stitches per inch. So if someone’s head is 23 inches you will need to cast on 115 stitches (23 inches*5 stitches =115). Good luck.
I am a beginner knitter,at least that is how I feel! I have been knitting baby hats on circular needles. ( with a 16″ length). They have been coming out great. I want to do preemie hats to donate. I was a premie and I have bad eyesight because of that. So a #6US is about as small as I can handle. I also like th circular because it is difficult for me to do a nice seam. Any suggestions?
One idea for making tiny preemie hats on circular needles would be to use the Magic Loop method. You should be able to go to YouTube and find some videos of how to do it. It’s a way to use circular needles, even on tiny projects. For a preemie hat, you could maybe try casting on 40 stitches (so that the hat is a couple inches smaller around). You might have to tweak the decrease rows at the top a bit too. I think you could still use size 6 needles.
I just finished making one of your hats and it is so small I wonder if it would fit any newborn. Was very disappointed. Would it be better to use larger needles?? Maybe increase number of stitches.
Julie
Was your gauge 4.5 stitches per inch? The finished hats should be about 11″ around when finished. I have used this size finished hat on my newborn grandchildren and they fit perfectly. You could probably go up a needle size if you wanted to, if that would help you get the proper gauge, or if you wanted a slightly larger hat.
Your little hats are adorable. Could these be increased to make for 5 year olds?
I have made these in a slightly larger toddler size by casting on 72 stitches and knitting until it was 5″ before decreasing, however I think that might still be a little small for a five year old. Perhaps you could try casting on 80 stitches (to add a couple more inches around) and knitting to about 6″ before the decreases. You might have to improvise on the decreases a bit at the top too.
Love these little hats. I knit for the local hospital as well. They ask that the hats be knit on a round needle to avoid a seam that can irritate bald heads. This pattern would still work by knitting in the round.
Some day soon I hope to try the magic loop method on these little hats. I think that would be a way to knit them in the round even when they get very small at the top.
You can purchase 10 inch length circular needles on the Internet of various sizes. I use these to make the premie hats. Works wonderfully.
Hi, Thanks so much for the easy pattern for infant hats. I have not done knitting for years and my daughter sent me a link, http://abcn.ws/2um5VmR which is to raise awareness of shaken baby syndrome. Look it up it’s about Oklahoma State making Purple hats for the hospital and will tell you why it’s Purple hats. I am going to make purple hats to either send to Oklahoma or I am going to see if my local hospital will be doing the purple hats for awareness.
Thanks Again,
Linda
P.S. i will also be looking for a preemie pattern.
I’m glad you are able to use this pattern for a good cause Linda!
I make these for my local hospital but use a circular needle. When it’s time to decrease, I divide the stitches between three straight needles and proceed to the finish. It saves the need for a seam and makes for a smoother, neater look.
Hi Margaret, when knitting in the round, do you simply knit for stockinete? Also, could you explain further how you decrease (at what point) with the double pointed needles?? Thank you!!
Thanks for the pattern. This was perfect for a gift for my sister’s first kid!
Hi sue how many stitches would I need to make the hat a bit bigger? Tks
After recently experimenting making this hat a little bigger too, I would suggest casting on 72 stitches and knitting until about 6″ from the beginning, and then doing the decrease rows in pretty much the same way. This should fit about a 2 year old size.
Hi, This is a wonderful and generous project. I, especially, would love to take part in something like this. Both of my granddaughters were very premature and lived in the NICU for four months and six months respectively. One of them miraculously came home to us. They each weighed only one pound at birth. They gained a lot of weight during their stay but their lungs don’t necessarily fully develop. Fortunately, Lauren did survive. I don’t know if I remember pom poms. I’ll have to look at the pictures. I have many. These two little girls were from two different mothers. I have four daughters. I guess the hats would have to be much smaller for a preemie that size. Do you have any idea what kind of pattern that would be?
Thanks for sharing your story Marjorie, and I’m glad one of the babies was able to come home from the NICU. I currently do not have a preemie size version of this hat, but I will put that on my to do list.
toddler free pattern for a hat
Just found your blog through Ravelry. I am making this hat for a friend that just had a baby. Thanks!
Can you share a down load link for this pattern please.
Beautiful and made really fast.
I wonder about the size I got, possibly a bit small? like 30 cms circumference.
I think I will try adding two more stitches and see how it goes, just in case, since I plan to do as may as I can for a charity in Uruguay
Wonderful just the right size some hats are to big for a newborn theses are just right thank you
I use double point needles and knit these in the round. I have no seams to sew up. I have been Donating baby hats to local hospital for 12 yrs.
I love charity knitting.
I want to make a bunch of these to donate. Do you recommend using circular needles?
I have made many hats on circular needles – they come out so nice ! I would !?
I have found that these hats are too small to make on circular needles. Some folks have told me the way to make circular needles work on small items like this is to use the “magic loop” method, something I haven’t learned yet!
Thankyou for sharing x
Lovely little hat thank you! Any tips on how to make the seam sit flat? mine is a bit lumpy (even though I was careful to stitch though the very edge).
If you use circular needles , you will have no seam to knit ! There are wonderful videos on the Internet on how to cast on , knit in the round ( as it is called on circular )! And how to join in the round ! It’s not hard at all! If you can knit on straight needles , you can knit on circular ! Give it a try ! I used to use straight needles but once I switched to circular , I won’t go back ! Knit picks.com have wonderful circular needles that are a joy to knit with ! Hope that helps !?
Circular needles can be a little challenging on this pattern because the hat is so small. One option is to try the “magic loop” method, which I still need to learn myself! Circular needles will, of course, eliminate any seam. But if making a seam, I usually try to do more of a “weaving” seam to make the seam a little less bulky, picking up a stitch on one side then the other. (However that might be what you were already doing).
Is size 6, American size needles or UK thank you
It is size 6 American needles
Is there any way you wild be able to make a YouTube video and link it to this page. I’m new to knitting and don’t know how to read patterns. If you could read your pattern and then show what that means that would be great. Also in Aus we ply and it gets a lil confusing when you talk about the size of your wool.
HI Beverly,
I am a brand-new knitter and I love the look of these hats. I have a quick question about needle size am I’m not sure which size to use.
Do I use size 6.00 mm needles?
Or do I use US #6 needles?
Many thanks and many thanks for posting this pattern! 🙂
You use US size 6 needles for this pattern (this equals 4mm or UK size 8)
Hanks, Beverly! I appreciate it very much!
Just what I have been hunting for. Many thanks. They are for my local neonatal unit.
I knit on double pointed needles and find it quicker because there is no seam to sew.
Did u knit these baby hat with a straight size 6 needle or size 6 in circular needles?
Thank you
CNC FARMS
I used straight needles which is why this pattern has a seam up the back. If you knit in the round, it gets too tight at the top of the hat when you are working on only a few stitches. Some people have suggested the Magic Loop method as a solution for that.
Love this patter. so easy, so cute. very happy I found this pattern. thank you.
I have just completed 30 newborn hats to give to Save The Children as I had done some years ago, but have learned that Save the Children want ONLY cash donations. Does anyone know to whom I might donate these hats
Your local church ( my Catholic one) always has church Fall festive that raises money to help the church and charity center for meals ministeries and are always welcoming knitted items for their craft tables . We have in our area a charity group called Caring Hands and they need baby hats to give to help the needy! You might want to look into that! Hope that helps ! God bless
Thank you
Hi! I may be starting a crochet/knitting group to make baby hats for the hospital(s) in my area. Would it be ok for me to make a handful of copies of this pattern for my group to use?
I enjoyed this pattern, it’s pretty mindless and you don’t have to think as much when doing it.
I use 4 size 6dpns and divided them amongst 3 needles. 16 in each needle, and instead of purling in just keep knitting after the ribbing part.
I used your pattern with circular needle and magic loop knitting. Knitted this way there is no side seam to sew up. Loving the hats.
I’ve been experimenting with some small circular needles for this pattern too, but I have not yet learned the magic loop knitting. I will have to investigate that further!
I learned magic loop knitting from You Tube videos.
Hi, I have printed the pattern for the newborn hats. I used to knit for the tiny babies in the major hospitals in Sydney. I done this for over 20 years. I intend donating these hats to my local hospital. They are always so grateful to receive anything. My grandson had a purple hat with a big pom pom when he was born. Thank you for the patterns.
I have been knitting baby hats for my local hospital ever since I lost a grandson, 12 yrs ago. Also my 2 granddaughters were both preemies. The preemies have a hard time holding their temperatures up, and they really need baby hats to be able to survive. I love your pattern and have made 6 of them in the last 2 days. I will continue to use your pattern for the babies. Thank you so very much for this pattern. God Bless you.
Made over a hundred now for local hospital in Lancaster in Lancashire England thanks for the pattern
How wonderful! Thanks so much for taking the time to share 🙂
many thanks for sharing this pattern. I intend making these for the hospital where my grand daughters were born. Your pattern will now be worn by little babies “across the pond” in Glasgow, Scotland .
Oh that warms my heart to think of little ones over in Scotland wearing these cute little hats too. Thanks so much for your comment!
I’m fairly new to knitting and made this toque for a friends newborn. A friend of hers would like me to knit one for her 2 year old son. Could you please let me know how many stitches you would use and what size needles? Thank you!
There’s a comment up above where I gave a little more thorough explanation of the math on this same type of question, but you will probably want to cast on between 70 and 80 stitches (make sure you cast on an even number), and you will probably want to knit a few more rows too before starting the decrease rows (maybe knit to about 6″ before decreasing).
Thank you so very much. I hadn’t read thru all of the previous comments..sorry about that.
Thank you for your pattern! Casting on 48 stitches is the best sized pattern I’ve seen so far. Hospitals in my area are asking for purple hats to hand out in November to spread awareness of the period of crying babies can go through.
just what i was looking for thank you i knit for hospitals
Beverly, This may be a repeat but wasn’t sure if my “post comment” went through. Was glad I checked for a newborn cap knit pattern on internet. Our local hospital is going to be opening a maternity unit. I thought it would be nice to donate some caps as a opening gift donation. They’ll look a lot cuter than the tube ones they used years ago.
Beverly,
Our local hospital is starting a maternity unit. I had thought it would be nice to knit some newborn caps as an opening gift. At the end odf checking my e-mails I decided to check the internet for a pattern. At first I was just going to check back on the site later but noticed the one for you that specified for hospital newborn caps. Glad I decided to check. My printer is not working so I copied it by hand. Am looking forward to making them. Will let you know how they turn out and how they are accepted.
In Christian Love
A fellow kniter, Jan
I Knit new born baby hats and donate them to hospitals as my husband and I travel around this country. I use a pattern not seen here, Knit 2, Purl 2 until decreasing. I also have a crochet pattern I would be glad to share. (Hospitals I have dealt with ask that we not use pom poms.)
I made this hat on US size 6 straight needles using worsted weight yarn casting on EXACTLY 48 stitches and the hat came out way too small! It even looks too narrow to be used as a premie!
I evenly counted the number of stitches BEFORE I even started to knit because I always like to make sure that I’m doing a project right !
I was going to make this for my church’s group called caring hands! I was very disappointed since the actual pattern itself was beautiful. If I did do this correctly , then it needs to be adjusted .
Sorry your first try at this pattern didn’t go so well! This is probably a matter of gauge with you getting more stitches to the inch. I will copy and paste in here my reply to a comment above about how to adjust for gauge:
“Knit a small swatch and see how many stitches per inch you are getting. Let’s say you are getting 6 stitches per inch. You would multiply 6 times 10.5 inches (the width of the hat) which gives you 63. Round that up to an even number (64) and that is how many stitches you would cast on. You want an even number of stitches so your decrease rows at the top of the hat are easier.
So to sum that up:
1. Knit yourself a sample swatch
2. Find out how many stitches you have per inch
3. Multiply that by 10.5
4. Round that up to an even number.
That number is how many stitches you will cast on.”
Thank – you Beverly so much for responding back ! I did do a swatch and I was doing 6 stitches per inch . You were right my stitching was very tight and I definitely am going to do that hat pattern again – since it’s so beautiful and easy to do !
I have a few questions . When it says in the directions , ” Piece will measure 4″ inches from the begining will my piece still be measuring 4″ even though my stitches will be more?
Do you happen to know what yarn brand was used for the blue hat with specks of light brown in it ?
Thank – You so much for your patience and time !!
Glad a sample swatch helped you with the guage issue. Here’s the answers to your additional questions: (I’m always happy to answer questions 🙂
1. Yes, you will still want to knit until it is 4″ from the beginning. To knit until you have a certain measurement gives you the control of how many rows you need to knit to get to the correct length.
2. The blue yarn with the flecks of colors in it was a yarn I bought at Hobby Lobby that I believe they don’t carry anymore. I think it was called “Little Britches” or something like that. The last time I looked I couldn’t find it. Sometimes though they end up replacing a discontinued item with something similar. It’s always frustrating when manufacturers stop making something you like!
I made this hat for my own son while I was pregnant with him. I used the bernat satin white and it turned out so beautiful!! I like to use the smallest loom to loom hats for newborn babies in the hospital, as I can make many more of them with the loom in the amt of time it takes to loom up this hat, but for those special gifts for friends, I will always use this pattern. It’s very special!! 🙂 thanks for sharing!!
This is a great pattern! Do you know how many more stitches to cast on for a size bigger? Like maybe for around 6 months? Thanks!
To make this hat a little bigger, you are probably going to want to add an inch or two to the size of the final finished hat. My gauge with this pattern was 4.5 stitches per inch. So to add a couple more inches, you would want to cast on about 8 or 10 more stitches (because you need an even number). The decreases at the top would still work in the same way (knitting 2 together across the row).
your hats are adorable love your site nice work.love the uncomplicated pattern.
Hey! How would I make this for an adult?
To make this hat for an adult you will have to do a little math. You will need to know the circumference of an adult head and how many stitches per inch you are knitting (do a small sample swatch with the yarn you want to use to figure that out). Now let’s say for instance that the head circumference is 22 inches and you are getting 3 stitches per inch. You would multiply those numbers to get the number of stitches to cast on (in this example you would cast on 66 stitches). You could follow the pattern from there, doing the decrease rows at the end in the same type of way. I have never tried making this for an adult, but that would be the method you would use to give it a try. Just make sure you cast on an even number of stitches. Hope that helps!
Hi,
Thank you so much for the beanie patterns. My new grandson arrives in 9 weeks and winter is just a few weeks away in Australia. I also have twins due around the same time. I have knitted beanies for premmie babies for many years until I was diagnosed with early stages of MS. I desperately wanted to do a shawl for the new baby ( 4 years work) and he will need beanies as well. Thanks again for sharing your pattern as my pattern book was borrowed and not returned. Regards Robyn
So glad you found the pattern helpful. Enjoy the new grandbabies 🙂
I just knitted this pattern in pure white and i love it. I used size 4.5mm neddles and it is rather but very streatchy.thank you so much for sharingthis patter
Yes we have just started a Knitting and prayer group at our church to make gifts for people in need. Shawls, baby clothes etc so this will be included. Thank you once again
I have just made this hat and I am so pleased with it. I was given some pale blue shiny wool (no idea what type it is) but thought I would just try this out as it seemed a nice simple pattern to try. I used 3.75mm needles and it has turned out great. Small but fairly stretchy. Thank you I will be making this again.
So glad your hat turned out and that you found that pattern helpful.
Thanks so much for this pattern – it’s just what I was hoping to find! I am getting ready to knit one (or more) of these hats for my newest grandchild (due in April). I’d like to use DK yarn instead of worsted. How should I adjust the pattern to use DK yarn so the hat is the right size?
Marilyn –
You will want to knit yourself a sample swatch with the DK yarn to see how many stitches you are getting per inch. These hats are about 10.5″ wide (when laying flat before the final seam is sewn). This means you’ll have to find out how many stitches you have per inch and then multiply it by 10.5 to get the total number of stitches to cast on, remembering that you want to cast on an even number of stitches.
For instance, let’s say you are getting 6 stitches per inch with the DK yarn. You’ll want to multiply that by 10.5 which would give you 63 stitches. You would then round that up to 64 to have an even number and cast on that number of stitches. From there you should be able to follow the pattern along with a few minor adjustments.
Wonderful! Thanks so much for the help – I’ll get started right away on my hats with confidence they will turn out just right using the DK yarn!
Thank-you for posting this pattern. I’m so happy with my hat…now I just have to wait to try it on my baby girl when she arrives! Do you have a similar pattern for baby Booties?
It’s been many years since I knitted booties but I know I have some patterns somewhere! I’ll look them up again 🙂
im expecting my second baby and was gutted when i couldnt keep the first hat my son wore as it was hospital property so am looking up on how to make my own to take with me. im not an experienced knitter at all, only knitted squares or rectangles, if there any way i can learn to make these as i dont understand your instructions. thanks
That’s a bummer that your hospital doesn’t let you keep the hats 🙁 This pattern is pretty easy for beginners. The basics that you need to know for this pattern are how to cast on (put stitches on your needle so you can get started), know how to purl (so you can do the ribbing which is knit one stitch, and then purl one stitch and keep doing that all the way across a row), and you need to know how to decrease (make fewer stitches on your needle) by knitting two stitches together at a time. If you can do those things, you can knit these hats. Perhaps you could watch some YouTube videos to help you learn “How to do Ribbing” and “How to Decrease” and then start making your hats!
Thanks for this pattern. One of my friends is due to have her baby in 3 weeks and, although she loves hand knits, she doesn;t want anything “fussy”. This little hat is perfect for her and knits up so quickly – I’m making loads in all different colours to match the cardigans I’ve already made. Thanks for sharing this 🙂
I love how fast these knit up too. Like you said, you can knit up a bunch in lots of colors!
Thanks so much for sharing, Im fairly new to knitting and find it so hard to find patterns that are simple to follow. Thanks again x
I love these hats! hey are easy to do,and will even stretch a little to fit a variety of newborn heads.
Thank you for this! I had been searching the net and having the same problem you describe – nothing was quite what I wanted. THIS is what I wanted. I’m teaching my daughter how to knit hats for the hospital and this is nice and simple for her 🙂
my mom use to work at country needleworks!!! its where i learned to sew, knit and do needle point!!!! still one of my favorite places to go!!!!
I make a similar pattern that I found on the Save the Children webpage. It uses a size 8 and size 6 needle, the band is 1 1/2 inches and the shaping starts after 3 inches of stocking stitch knitting. It can be made with a sport or worsted yarn and I always used a bernat yarn. I want to make them for a friend's new twin grandchildren coming soon. I will try your pattern soon to donate to the local hospital preemie unit.
Tolsa Greenberg
Jennifer – so glad the hat for your neice turned out 🙂
To adjust for a larger size, I would measure around your older child's head to get the total circumference. (let's say it's 18″) If you are getting 4.5 stitches per inch like my gauge is, you would then multiply 4.5 x 18. This comes out to about 80 stitches for an 18″ circumference hat. However you might want the hat to be a little smaller than an 18″ circumference to allow for some stretchiness so it is tight enough fitting. You might also have to add an extra inch or so before you start the decrease rows. The decrease rows could be done the same way, knitting two together across the rows alternating with a purl row.
So increase the number of stitches you cast on (probably to something between 70 to 80 stitches). Make sure you cast on an even number of stitches. Then add an inch or so to the length (maybe to 6″ inches from the beginning), then do the decrease rows the same way.
That's my best guess 🙂 It will take a little trial and error but that is how you would begin the process. Hope that helps!
Just made one of your hats for my niece who is due to arrive on Tuesday! It turned out so adorable – thanks! My question is, can you tell me how to adjust the pattern to make it fit an 18 month old? I really wanted to make one for my daughter too. Thank you!!
thanks very much, it looked adorable. everybody love it.
thanks very much, it looked adorable. everybody love it.
No, you do not necessarily have to top it with a pom pom. It just adds a little something extra. I'm sure a little flower would look cute too 🙂 That's whats fun about making things yourself. You can be creative and add your own special touches.
Do you have to top it with a Pom Pom? I was thinking about garnishing it with a flower.
Hi Bev -i've been reading here for a while, but somehow had never seen this post. I've been doing hats for preemies for a while now. They are tiny but knit up quick. I use double points and knit in the round, but i recently learned how to use 2 same-sized circular needles to knit in the round. This way you don't have to worry about the whole hat fitting on a circular needles. Enjoy your site, as always. 🙂
Kathryn, how did you need to change the pattern for the circular needles?
Thanks!
Alice
THANK YOU I have been searching for months for a pattern that would be easy for beginning knitters. We have an organization in Kentucky called Frontier Nurses that works in rural areas of Eastern Kentucky. They were asking for donations of handmade baby hats. This would be a great first project for some 4-H'ers who are beginning to knit and it would benefit a good cause.
This hat is wonderful. I came across this pattern as my daughter is in labor with another little love(her 2nd baby my 3rd grandbaby) So I am knitting it as she is in labor now. 😀
Thanks for sharing this pattern. My second grandson is due Christmas Eve, and I was looking for a simple cap for him to wear. I'm new to knitting, so this is just what I was looking for. I'm already on my second one! Debbie
Thanks so much for sharing this pattern! One of my second grade students will be a big sister any day now, so I knitted this super cute hat today for the baby so I'm ready! 🙂Marvelous Multiagers!
I'm sorry to say that I don't have a crochet pattern for this newborn hat. I used to crochet a little bit but it was never as easy for me as knitting was and I finally gave up and just stuck with knitting.
However you could crochet a small sample swatch to figure out how many stitches were in an inch. You would then multiply that by 10.5 to find how many single crochets you would need in a row to make a 10.5″ wide hat. To make the decrease rows at the top you could maybe single crochet in every other stitch across a row.
That's about the best crochet advice a knitter like me can come up with 🙂
Just wondering if you have a crochet pattern for these 2 hats.
Hi April,
Switching to a different size needle is where the gauge in the original directions becomes important. My gauge was 4.5 stitches per inch and I cast on 48 stitches. This means my piece was about 10.5″ wide. (48 divided by 4.5). So your goal with different sized needles would be to still knit a hat that is about 10.5″ wide.
Knit a small swatch with your size needles and yarn and see how many stitches per inch you are getting. Let's say you are using smaller needles and are getting 6 stitches per inch. You would multiply 6 times 10.5 inches which gives you 63. Round that up to an even number (64) and that is how many stitches you would cast on. You want an even number of stitches so your decrease rows at the top of the hat are easier.
So to sum that up:
1. Knit yourself a sample swatch
2. Find out how many stitches you have per inch
3. Multiply that by 10.5
4. Round that up to an even number.
That number is how many stitches you will cast on.
Isn't math fun? 🙂 Hope that helps!
Bev,
I don't know if I have size 6 needles. I think I have size 3 or bigger. How would that make the pattern or hat turn out differently?
Thanks,
April
Thank you so much!! I live in the UK, so I'll have to see if I can order one online. I'm working on my second hat today and plan on doing another one (they are such a great starter project!). Also, I *love* your website! Thanks for the tips!
I always use a pom pom maker gadget so that my pom poms turn out a little better looking. You should be able to find one at craft stores like Hobby Lobby or Michaels (or there is link up in my post above too). Make sure you wind the yarn around enough times to create a fairly bushy pom pom. Once you take it off the pom pom maker, you can trim it a little bit more too so there aren't pieces sticking out. I try not to be too obessive about that part because you can trim forever trying to get a perfectly round pom pom 🙂
Hope that helps a little bit. Even though you can also make pom poms by just winding yarn around a piece of cardboard, I think my pom poms turned out better once I started using the store bought pom pom makers (and especially because these hats need a pretty small pom pom).
Hello! I just made my first hat (well, my first knit project ever)for my soon to be born son and the hat looks great (such an easy pattern to follow!!), but the pom-pom is a bit rough (all my fault!). 🙂 Any tips on how to make one??
For these baby hats you only really need a small pom pom. I found using a kitchen fork makes the perfect size! It’s easy and you don’t have to buy any additional tools. Here is a like that walks you through the steps.
http://www.instructables.com/id/Create-Yarn-Pom-Poms-Using-a-Fork/
Good luck!
I’ve used a fork to make a bow, but now I will have to try using a fork to make a pom pom too!
Bev, thank you for responding and explaining. I look forward to making one one day soon! I really enjoy your blogs.
Thank you!
The finished size of the knitted newborn hats are pretty tiny. I have never used a loom to make hats, but I would wonder if there is a small enough loom to create a newborn hat. If there is a very small loom, then I think it would work. If the loom is too large you would end up with a hat that was too wide for a newborn head. Newborn hats are only about 5″ across when laying flat (about a 10″ circumference).
Hi Bev,
I noticed you didn't mention using a loom to make newborn hats. Is it possible to knit one without using a loom?
Good suggestion – Gauge has now been included in the pattern. I had included it in a comment but it is now part of the pattern too 🙂
I use dp needles to make decreases at the top.
Suggestion: I would include the gauge in the pattern.
Thanks Bev. They seems to have turned out right for me and are a great way to use up all my little ends of wool. Thanks for the pattern. Joanne
Hi Joanne – Yes, my size 6 needles are American. The conversion to metric would be 4mm (or UK/Canadian size 8). My gauge on the finished piece is 4.5 stitches per inch, or 2 stitches per centimeter.
Are these American size 6 needles? And would that match up to 4mm needles?
Hi Artikaur – I'm assuming if you want to use circular needles you might be hoping to make one continuous piece with no seam. This might work, however, I think when you get to the decreases at the top, it might be hard with such a few stitches on the circular needle. Perhaps you could not do as many decrease rows (just knit them straight instead) and simply gather more stitches at the end. I think that would probably work. Hope that helps!
One learns by mistakes. I thought I would outsmart the straight needle method and knit the infant baby hat on a small circular needle but when I got to the decreasing part I was stuck. I had to switch to four needles to finish. Two needles is better.
If u use circular u can knit in the round and join using decreasing method by splitting even amount of stitches to both needles I will find a link for u its very easy once learnt
The problem at the top of the hat is easily solved with two circulars, which is how I knit the entire hat. Either that or transfer stitches a long circular (40-42″) and use the magic loop method. I find it much easier than 4 dp’s.
Could I use the same pattern, but with size 5 (12 inch long) circular needles, instead of size 6 straight needles?
You will have trouble decreasing toward the end. I find using four double point needles Wouk best. You can decrease at each juncture equally and not have a seam up the back to worry about.
These hats are adorable! I've been looking for a simple newborn hat pattern like this one for such a long time; all the other patterns I found were too fancy, with animal ears or flowers or bows. Not that those aren't cute, too, but this pattern is classic. I'm going to start knitting right away! Thank you!
Hi Bev,
I've been following you for a while now and I love your blog! I too feel like why should you pay good money for things when if it's worth it to make it at home! I love your blog so much that I have featured you twice the second time was today with this pattern I gave it a try and as a novice knitter I found it easy to follow but also looked soooo good! Thank you for posting this pattern and I hope you post more knitting soon! If you would like to have a look at my hat come over and visit me!
http://mommamadeit.blogspot.com/
Hey Beverly! Those little hats are precious! I cracked up at the term “vintage hats” from 1986-87! Boy that makes me feel OLD! To me, vintage is 50's and 60's! LOL! They are adorable!
God Bless!
PJ
“Vintage” to me is 30’s 40’s (or earlier!) Love the pattern.
These are so BEAUTIFUL!