Holiday Snowman Jars
Mason jars can be a handy way to give a gift of food around the holidays. I’ve filled mason jars with my chex mix, I’ve put layered baking mixes in them, and I’ve used it for my homemade pancake mix too! Add some colorful fabric and ribbon and you’ve got yourself a frugal and festive gift.
This year I’m using mason jars again but this time I’m making them look like snowmen. One of the ideas doesn’t even require giving your snowman a face, because I’ve decided that putting a face on anything adds a whole ‘nother level of craftiness skill to your projects.
{ Yes, getting faces to look cute on craft projects is hard! }
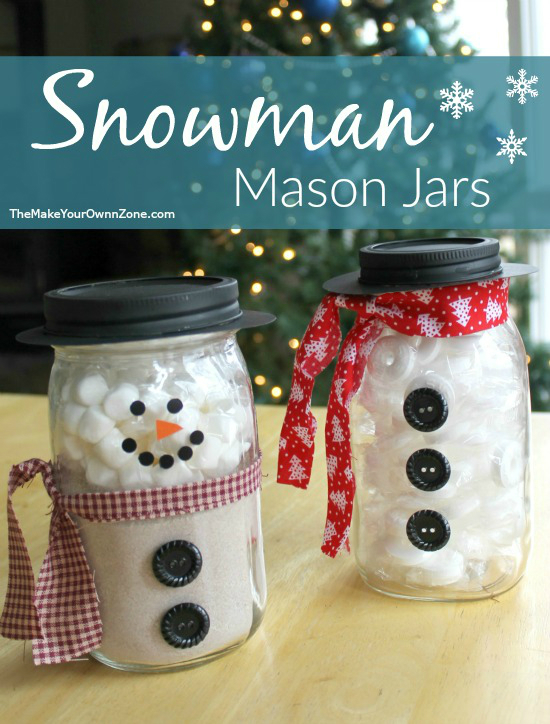
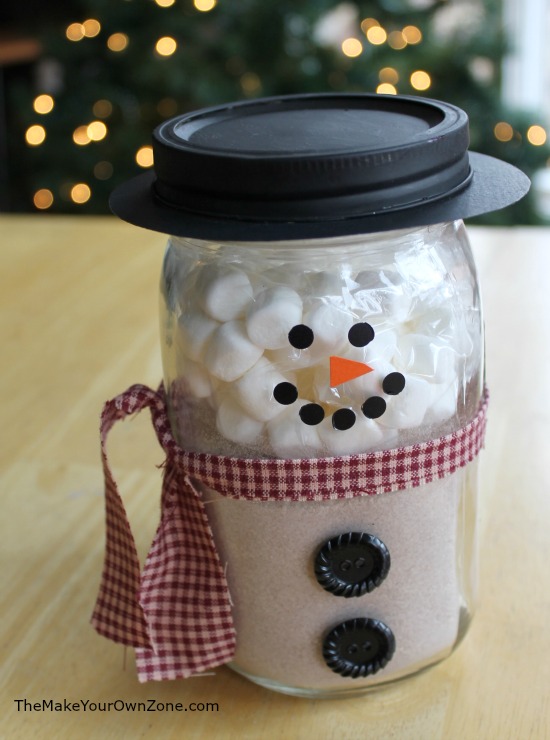
So the first snowman jar idea just has a little hat, buttons, and a scarf and it’s enough to make the whole shebang look like a snowman. Yay!
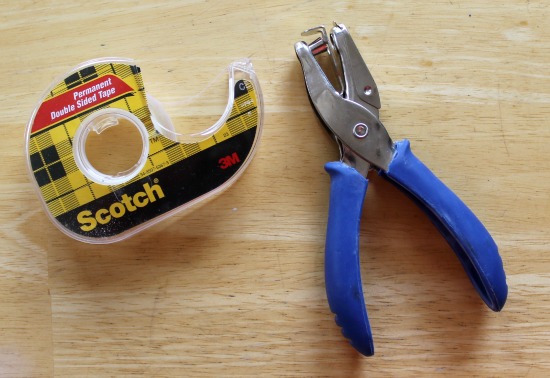
The second idea does have a face, but I found using my paper punch to make little black circles made the process a bit easier. I found my double sided tape came in handy for both these projects too.
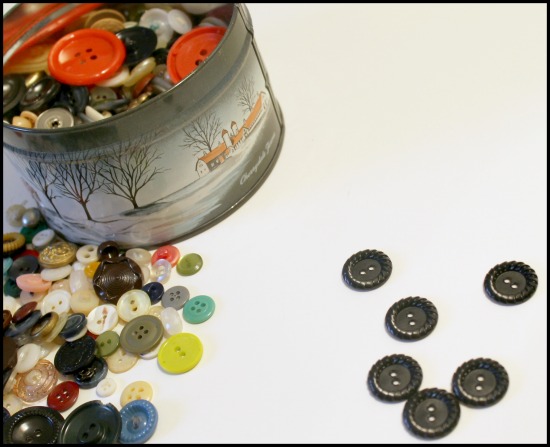
For both projects I used black scrapbook paper to make a rim around the top of the jar and painted the canning jar lid and ring black to give the appearance of a little hat on the top of the jar. Then I raided my button box and was happy to find that I had some nice black buttons in my stash that would be perfect on the front of the jars. Each jar also has a small amount of fabric wrapped around it to make a scarf.
Here’s a closer look at each project:
Snowman Jar #1
You Will Need:
- Quart Size Mason Jar
- Lid and Ring for the top of the Mason Jar
- Black Paint and Paintbrush
- Heavy Black Paper (I used scrapbook paper)
- Buttons
- Small Amount of Fabric
Begin by making the black rim for the hat. Place the canning jar upside down on the black paper and trace around the opening. You then want to draw another circle about 1″ larger around that circle. (I found it easiest to find another item in my house of the appropriate larger size and trace around it). Cut out the circle, and then cut out the inner circle so you have a “rim” for your hat. Trim as needed to fit around the neck of your jar.
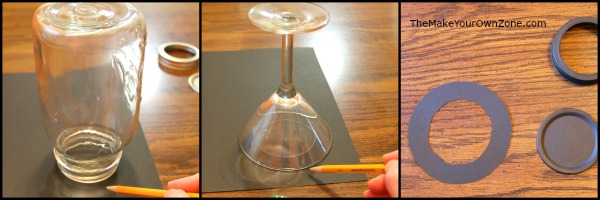
Paint the canning jar lid and ring with black paint. You can use spray paint for this step if you prefer.
Add two or three buttons to the front of your jar. You can glue them on, or I just used my double sided tape to stick them in place.
Cut a piece of fabric approximately 1.5″x20″ for a scarf and tie it around the top of the jar just under the rim.
Fill the jar with treats of your choice (my jar is filled with white mints to give it a white snowman look).
Place the black ring around the neck of the jar and put the lid and ring in place on the top of the jar to complete your snowman.
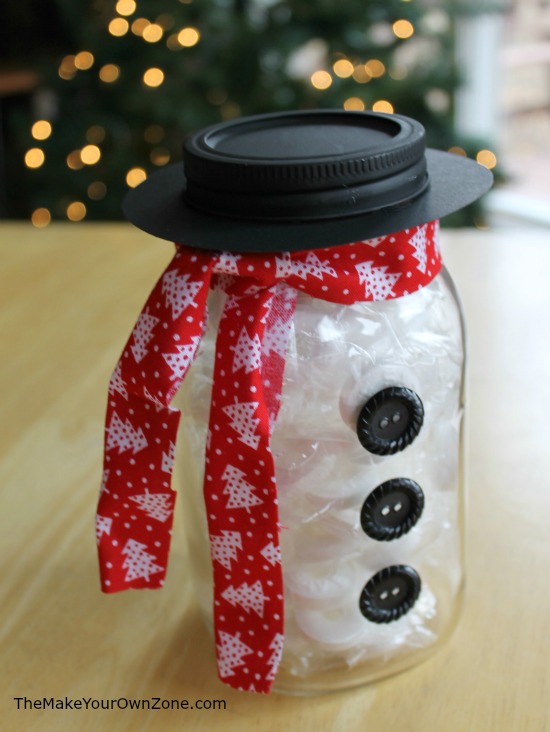
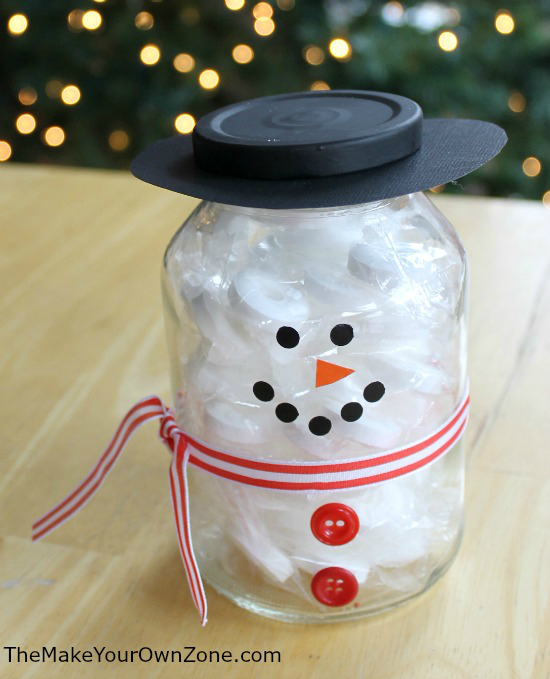
The next snowman jar project is used with a hot chocolate mix and marshmallows that go in the jar. To make the face on this snowman, I wanted little black circles that I could stick on the jar. I ended up using some adhesive chalkboard vinyl that I had leftover from this canning jar with a pourable top project. This worked out very well because I could just peel and stick the circles on the jar. If you don’t have any kind of black adhesive paper, you can just use black scrapbook paper and glue the circles to the jar too.
Snowman Jar #2 with Hot Chocolate Mix
You Will Need:
- Same supplies as Snowman Jar #1 Above
- Black Adhesive Vinyl or Black Paper for eyes and mouth
- Small amount of orange paper or cardstock for nose
- Paper Punch
- Hot Chocolate Mix (see recipe below)
- Marshmallows and Baggie
Follow the steps in Snowman Jar #1 above to cut a rim for the snowman’s hat from black paper. (I used a wide mouth mason jar for this snowman so had to find another appropriate size item to trace around for this project!) Paint the lid and ring black.
Next you will want to add the hot chocolate mix and the marshmallows to the jar. This will help you know where you want to place the buttons, scarf, and face.
You will need about two cups of hot chocolate mix to fill your quart size mason jar half way. You can use my recipe below if you need one. Place the hot chocolate mix in the bottom of the jar.
Next fill a baggie with marshmallows, enough to fill up the top half of the jar. Carefully place on top of the hot chocolate mix in the jar.
Stick a couple of buttons on the bottom half of the jar where the hot chocolate mix is (I used my double stick tape to stick on the buttons).
Next, I used my paper punch and black adhesive vinyl to make two small circles for the eyes and five small circles for the mouth and stuck them to the top half of the jar where the marshmallows are. I cut a small triangle from a scrap of orange cardstock I had and attached that to the jar with a bit of glue.
Finally, cut a piece of fabric approximately 1.5″x20″ for a scarf and wrap it around the jar where the hot chocolate and the marshmallows meet. I found my double-stick tape came in handy here too, to help keep the material in place where I wanted it.
Hot Chocolate Mix
Ingredients:
- 1/2 cup Nesquick
- 1/3 cup Powdered Sugar
- 1 cup Instant Powdered Milk
- 1/3 cup Powdered Creamer
Combine all ingredients. (If you want the mix a little more powdery, put it in a food processor and pulse it a few times). This is the recipe I make when I want just a small size batch of hot chocolate mix in the house. It fits in a pint size jar. It will also work for this snowman project and should fill your quart jar about half way.
If you want to label your snowman jar with instructions for the hot chocolate, you use 1/4 cup of the mix to a coffee mug of water (6 to 8 oz).
And finally, just for fun I tried making this project with an old applesauce jar just to see how a frugal version of this project would turn out. It was a bit harder to get the rim of the hat to lay nicely because the screw-top of an applesauce jar isn’t as wide as a mason jar. I also just used ribbon for the scarf as a frugal alternative for those who might not have scraps of fabric around the house. I decided to give this project a face because it was just an applesauce jar – and I thought it needed a happy face to perk it up!
So with a little creativity these snowman jars can be adapted for recycled and repurposed jars, or for smaller or larger jars too.
The final project in this series of holiday ideas with jars will be a layered baking mix to put in a canning jar, which I always think are great recipes to have around for a last-minute gift idea. Stay tuned for that recipe coming next!
Click here for Jar Project #1 = = > Recycled Jar Luminaries made with Epsom Salt
